Top

Archive | Home-sweet-home

How to install a gallery wall in five easy steps

How to install a gallery wall in 5 easy steps
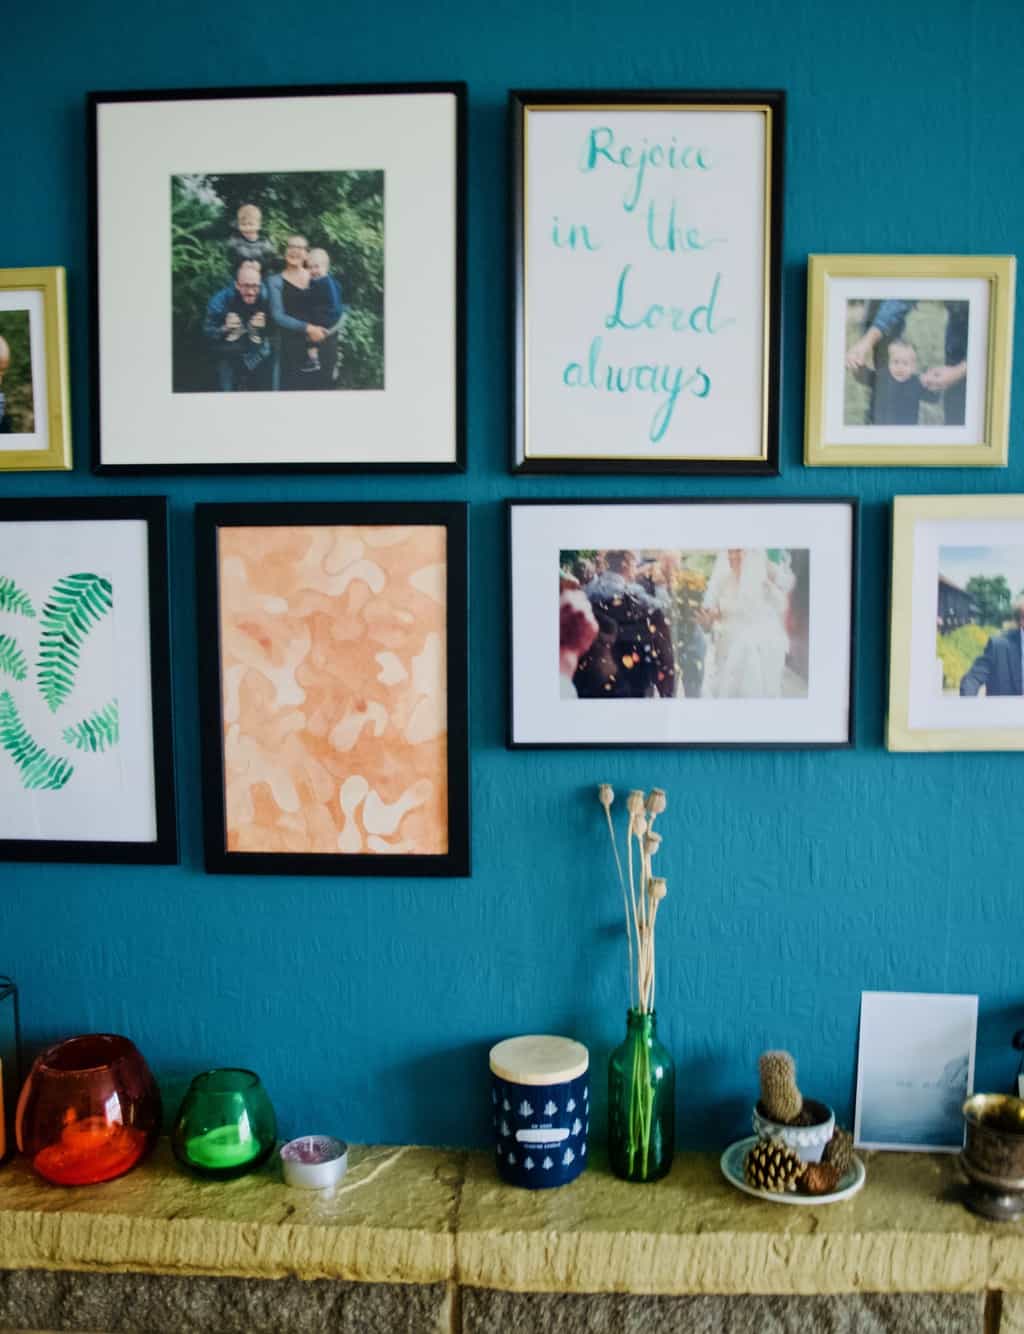
One of my last years goal was to fill the walls with art, and thanks to my watercolour challenge I kinda did! Except the wall space above our fireplace stayed empty for a while. I planned a wall gallery here with family pics and I have been putting this task off for a while. Why? Because I must admit making a gallery wall is challenging to me too. It’s overwhelming, so many pics to add, how to decide on frames (there are so many available!), how to arrange them. I get you! I got the same feelings too!

After doing some research and remembering what I learned in the past when doing other wall galleries at my old house I came up with a step by step plan that made arranging the frames on the wall much much easer. Creating this gallery was such an easy job after all!  Which is why I decided to share these 5 easy steps with you!

First thing I learned about creating a gallery wall is to deal with one component at the time. It soon get’s very overwhelming if you try to visualise everything in one go. My starting point is often choosing the frames maybe with one main photo installed in it. You can think what pictures to install in what frame later.

1. Create picture frame layout. When you remove one distraction is so much easer to focus on another aspect of creating gallery wall. Lay the frames you choose on the floor and keep rearranging and taking pictures of different layouts till you have at least 3 variations. Have fun!How to install a gallery wall in 5 easy steps 2. Arrange pictures/photos into the frames. After you have decided on the picture frame layout you can begin arranging pictures into it. I found using photoshop or other photo editing program to arrange the images into frame so much easer. That way you know what sizes to aim for when you do actually print it out. I used this technique when making our wedding album and that helped me to visualise the end result much better!

My Tip: Aim for balance between pictures and photos (or at least different type of photos). It looks a bit boring when all you have on the wall are pictures of people faces (as lovely as they are).How to install a gallery wall in 5 easy steps 
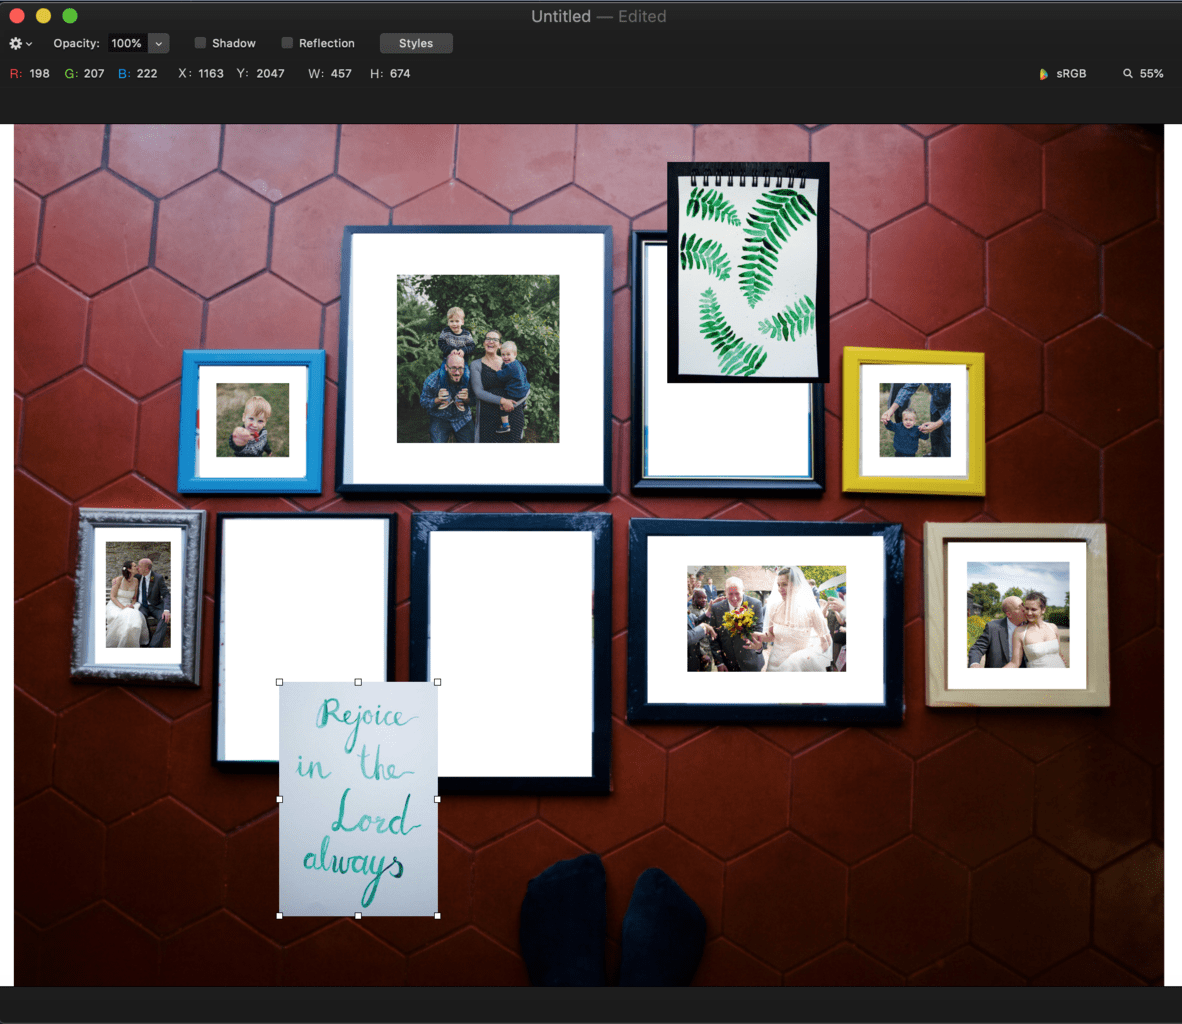
3. Print and and frame the pictures/photos. It is that simple once you have the layout designed! This is when you can decide how much of white area you want to have around the photo in the frame. How to install a gallery wall in 5 easy steps 
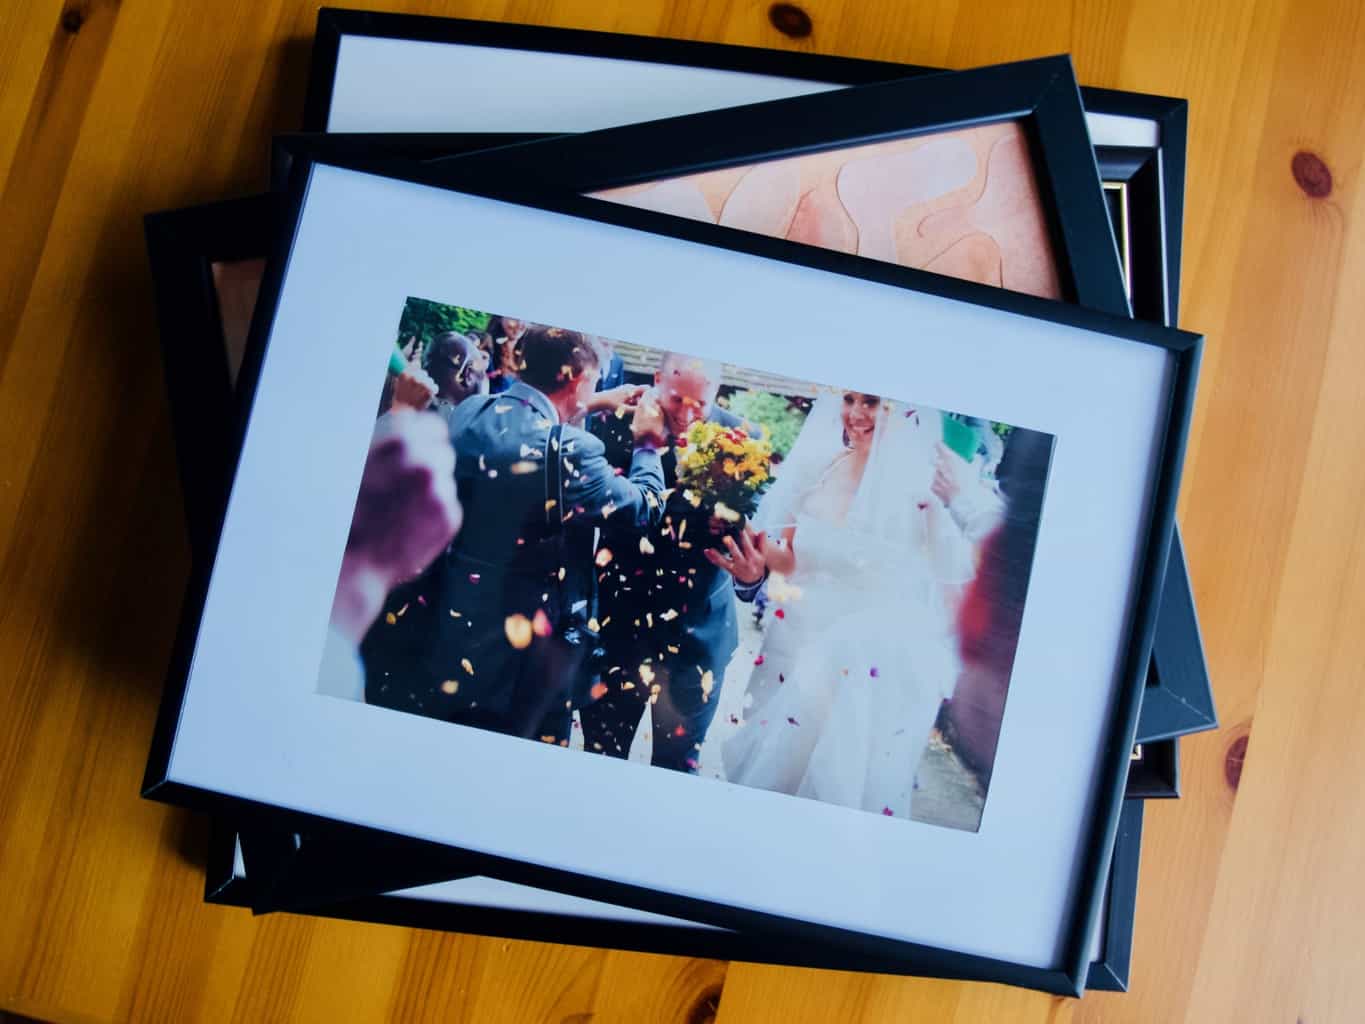
4. Transfer the layout onto the wall. Using cheap craft paper (in my case it was pattern cutting paper that I have loads of) trace around each frame and title each of them so you know what is what when you paste it on the wall. Cut the frame shapes out of the paper. Using sticky tape (not too strong as you don’t want to rip the wall paint off) arrange the cut-out frames onto the wall according to your original layout design.

Joni tip: Mark the centre on each cut-out frame so you know where to insert the nail/hook to hang the frame (usually in the centre). How to install a gallery wall in 5 easy steps How to install a gallery wall in 5 easy steps 
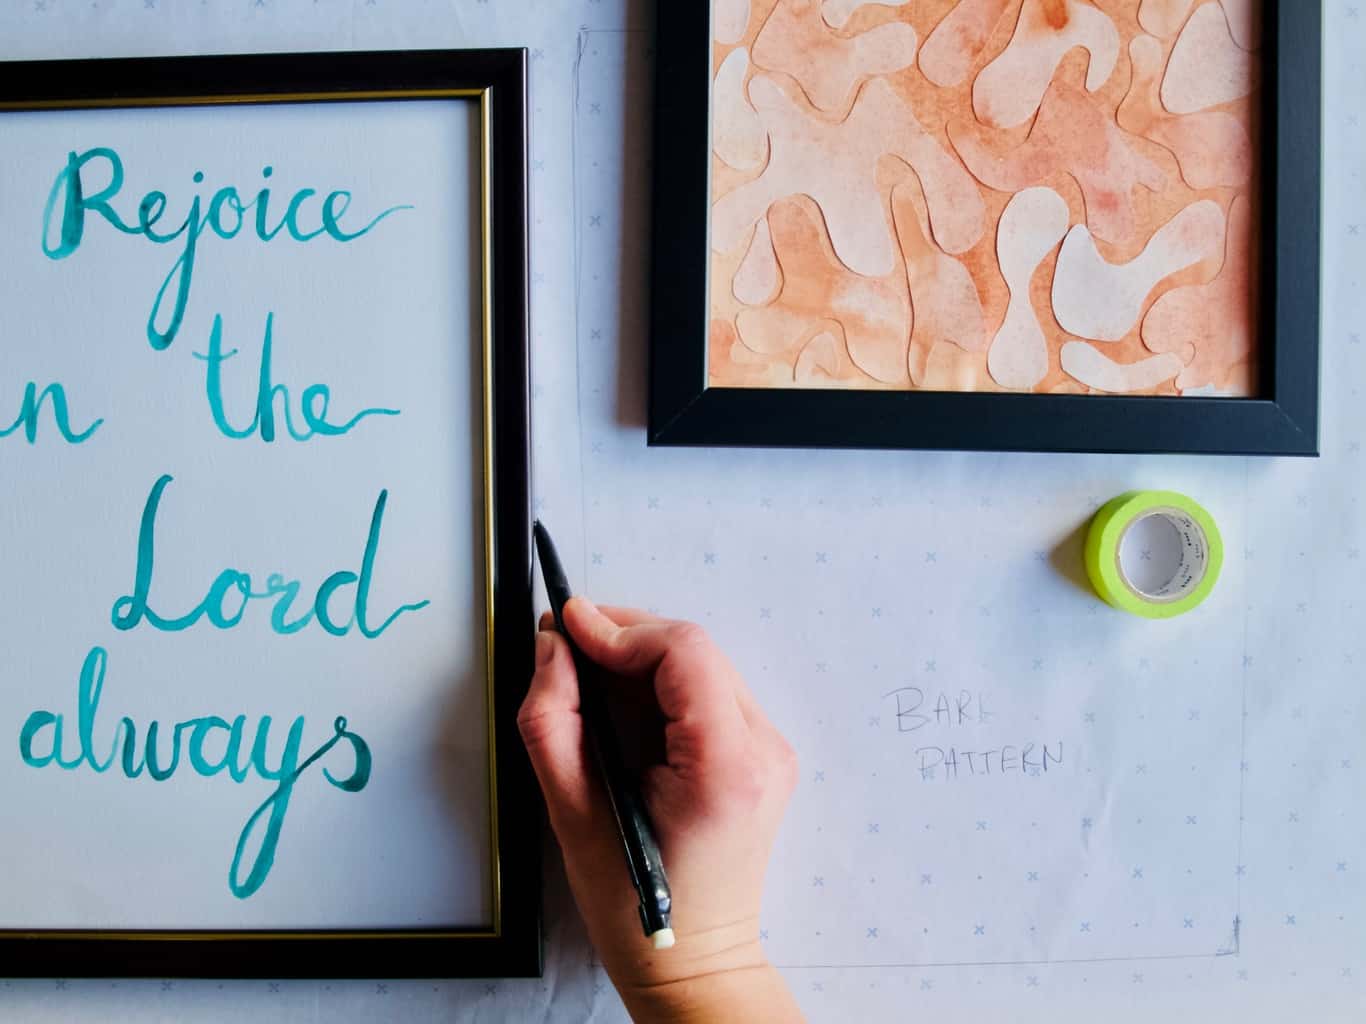
5. Finally, hang the frames on the wall. And that is all! Don’t worry if the frames are slightly off the level. I think as long as it is pleasing to the eye then it’s ok.How to install a gallery wall in 5 easy steps How to install a gallery wall in 5 easy steps
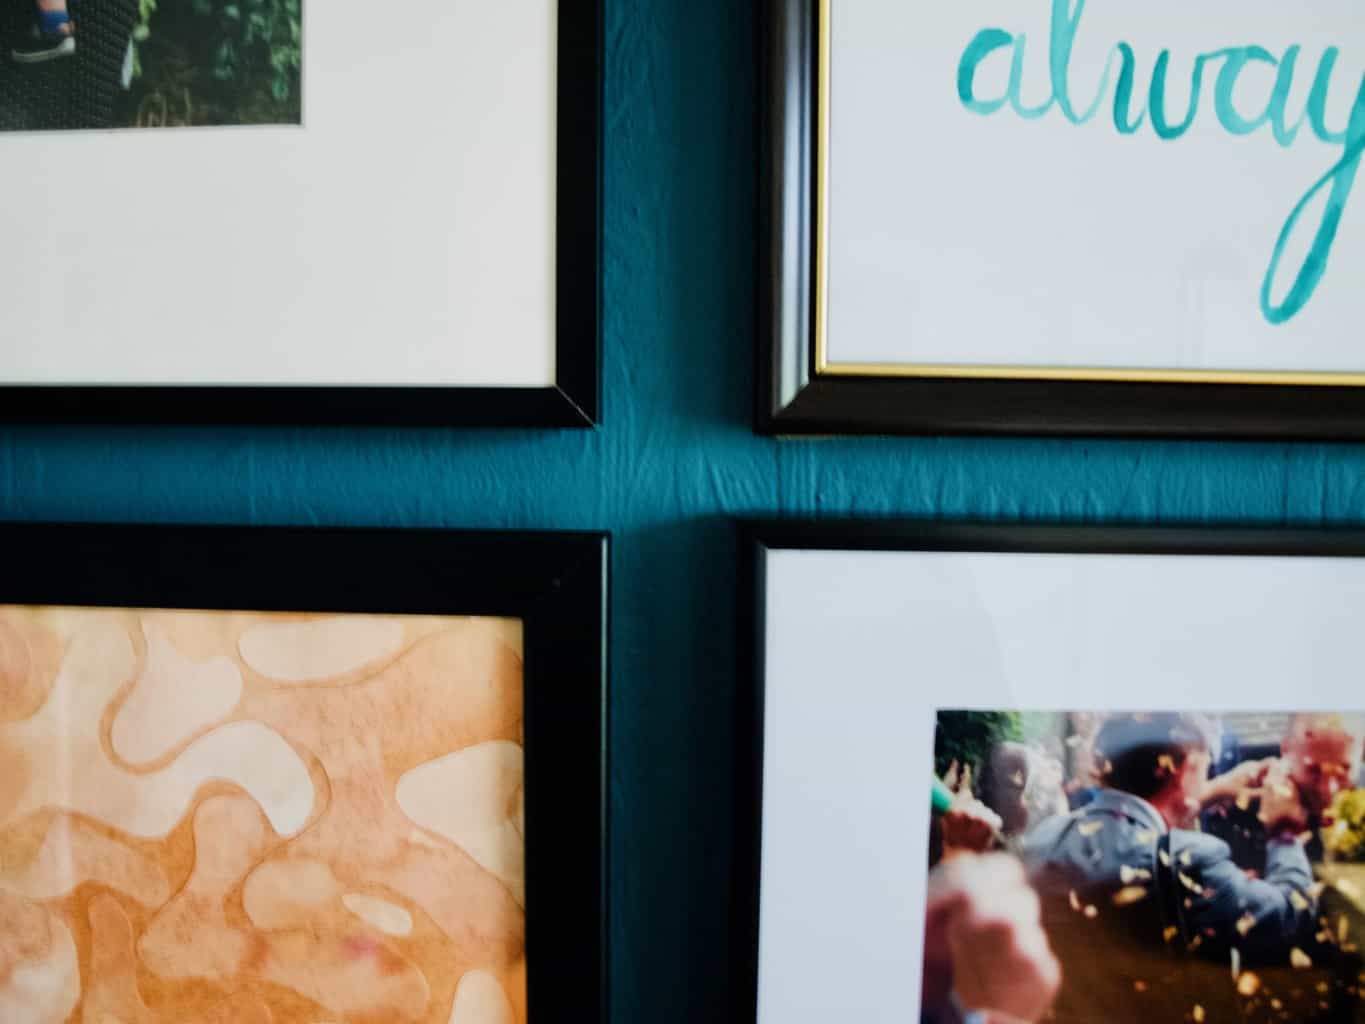
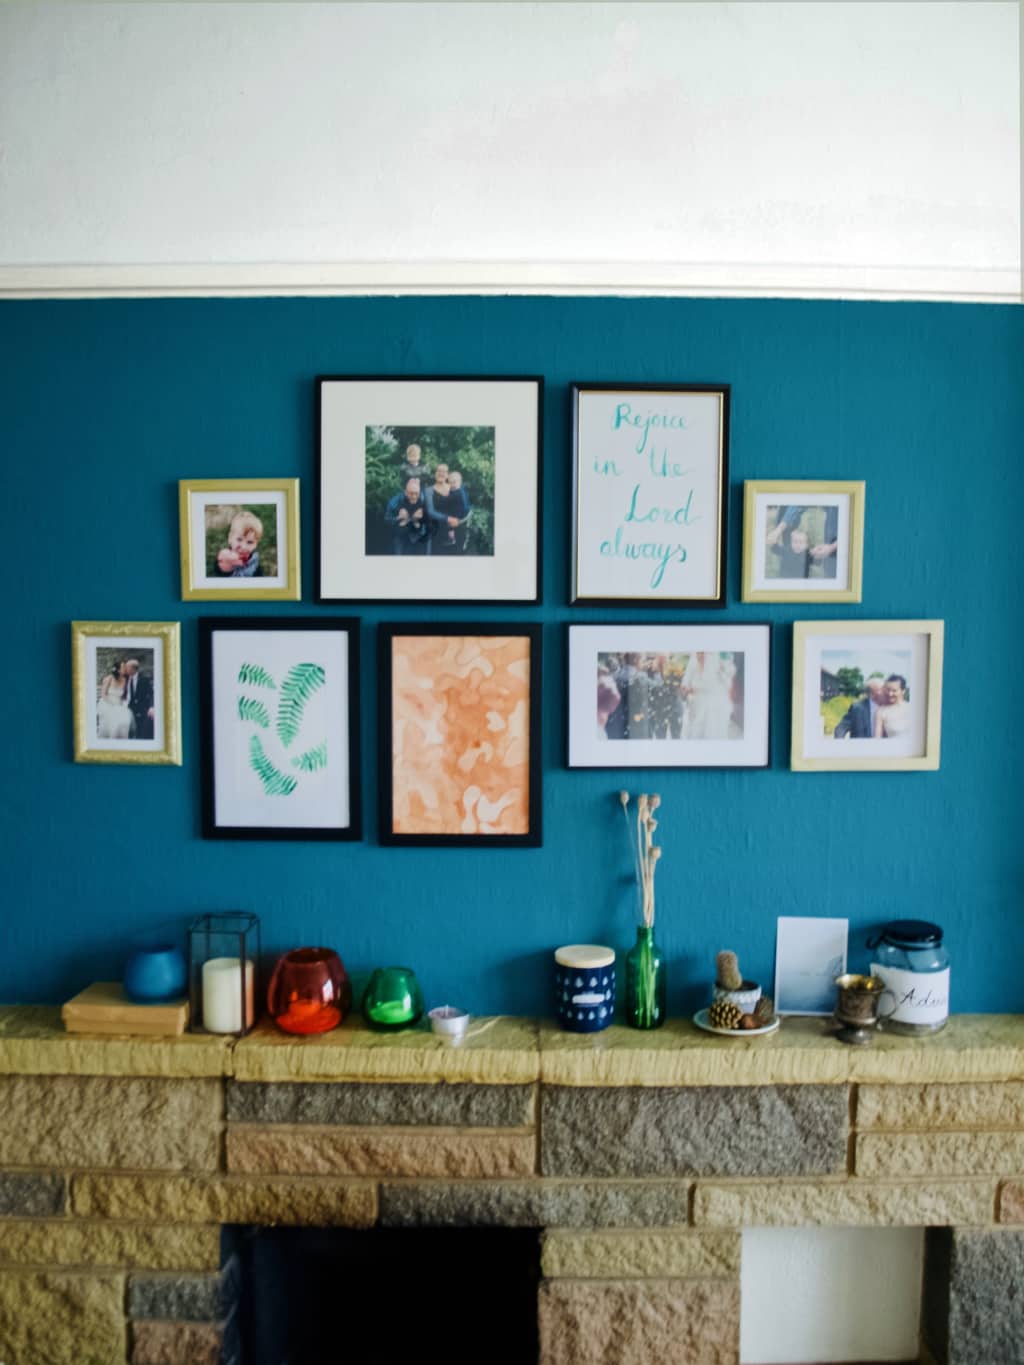
Hope you found this super useful!

Rasa xoxo

0

Our new kitchen reveal

Our new kitchen revealIf you knew how long it took us to build this kitchen then you would understand how excited I am right now when it is finally finished! We started this project two years ago, just few months before Tomas was born.

Originally this was a study or a front room (pic bellow). We have our office upstairs so this has been used for various things such as storage, laundry, Lukas playpen and Joni desk was kept here at some point too. From very early on we have decided this space was perfect for the kitchen. We pretty much copied this idea (but not the layout) from next door neighbours who also transformed their so called front room into the kitchen.

Initially the chimney has been knocked down that took over so much space and then of course there were a break when Tomas was born. Once Tomas turned five months Joni started fixing floor and then we both were tiling (hexagonal tiles again). Then Joni’s dad helped us out to build the kitchen and then we got somebody to install the worktops. After that very hot summer came and I have been doing more gardening then DIY. I came back to painting and tiling walls by the end of summer thankfully. Only recently Joni finished installing shelves and now I am working on the organisation. If you think moving into new kitchen is easy, think again! Through this time we have been using our old kitchen and now we are so used to it that it is hard to change and start using our new kitchen. I am sure we will get into the habit very soon!Our new house tour: front room aka studyOur new kitchen revealI always liked the idea of shelves in the kitchen. I think above counter storage needs to be clear to see and because it is not hidden by the doors this storage needs to be ascetically pleasing too. This is why I organised my dry ingredients into jars (read how I did that here) and then I had cook books stored on other shelves. If you have any space left then you can always add little things such as vases or potted plants. I love my Fittonia that my friend gave, it does really well in the warm kitchens I think. Our new kitchen revealOn the shelves that are little hidden by the fridge we stored our microwave and other essentials for microwaving kids milk and porridge. It felt only natural to also store plates, bowls and glasses here too!Our new kitchen reveal My new planner is also ready for the next year ;-).Our new kitchen revealNow we probably need to work on our dining room which happened to be in the same room as kitchen. Painting walls are in order hopefully soon!Our new kitchen revealThanks for letting me share!

Rasa xoxo

0

Foraged winter wreath + make your own willow wreath base

Foraged winter wreath DIYSo it turns out this kind of wreath (pic above) is called a foraged wreath. I am so surprised! You see I have been using tree branches and dried plants for deco for years and never considered it as a positive thing to do. When I was little my grandad told me off for breaking the branches off the tree, “if someone broke your fingers off, you would’t like it would you?” he said. So ever since I have been feeling guilty when I “vandalise” (as I call it), but then felt inspired when I see the beauty of nature in my home. Therefore word “foraging” is so much more positive! It sort of makes you feel like you are being savvy and forest wise. Hmm, besides foraging a bit of fir tree branches (pine tree in my case) is better than taking the whole tree just to decorate for Christmas?? Also, not forgetting this is free!!Foraging with kids + Foraged winter wreath DIYTo make a foraged winter wreath collect some tree branches from your forest. Since it is for Christmas you want to pick evergreen tree branches. I picked two pine tree branches and some larch (I was surprised to see that it got coloured for the autumn!). Sadly there were no fir trees in our forest. I did however pick a few bits to accessorise my wreath. Dry dead plants and red berries are great! Foraged winter wreath DIYSince I wanted this wreath be as natural as it can be, I decided to make my own wreath base out of willow. To be honest I made mine out of any twigs I could find. Willow is good because it is supper flexible, but do not worry if you don’t have it in hand. It’s important to pick long twigs that comes from a live tree. You really can’t bend dry tree branch. It would just break! To make the wreath base you will also need florist wire and some good gardener shears. Foraged winter wreath DIYTo begin with take the largest twig and bend it to a circle. Secure the ends with some florist wire. Use the next twig to wrap around the circle you have already made. Secure the ends with the florist wire. Carry on wrapping the wreath base with more and more twigs till you achieve your desired thickness. Try to avoid using florist wire on any areas you are planning to leave exposed.Foraged winter wreath DIYI ended up leaving the top of the wreath base exposed. I deliberately focused on tree branch arrangement in the bottom part of wreath base. I as I added more on I placed different pine tree branches between the twig gaps I could find in the wreath base until I filled in the gaps. Foraged winter wreath DIYI secured the ends of the pine tree branches at the back of the wreath. This way it is less visible on the exposed side. Foraged winter wreath DIYFinally I added dry plant bits and berries to decorate the wreath.Foraged winter wreath DIY Now the question is how long this wreath will last. I wonder if my wreath would last till Christmas. Turns out there is hope! Apparently it lasts best outside in the cold (check!), then I read that it may last longer if I spray it with some water when I can (will do!). Finally if any part of the wreath dies out, you can carefully replace it with some fresh branches. Foraged winter wreath DIY Foraged winter wreath DIYHappy Christmas waiting (sorry, but not sorry for mentioning it so early!)

Rasa xoxo

0

How to make your own laundry liquid

All natural laundry liquid recipeLiving sustainably does not mean going extreme, I believe every little bit helps (oops, did not mean to sound like Tesco slogan). I dream to be completely sustainable one day, but for now I only choose the steps towards it that have immediate benefits for us (like reusable food wraps I made last month).

So this month I have been researching about cleaning products (all natural as possible of course!!!). I am very sensitive to synthetic and strong smells, so this was my main driver for going ahead and making some myself. Because I thought I could make cleaning products that smell nice and do not break the bank.

I made laundry liquid first because I was keen to make something for Tomas who has eczema. I heard that added perfumes and other nasty bits can make eczema worse! I looked at a few laundry liquid recipes and decided on the ingredient combination that I though would work best and that are easily accessible in UK (so you won’t find any borax in my ingredient list!). I added some lavender essential oil so now my laundry liquid smells very similar to the Ecover liquid that we tend to buy. All natural laundry liquid recipeTo make your own laundry liquid you will need:

  • 240g soda crystals (similar to Borax but not the same)
  • 50g bicarbonate soda (can be baking type)
  • 150ml liquid Castile soap
  • 800 ml boiling water (it needs to dissolve soda mix)
  • 20 drops essential oil of your choice (I used lavender)
  • large bowl or a jug
  • whisk

All natural laundry liquid recipeMix soda crystals with bicarbonate soda. Gradually add boiling water and the Castile soap while whisking. Continue whisking till it combines well and the soda is dissolved. You should end up with foam on top.All natural laundry liquid recipeLet the laundry liquid cool down and then add essential oil if using.All natural laundry liquid recipePour the laundry liquid into jars or bottles. Use half a cup per wash, so the recipe last for about 12 loads. I already did a few washes and I must admit I can’t see much of a difference between shop bought and mine, except the homemade one is much cheaper. Besides this laundry liquid is so quick to make and uses similar ingredients that other cleaning products need. So essentially you only need a few basic ingredients to make many cleaning products for around the house!All natural laundry liquid recipeHope you found this useful ;-)

Rasa xoxo

1

Make your own macrame inspired crochet wall art

Do you remember when I made watercolour and embroidery wall art? I did say I was not 100% sure if it went with our bedroom interior and I think I was right (although there is no right and wrong when it comes to deco they say). This artwork never grew on me and it was time to replace it to something else completely different.

Now I am currently loving macrame craft although I am clueless how it’s done. When you are too busy with other projects I think sometimes its best to use the skills you already have. In my case this means crochet. Don’t you think crochet looks visually similar to macrame? I think when it is done the right way it can look pretty close!

Few months ago I made the climbing plant trellis inspired by macrame. I loved the outcome (and some yarn left) so I decided to repeat the technique somewhere else (although it happened to be in the same room). What do you think?Make your own macrame inspired crochet wall art If you are loving this as much as I do then you can access the project here.Make your own macrame inspired crochet wall artThanks for letting me share my macrame love ;-)

Rasa xoxo

0

Growing jasmine indoors + macrame style trellis diy

Macrame style indoor trellis diyI can’t remember when and how I came up with the idea of a climbing plant in our bedroom, but I am very pleased right now to actually have achieved this goal. I must admit I did not do much research when it comes to what climbing plant to get specifically though. It went something like this: I went to Homebase to get some paint, checked out their indoor plant selection, saw some jasmine plants heavily reduced (it was after their flowering season in March), looked up on Google on how to care for them and so on, liked the description so I thought worth it to have a go for £2 per plant. These plants need bright light with some direct light if possible (check), moist soil without being soggy (check) and natural season temperatures (check). Now I just hope I like the flowering scent when it comes next February…. should be lovely for the bedroom, surely!Macrame style indoor trellis diy I repotted the plants within a week of purchasing. Bingo! They don’t have to be fancy pots, don’t even need to have a drainage hole. Instead fill the pots with gravel, then soil and that should do the trick.Grow jasmine indoorsTo make one of the pots more exciting (it was a very basic pot). I used some masking tape for areas where I wanted the original colour to stay and create a pattern of my own. I used some Hammerite metal paint that was leftover from our shelf brackets, but you can use any other suitable spray paint too. I love how spray paint creates an even finish without those undesired brush marks.Quick planter refresh deco with spray paintNow, forgot to mention, when I used to dream about climbing plants indoors I always envisioned that two vines would meet over this wardrobe door. This is why I placed the jasmine plants right where they are (one either side of the door). Grow jasmine indoorsTo tell you the truth I have never been a fan of macrame deco, but after seeing so much inspiration on Instagram its hard not to fall in love with it. I obviously have no idea how to do macrame, but I am sure I will learn one day. I used my crochet skills this time to create an indoor trellis looking slightly like macrame art. Or could it be because I used classic cream white yarn that looks like cord?

To make this trellis you will need macramé rings (whatever size and amount you want), some yarn (preferably cotton or even cord, but I needed to use up wool so I used that) and a large crochet hook (used size 9mm).Macrame style indoor trellis diyTo begin with, have a plan how you would like the rings laid out. I wasted so much time trying to work this out on the fly while i crocheted them together. I had to undo it many times as I realised there were better ways to connect the rings. I began with single crochet on my first ring.Macrame style indoor trellis diyThe plan does not have to be complicated. All you need to do is draw the rings and draw the direction the crochet will flow round the ring and onto other rings to connect the rings together. You can see how I did it at the picture below. Macrame style indoor trellis diyBy the end I began using chain stitch on the areas where I skipped from one ring to another without connecting any other rings at the bottom. Macrame style indoor trellis diy Macrame style indoor trellis diy Macrame style indoor trellis diy I hung the trellis with nails, I thought this is the least damaging and sturdy at the same time. Macrame style indoor trellis diyMy poor jasmine plants have been waiting for their trellis for a month or so. This is why I did not even prune them straight away as I should. Hopefully I was not too late. Apparently you should prune jasmine as soon as they flowered to give a good chance for the flowers to develop next year (fingers crossed). As I was pruning I also removed dead vines as well as dried leaves.Grow jasmine indoors Macrame style indoor trellis diy I am so looking forward to see that trellis to fill up, will keep you posted how it goes.Macrame style indoor trellis diyHope I inspired you

Rasa xoxo

3

Water colour and embroidery wall art idea

Embroidery and watercolour art DIY I love love love (and still falling in love further) with water colour! I did some watercolour last month and this month I decided to incorporate some embroidery in it. This is why I thought to try to paint on the fabric and let me tell you it totally works!!! It felt almost the same as painting on paper, if not easer. I think fabric soaks up more water, so the results can be even more dramatic for all those dreamy watercolour blurs… ahh. Will tell you more in the minute….

But first I would like to make a little confession. You see I am not 100% sure if this artwork I made goes where I intended to go over our bed (yes, it happens to me too when my vision don’t match with the results). Which makes me feel a little embarrassed that I did not think it through. I am now realising that the artwork over the bed should be more dramatic and definitely more geometric. When I was thinking what artwork I would like to put over our new refurbished headboard, I was imagining something round and thats when I thought of idea using an embroidery hook (and embroidery). Which works fine here, but my painting has to change. Will let you know what I come up with :-).

Embroidery and watercolour art DIY Although the artwork did not suit the interior of our room, I still liked it and I definitely enjoyed the process of making it! So I thought to share my experience of watercolour on fabric anyways.

To prepare I cut out some pieces of cotton fabric (I used old bed sheet) and stuck it onto large piece of paper. I used plain wallpaper roll and stuck few fabric pieces next to each other. That way I could practice and have few goes at it. I had a cup of water and paintbrushes lined up as you would normally when you use water colour paint. Embroidery and watercolour art DIY I started with the most common water colour technique. I brushed the whole fabric with water to achieve this classic blurry water colour look. Embroidery and watercolour art DIY I also tried watercolour with less water so I could paint in more detail. I loved that I could just add more water and make some parts more blurry then others.Embroidery and watercolour art DIY Embroidery and watercolour art DIY Once the painting dried I chose the colours for the embroidery. If you need more inspiration on embroidery stitches then you should definitely check out this tutorial.Embroidery and watercolour art DIY Embroidery and watercolour art DIY Embroidery and watercolour art DIY To tidy up your artwork simply stitch a round piece on the back so you can tuck in all the raw edges of the fabric. Embroidery and watercolour art DIY Embroidery and watercolour art DIYHope I inspired you ;-)

Rasa xoox

1

How we upholstered our bed

How we upholstered our bed You might be shocked to know that I have been planning this project for very very long time. It took me one whole year to choose the fabric and then three months to actually start the job after ordering the bits and bobs (including pretty pegs). The design changed millions of times (only joking), but thank goodness the choice of materials stayed the same. Interestingly, the project itself was quick and simple once I got it started.How we upholstered our bed So here is where it all started. I had this double bed (because it is IKEA so slightly bigger than standard double) since I bought my first house. When we moved to our current house, the bed needed to change. As you can imagine new building interior style no longer matched this plain looking bed. The bed of my dreams was out of my budget, so I did the next best thing and upholstered the one we had. How we upholstered our bed I am actually very glad we had to “renew” our bed. Look at all the corners, damaged by our cat :o. How we upholstered our bed The upholstery started with the bed base. I measured bed depth, length and width and then cut out 4X40cm wide strips (2X202cm long for the length and 2X142cm long for the width). I stitched them all together to make one long strip of fabric. How we upholstered our bedI applied this long strip of fabric all around the bed base.How we upholstered our bedI loooove my staple gun. Serious upholstery professionals would probably judge me for using it so much, but all I care about the convenience and the end of result. Never mind it is not considered a proper tool to attach the fabric to the furniture. In this case I used staple gun to secure the fabric on the bed base from inside as you can see here in the picture bellow. How we upholstered our bed How we upholstered our bed Next we turned the bed upside down so we could attach these pretty pegs. They were quite expensive, but it was worth it I think. Once the legs were on, I finished securing the base bed fabric at the bottom of the bed. How we upholstered our bed Next up is the headboard. I spend a lot of thought on how to upholster this! I liked all the curvy headboards and unfortunately I could not change the shape of it. Ikea headboards are made of honeycomb structure inside so it could not be cut in any way. The insides are hollow (well almost)! So I decided to add more interesting details by adding decorative nails (will speak about it more later).

So to begin with I used a spray glue to secure a piece of wadding onto the headboard where I wanted to be cushiony. How we upholstered our bedI added another layer of wadding and wrapped it around the headboard to make it look softer. I used the staple gun of course ;-).How we upholstered our bedFinally I used the fabric to wrap around the headboard(almost like a gift). Again, I secured the fabric at the back with more staples. How we upholstered our bed How we upholstered our bed As I mentioned before, I used these decorative nails to make the headboard pretty and “curvy”. I was risking here a bit, was not sure how the nails will hold as it is a hollow headboard (with honeycomb structure inside like I said). I ended up using staple gun to hold the fabric “dipped” where I liked and then applied strip of decorative nails on top. Why did I use a strip of nails rather than single nails? Because of the same issue (hollow headboard), did not want to hammer every single nail down in case it does not hold. Besides if one nail comes out at least the strip is going to be held by other nails. So far so good! Phew!How we upholstered our bed And here is the result, I am very very pleased :-).How we upholstered our bed How we upholstered our bed How we upholstered our bedHope you found my story inspirational ;-)

Rasa xoxo

2

How we tiled the bathroom with hexagon tiles

How we tiled the bathroom with hexagon tiles So if you were following me on Instagram than you probably have seen these hexagon tiles pop up quite a few times. When I was choosing tiles for the bathroom I was not thinking how to make my tiling complicated, but my exact thought was “oh this has a very nice pattern and does not cost a fortune!”. But in return it was a very, very complicated job. It took us three whole months to complete the project even when working as a team!

To give you some background neither Joni or I had done any tiling in the past. I felt slightly more experienced since I watched somebody doing the tiles and did some tile mending in my last house. But oh dear that was not enough expertise to prep you for hexagonal tiles! I would strongly advise not to start with this kind of shape if you are a beginner in tiling. Will tell you why more soon why, but if you are about to enter this kind of project I hope you find this post inspiring. How we tiled the bathroom with hexagon tiles In the very beginning when I fell in love with this hexagon tile at the first site, I made a visionary picture of our bathroom. I used a editing program to roughly plant the tiles in the exciting bathroom pic, which as you can see may not be the most professional CAD out there. But it was enough for me to see if tiling both walls and floors would not overwhelm overall look of the new bathroom. Some details changed trough the process, but there were a lot of things that stayed. I am very pleased with end result and I must admit I may not have achieved it without this very primitive visionary board.   Bathroom vision So when we created a clear plan we started stripping the bathroom…. quite literally! Everything had to go, even the sink and bathroom. After that walls needed to be repaired and very firm floors installed (we used 22mm WBP plywood that was resistant to water). This took longer than we planned, which left us with only one sink in the whole house for few weeks (had to go to my friends for showers). Thank goodness this is a distant memory now!  How we tiled the bathroom with hexagon tilesOnce Joni installed the bath and fixed all the plumbing that took longer than we thought, I could then start to tile. Although it was not so straight forward! It took me a while to figure where to start and how to plan the tiling out exactly so it does not end anywhere awkwardly. This is when I realised that hexagon tiles are pain in the butt! We have been recommended to start tiling from the top but that did not make any sense since the tiles would slide when tiled on the wall. We watched plenty of YouTube videos on tiling, but that only gave us a rough idea how to start as they were all based on rectangular tiles. Seriously? No one produced a video for how to tile hexagon tiles? Eventually we used piece of wood that we screwed on the wall as a baton to stop all the tiles sliding down. We started round the middle of the wall, however I sometimes wonder what would have happened if we started from skirting board?! Would that make the tiling super uneven?How we tiled the bathroom with hexagon tilesThis is how much we roughly done in a day. Everything took sooo much longer than we expected! Unlike in the tiling YouTube videos somehow they manage to do the wall in 10min.How we tiled the bathroom with hexagon tiles The other challenge I came across when tiling is the uneven gaps between the tiles. I can blame the awkward shape of hexagon here again! It was hard to keep the tiles straight considering they were resting on the baton just by one corner. Unlike rectangular tiles has the whole edge to itself!  Luckily the grout have made it less visible so it’s all good!How we tiled the bathroom with hexagon tilesHow we tiled the bathroom with hexagon tiles Tiling round the window was another difficulty.  We were suppose to use edge tile trims to cover the tile edges, but I find them not very aesthetically pleasing. Somebody suggested we go without and instead leave the gap for the grout. However it ended up to be a very large gap which made me worry if the grout would be strong enough to stay there. Luckily it did! And I am very pleased we took the risk here :).

I applied the grout with the grout float which was much easer than tiling itself! I chose medium grey which I feel was a great choice for the tiles. I believe this is what hidden all the small mistakes I previously made in tiling. Yey!How we tiled the bathroom with hexagon tiles After grouting there were so much to clean that I only finished doing last week. Ooops!How we tiled the bathroom with hexagon tiles How we tiled the bathroom with hexagon tiles How we tiled the bathroom with hexagon tilesHope you found our journey in tiling useful, maybe you will be the first to create a tutorial how to tile hexagon?

Rasa xoxo

6

Crochet your own giant bed blanket

Crochet your own giant bed blanket If you are wondering what to crochet during Christmas, then this project is a good one to start with. It is uncomplicated, however be warned it may take a while to get it into decent size. I took over a year to finish it (shocking I know!)!!!

In case you wondered how much yarn I used up to crochet this blanket, It was about 80 of these Seriously Chunky wool balls. Sounds quite a lot right?! Well I used 7mm crochet hook instead of recommended 10-12mm which used up more yarn than it could have with larger hook. However in return it made a heavier and denser crochet which is what I wanted, it’s your choice of course! Also, you don’t have to use one colour. In fact you could use up all the yarn you already have! This is the most common way to crochet this type of blanket. Click here for a tutorial if you have not already checked it out ;-).Crochet your own giant bed blanket Crochet your own giant bed blanket Crochet your own giant bed blanket Crochet your own giant bed blanketHappy crocheting!

Rasa xoxo

0

Mirror mirror on the wall…

When Lukas learned to roll he never stopped moving. Changing his nappy became such a challenge! This is how the idea of  having mirror over changing unit came about. Since Lukas smiles at the image of himself (he certainly confident about his looks!) I thought having a mirror there would distract him. I of course did not want to spend much money for this so I decided to reuse the mirror I already had. The only issue was with it is that it consisted of squares and I did not like tiled mirror look. This is when I thought of disguising it with geometric design. I got this idea after seeing this mirror in Ikea few months ago.Geometric mirror DIY on the budgetFor this quick DIY I used four 30X30 square mirrors, Command strips (a bit pricey, but it does not damage the wall so win win!), slim washi tape.Geometric mirror DIY on the budgetAs usual I like to plan my design on paper, but it is possible to be spontaneous and create the look as you go. The choice is yours ;-)Geometric mirror DIY on the budget

First I made the initial lines that are not on the mirror joints. Geometric mirror DIY on the budgetThen I applied Command strips on the back ready to apply the mirror squares on the wall. Geometric mirror DIY on the budget Geometric mirror DIY on the budget Geometric mirror DIY on the budgetFinally, I applied finishing lines on the mirror where they meet so they all concealed. Geometric mirror DIY on the budgetI am very pleased with the outcome of this mirror. The only thing that I am not 100% happy is the colour of washi tape when is on the glass. I was expecting it would be bright and bold, but now it rather look pastel. On the other hand Lukas just don’t care while applying multiple fingerprints on it. I guess I will have to clean it often to maintain the look. Will let you know if this design lasts.Geometric mirror DIY on the budgetHope you feel inspired!

Rasa xoxo

0

Our bedroom update: curtains

Basic curtain DIY Our bedroom has been painted last year, but we only have moved in from our spare room in February. What took us so long? The fact we did not have any curtains! I could not find the ones I liked, so I went trough make-your-own process instead. Which delayed our moving in date too many times! Anyways, I am really glad they are there and although it was a project on more challenging side (dealing with large amounts of fabric is not my thing I guess), I love the fabric I chose.

These are basic lined curtains that is good to know how to make. The instructions on how I made them are here ;-).Basic curtain DIY Basic curtain DIY Basic curtain DIYHave a lovely weekend everyone

Rasa xx

0

How we fitted a light fitting (+upcycled an old glass lamp shade)

New lamp fitting As you may all know that we are working our bedroom to be while sleeping in our future office/craft room/guest room. Can’t wait till we move into our actual bedroom!

Today I would like to share about our lamp fittings that we installed recently. they only costed us few pennies (under £10 to be specific)! Yey! Thats because we reused some lampshades that we had in the corridor (I love to be able to use whats already in the house!). All I needed to do is buy the basic lamp fitting ;-). The lamp fitting beforeNeither of us are electricians so this is not a step by step guide how to wire the light fitting. Every house can have a different wiring so it would be pretty difficult to cover all here anyways. I fitted light fitting before which was pretty basic as it was a very similar one to the one I had to replace. I remember just removing old fitting wires and replacing with the new fitting wires in exact same way as it was. I guess I was lucky that time as that light fitting was not connected to any other light fitting in the house.

Before you begin it is very important!!

  • to switch off the lights and the electricity on the distribution board (that box with the switches).
  • start working (touching the wires) with the right hand, not both!

So to replace the light fitting in our new house we had to follow very a similar routine (even though the wiring is completely different and very very old). First we removed the cover and bit by bit unscrew the little screws on the connector that were holding all the wires. Eventually the light fitting base got freed! Removing light fittingThen we connected the ceiling wires back to the new connector. Joni used this guide in order to connect old type of wires with new.Connecting wires with the connectorWhen the wires on the ceiling were ready, we had to prepare the light fitting we bought for the fitting. Unfortunately it was a very long fitting perfect for high ceilings or landings, but not so good for our bedroom. Luckily Joni was able to adjust the length of it! He pulled the wire cord inwards, then cut it to required length and stripped the insulation leaving two wires open (neutral and live).Adjusting lamp fitting lenghtWe then attached the light fitting bracket onto the ceiling that suppose to hold the fitting itself (don’t worry, this comes with the fitting you buy). After fitting wires have been connected to the connector on the ceiling we closed it off by attaching the light fitting itself onto the bracket.Fitting in the lamp fittingFinally we are ready to hang the lampshade on the light fitting. Our lampshade was a glass ones so to restore it all we needed to do is to clean it! I dipped the lampshades into the soapy water, wiped it with the soft sponge and carefully dried it with the clean tea towel.To hang the lampshade I used shade reducer. I unscrew the light fitting skirt, inserted the lampshade then the reducer and finally put the skirt back on. Attaching lamshade onto the light fitting with adaptor:reducerHow we installed new light fittingHow we installed new light fittingI hope you found this useful!

Rasa xoxo

0

Our new house tour

Our new house tourI am happy to announce that we have finally bought a house here in Shortstown (sounds a bit American, but be reassured this little town is in England very close to Bedford).  Me and Joni fell in love with the architecture and location of it as soon as we saw it advertised. It was love from first sight! Yes, it needs loads of work, but we thing it has a great potential. The house is very large and spacious with a good size garden. It kind of makes me feel like I am about to live in councillor’s house because of it’s large windows and arched front porch.Our new house tour: front room aka studySo watch this space for lots of interior DIY’s, because this time I am recording everything! It will of course won’t happen overnight, but we are hoping to at least decorate master bedroom very soon. The other parts of the house might take a while because of new baby joining us soon :-).Our new house tour: dining roomOne of our plans are to build a conservatory into the garden as well as extending this very small kitchen (pic bellow).Our new house tour: tiny kitchenThis is where our sitting room with fireplace be (pic bellow).Our new house tour: sitting roomThis bathroom need complete transformation as you can see.Our new house tour: the corridor and the bathroomNursery is coming to place sometime early next year.Our new house tour: baby nursery to beThis is the master bedroom I was mentioning. It has a very cute walk through wardrobe to the bedroom no 2. We shall keep it for few years till we need more space and need to extend the stairs into the loft.Our new house tour: Master bedroom and walk-through wardobeAnd this is bedroom no 2. Guess what we are planning to do with it! It has a very funny surprise: random shower cubical! Will be removing it soon.Our new house tour: Bedroom 2 with the surprise!Thanks for letting me share!

Rasa xoxo

0

A colour story for our new home

Creating colour storyI want something exciting to say. We have finally exchanged with our house purchase last week! Anybody who bought the house before know what it means: we will have this house for sure and the date is set when we could move in. Yey!

Ever since we exchanged I have been dreaming how we are going to decorate the house and what alterations we are going to make. I have done this before and it was difficult and long process. But now I am not alone so hopefully we will settle much quicker, although we have baby on the way so I am interested to see how difficult it will be to do at least some DIY.

I have started planning the colours. Why? Because I really really want everything to “flow” in the house and right now I already need to buy few things that will match (such as sofa bed for my mum to sleep in when she is visiting her grandchild). I must admit last time I was decorating the house I did not put so much effort in planning the colour… because I went an easy way and chose neutral colours (mostly white). Yes, I did get many comments that it looked like a hospital to begin with, although I accessorised it with bold colours so it was cute at the end). This time I want to be braver and try darker colours (gosh, I am sooooo scared that it may make the place look small). But I so love those eccentric rooms that I see on Pinterest, so the challenge is on!

So how did I create this colour story? I am very lucky that I have gone to Uni to do fashion. During my course one of the things I have learned is exactly that, creating a colour story for a collection. It is of course very different to creating a colour story for the house, but the goal is the same: to create a set of colours that will be used through out the project (in this case the whole house). Of course I had failed many times before. One instance I remember quite clearly when my colour story looked like a rainbow just because I liked many colours and because I arranged them in colour wheel order. Another thing I learned is to identify what colours are main and which ones are for the accents. For better visualisation arrange the accent colours in small amounts that could be displayed in a item form (such as red lamp in the pic below).  Our new home colour storyThe third advise I can give is to look through some pictures of the house interiors and see what colour arrangement you like (Pinterest or Houzz have been a good source to me). For instance I like the feature wall colour in the pic below combined with bold colour picture display on it.

Lovely picture rail, pic from ilovebokkieI like red as an accent colour but I might try this and paint bigger furniture in red as well. The pic bellow comes from Apartment Therapy.

Bold red accent cabinet, pic from apartment therapyAlthough black is not a main colour in my colour story I would love to have a black board wall where we could scribble things! The pic bellow comes from IKEA website as an inspiration.Black board wall, Ikea kitchen inspirationAnd of course I would love to decorate the house with many plants! The pic bellow comes from My Attic.plant overload, pic from entermyatticI hope you found this useful :-)

Rasa x

0