Top

Archive | Lunch or Dinner

Pinterest challenge: slow cooker moroccan chicken

Slow cooker moroccan chicken I don’t know about you, but I love Pinterest! As mentioned many times before I got addicted to it two years ago and by now I have over 7000 pins (click here to see my pins) and over 1000 likes. Although I love pinning craft ideas, majority of my likes are related to food. But do I actually cook/bake from many of those recipes? Although I do try from time to time to bake or cook from my boards and likes, but sadly not often enough. I wish some of those foods would come alive in my kitchen! Can you relate? If so, than this challenge is for you! I have decided from this week forward I will try out one recipe from Pinterest once a week and will write my reviews here. Sounds like a plan? Great! Let’s go with that ;-).

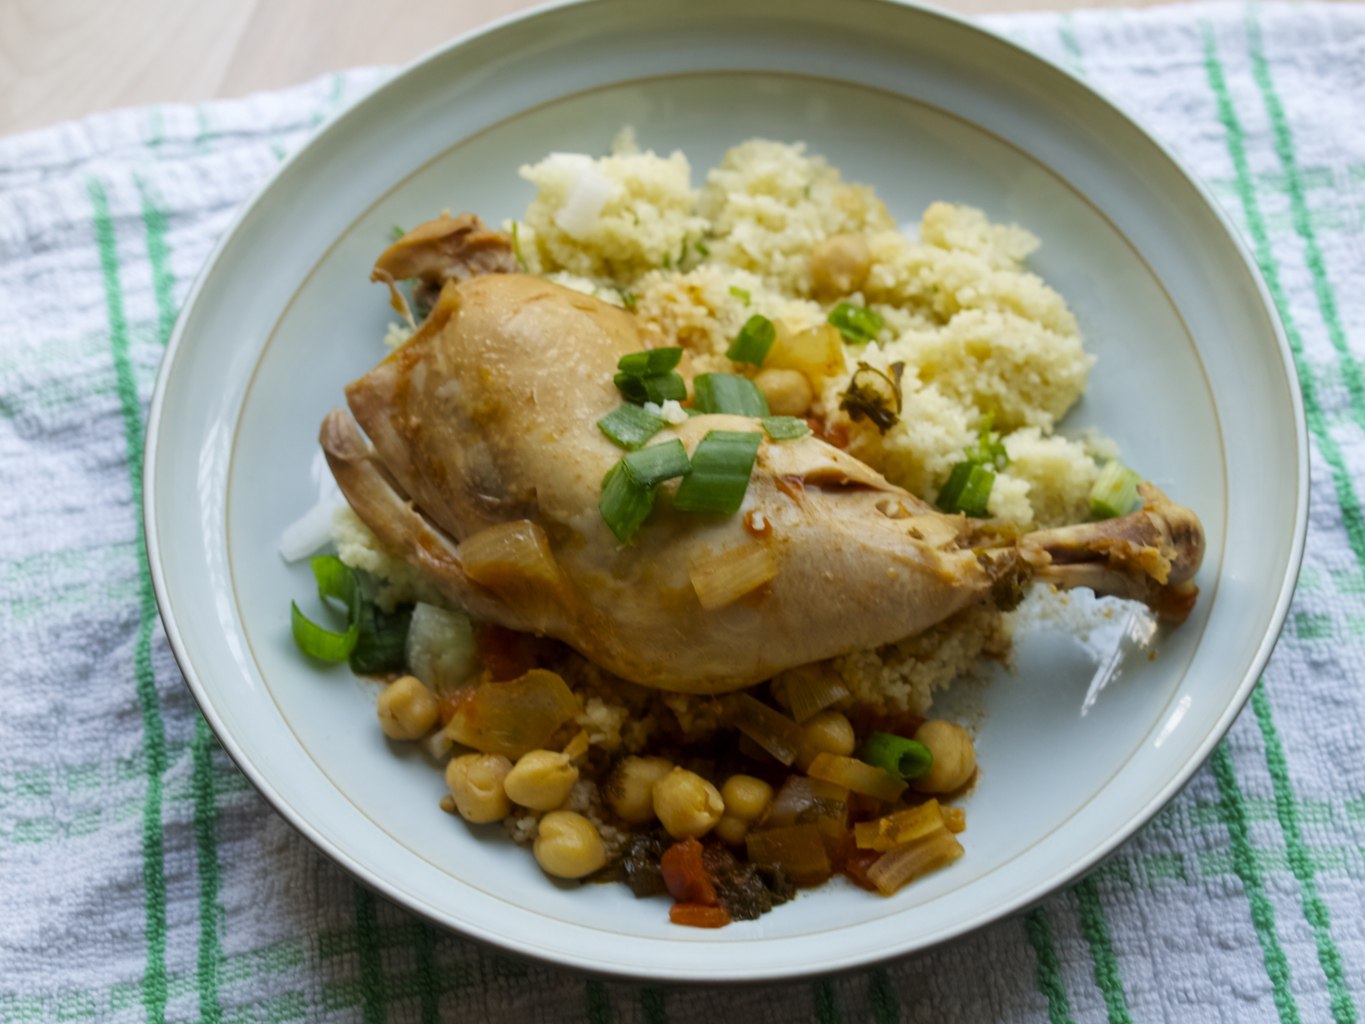
My first recipe to try out is slow cooker moroccan chicken from ‘Will Cook for Smiles’ blog. I got attracted to it as we have recently received slow cooker as a gift and I love the convenience of it. So was kind of looking for more ideas for that type of cooking method. I had to change few things in this recipe however. First, I did not like the idea of using ready sauce from the packet so I made my own. I also used chicken legs instead of breast just because I prefer those parts and I used parsley instead of cilantro (american way to call coriander), because I wanted to use up parsley in my fridge. The chicken came out tender and really tasty! Will definitely make again ;-)Slow cooker moroccan chicken

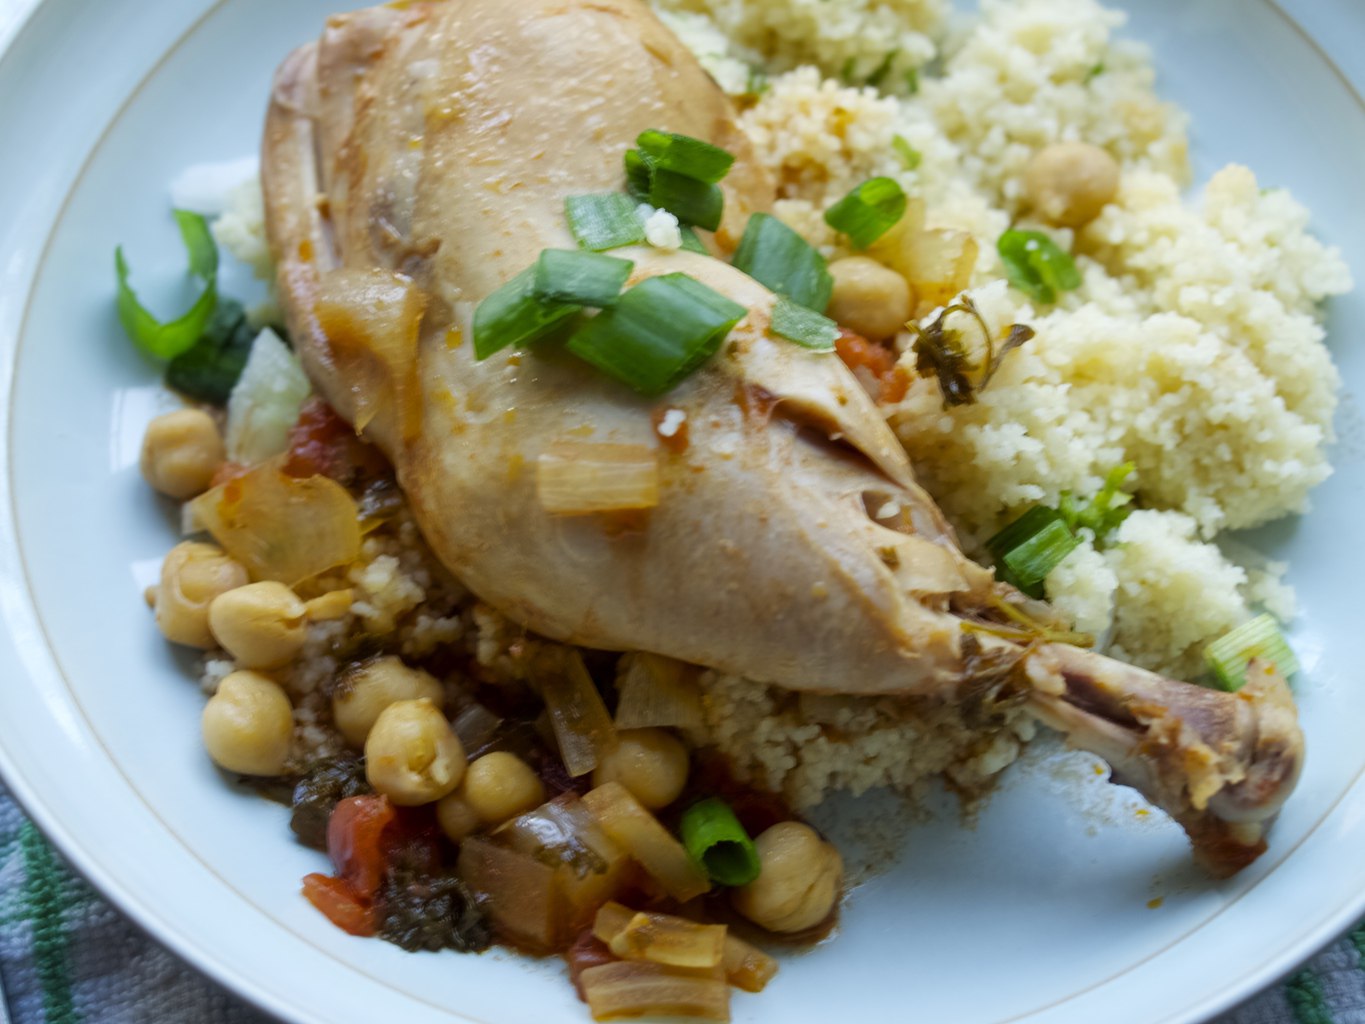
SLOW COOKER MOROCCO CHICKEN adopted from Will Cook for Smiles

For the chicken

  • 1tbsp coconut oil
  • 2 garlic cloves, finely chopped
  • 1tsp salt
  • 1tsp paprica
  • 1tsp cumin
  • 1/2 tsp cayenne pepper or black pepper to taste
  • 1 tsp sugar
  • 1 tbsp chopped parsley
  • 2 tbsp tomato puree+2 tbsp water to dilute
  • 3-4 tomatoes
  • 3 chicken legs
  • 1 cup of chicken stock
  • 1 small onion, sliced
  • 1 can of chickpeas, drained

For the meal:

  • 1 cup of dry couscous
  • 1tbsp ground almonds
  • 2 tsp chopped parsley
  • 2 tbs chopped  spring onion

1. Fry garlic in the frying pan using coconut oil. Add all the seasonings, tomato puree with water and fry for another 2-3min.

Slow cooker moroccan chicken 
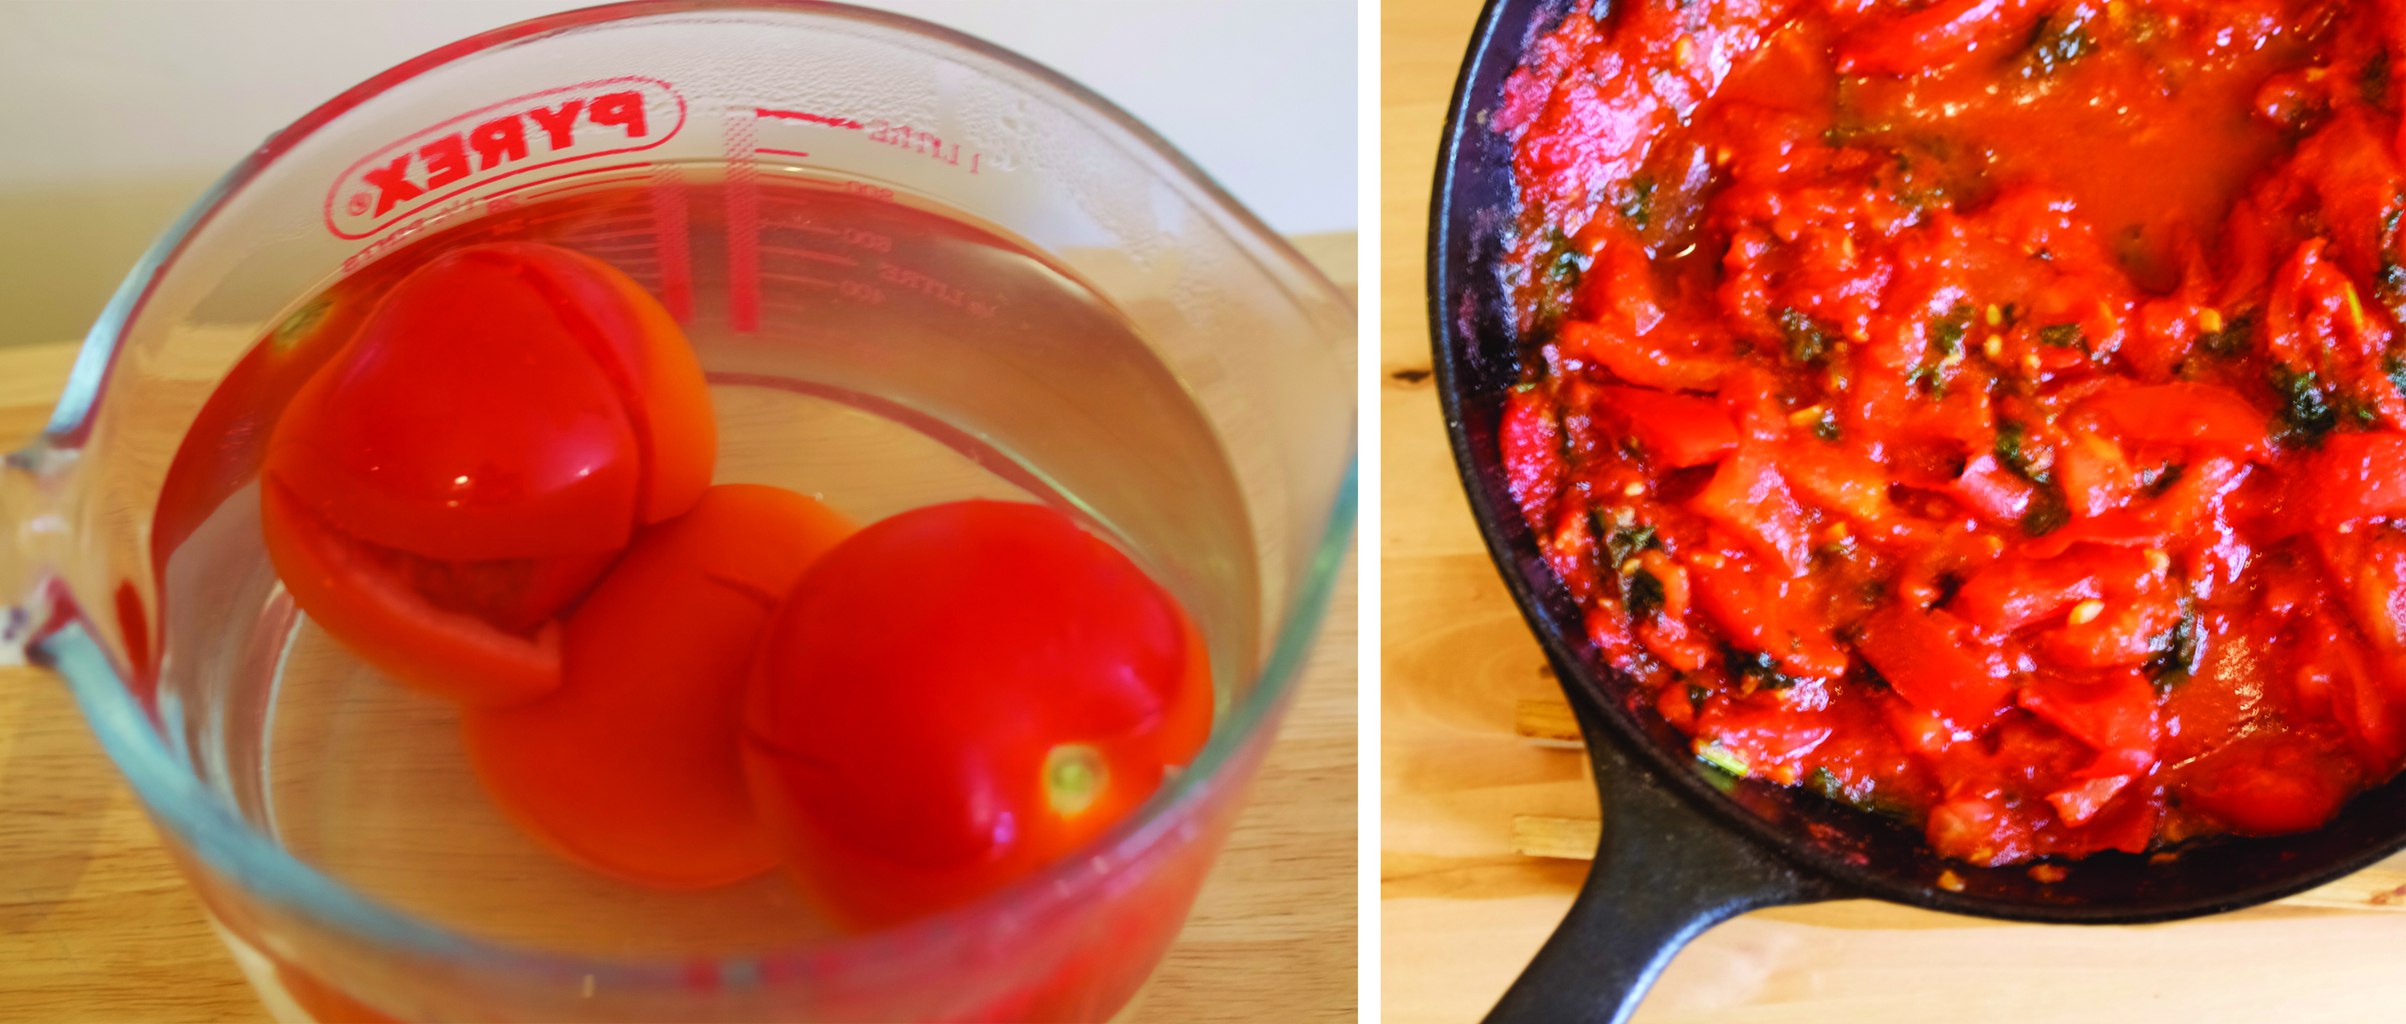
2. Meanwhile peal and deseed the tomatoes. Slice the tomatoes in four and pour boiling water over them. The skin should fall off and seeds come out easer. Chop the tomatoes and add them into the frying pan together with garlic and seasoning.

how to peal, deseed and chop tomatoes3. Place the chicken breasts in the slow cooker and add the tomato sauce from the pan, chicken stock and onions. Mix well and set of 6-8 hours. Add the drained chickpeas about half way through.

4. Make couscous by pouring boiling water over it. Once it’s made, stir in the almonds parsley and salt to taste.

5. Serve chicken on top of couscous. Scoop juice and chickpeas over the chicken and add some spring onions on top!Slow cooker moroccan chicken Slow cooker moroccan chicken

Enjoy!

Rasa xoxo

0

Any-day roast :-)

any-day roastAfter living in UK for 14 years I am very familiar with the sunday roast concept. However I probably could count on my fingers how many times I actually roasted any meat, so you can imagine not so many times! Joining Pelham family prompted me  to rethink my strategy on roasting. Pelhams proved me on so many occasions that they can do roasting amazingly well. Not only that they roast pheasants and other game meat, Joni’s dad actually makes his own handmade Yorkshire pudding!any-day roastAnyway… luckily, thanks to Nishalini’s wedding gift (a book called “Sunday Roast” by Clarissa Dickson Wright & Johnny Scott) I had another attempt at roasting! I picked chicken recipe with anchovies. I know, I know not a very classical choice, but I thought it was interesting and it did taste amazing in my opinion (it did not go well with Joni however as I think he only likes anchovies on pizza). The only thing I edited is the sauce.  I added corn flour to make it thicker and I added parsley… well, because I am Lithuanian!any-day roastROASTED CHICKEN WITH ANCHOVIES adapted from “Sunday Roast” by Clarissa Dickson Wright & Johnny Scott

  • 1.3kg chicken
  • 6 anchovy fillets, chopped (I used 12 anchovies, sorry, Joni)
  • 75g unsmoked bacon + 4 slices to cover the chicken while baking
  • 4 tablespoons chopped parsley
  • 1 onion, finely chopped
  • salt and freshly ground black pepper
  • fat such as oil, butter, pork fat or goose fat
  • 1tsp nutmeg
  • 125 chicken stock

1. preheat the oven to 230C.

2. to make the stuffing mix two-thirds of anchovies, chopped bacon, half parsley, and onion, and season well with salt, pepper and nutmeg.

3. Insert your hand under the loose flap at the non-cavity end of the chicken (basically where the chicken head was), loosen the skin and then slide the stuffing under the skin.

4.Put the bird in a roasting tin together with potatoes, carrots and parsnips if using. Lay the bacon slices over the top and brush it with fat.

5. Roast the chicken for 30min, then reduce the oven temp. to 160C and cook it for another 20min.

6. Leave the bird to rest while making the sauce.any-day roast any-day roast7. Add the stock, corn flour, remaining anchovies and parsley to the juices left in the roasting pan, and heat it to make a sauce. any-day roast any-day roast

Have a lovely weekend ;-)

Rasa xoxo

0

Tuscan bread salad

Tuscan bread salad recipe While in Tuscany we took some classes in cooking. Although the most intricate food we learned to make was fresh pasta, my favourite thing to eat and to make was bread salad (otherwise called Panzanella). It’s a perfect summertime appetiser and in my opinion this can be served with meat dishes as well!

TUSCAN BREAD SALAD

  • 3 slices harden stale bread (good quality, home baked not the regular shop bought sliced bread)
  • 3 medium sized tomatoes (my favourite is beefsteak tomato if you can find them in stores)
  • 1/2 red onion
  • 1 cucumber
  • 1-2 celery sticks
  • Balsamic vinegar
  • Extra-virgin olive oil
  • Salt

Tuscan bread salad recipe 1. Soak Bread in water for about 15 min. I recently have been trying to bake focaccia bread so this is what I used to make the salad this time. Tuscan bread salad recipe 2. Meanwhile slice tomatoes, cucumber, onion and chop celery. Place everything in one salad bowl. Tuscan bread salad recipe 3. Drain the bread and squeeze out the excess water and coarsely crumble with your hands. Place in a bowl with vegetables.Tuscan bread salad recipe 4. Season with salt and pepper and drizzle with vinegar and olive oil.

Tuscan bread salad recipe 5. Mix carefully and refrigerate.Tuscan bread salad recipe Tuscan bread salad recipe Tuscan bread salad recipe


Buon Appetito!

Rasa xoxo

0

Quick and easy way to make Lithuanian pasta (skryliai)

Quick and easy Lithuanian Pasta (skryliai)If you like fresh pasta, then this is for you! Its so easy to make, can be cooked on the spot (only flour and egg needed) and it’s so delicious! Traditionally skryliai are served with sour cream sauce together with fried lardons, however it works well with any other pasta sauces or toppings.

Quick and easy Lithuanian Pasta (skryliai)SKRYLIAI

  • 250g plain flour
  • 1 egg
  • pinch of salt
  • water as needed

1. Mix flour with salt and egg. Gradually add water while kneading until it forms a solid dough. For best results leave the dough to rest for 15 min or so before rolling it out.Quick and easy Lithuanian Pasta (skryliai) 2. Roll the dough out.Quick and easy Lithuanian Pasta (skryliai) 3. Cross cut the dough to little diamond shapes ;-).

Quick and easy Lithuanian Pasta (skryliai)

4. Cook pasta in boiling, slightly salted water for 5min.

Quick and easy Lithuanian Pasta (skryliai)

5. Drain the pasta and serve it with your favourite sauce and topping. Here I have topped it with stir fried vegetables and some parmesan cheese.

Quick and easy Lithuanian Pasta (skryliai)Enjoy!!

Rasa xoxo


1

Savoury tea cakes

Savoury tea cakes

Sometimes, don’t you want savoury food looking as pretty as cakes? Well, here is your solution making sandwich cake like ;-).

savoury tea cakes

SAVOURY TEA CAKES

  • sliced bread (I used German style rye bread)
  • your favourite sandwich filler (I chose simple egg mayo)
  • edible flowers such as pansies or chive flowers

1. Using cookie cutter cut out even circles out of the sliced bread

Savoury tea cakes2. Prepare the sandwich filler you likeSavoury tea cakes Savoury tea cakes Savoury tea cakes3. To assemble the cake just spread the sandwich filler on each bread circle and stack it upSavoury tea cakes4. Decorate the cake with edible flower

Savoury tea cakesSavoury tea cakes

Enjoy!

Rasa xoxo

0

Easter feast with friends

Gammon roast with side salads and stuff

When it comes to Easter feast with friends, first thing comes to my mind is some sort of roast. I think this is the best way to use up all the leftover preserves such as apple sauce or pickled beets for sides . That is if you are lucky enough to have any leftovers from last Autumn ;-).

This weekend we tried to roast a gammon. I was terrified at first as I have never dealt with such a big piece of meat. Luckily the recipe that we found on BBC Good Food website had really good reviews so we just went with that. Gammon pre-cooked in cola and roasted with honey and mustard glaze tasted amazing!

Cola gammon with honey & mustard glaze

Unfortunately we did not have any leftover preserves. I made quick Lithuanian white salad instead! My favourite festive salad in fact ;-).

White Lithuanian salad

LITHUANIAN WHITE SALAD

  • 3 medium size potatoes, cooked
  • 2 carrots, cooked
  • 3 hard boiled eggs
  • 3 big pickled gherkins
  • 2 small cans (300g each) processed peas
  • 3 tbsp or more mayonnaise
  • salt and pepper to taste
  • fresh herbs to decorate (optional)

1. Dice all the ingredients and place them in the large bowl.

White Lithuanian salad recipie

white lithuanian salad recipie

2. Mix everything with mayonnaise, season and decorate with fresh herbs.

IMG_8909

Enjoy!

Rasa xoxo

0

Bobotie

Bobotie recipie

I have fallen in love with bobotie from the first time I tasted it! Thanks to Joni for introducing me to it ;-). Bobotie is curried South African dish that reminds me of coronation chicken, because of its sweet curry taste. What’s more, it is really easy to make! The recipe bellow is an edited version that I got from Joni’s mum.

bobotie recipie

BOBOTIE

  • 250ml Milk
  • 2 slices of bread
  • 2 onions, peeled and finely chopped
  • 1 clove garlic, peeled and finely chopped
  • cooking oil
  • 1 tbsp mild curry powder
  • 1tsp cumin
  • black pepper
  • 450g minced lamb
  • 60ml apricot jam
  • 60g dried apricots
  • 25g ground almonds
  • salt to taste
  • 2 eggs

1. Pour half the milk onto the bread and allow it to soak.

2. Fry the onion and garlic gently in a little oil until translucent.

3. Mash the bread and add it into the onion and garlic mixture, the spices, meat, jam, apricots, half the almonds, and the salt.

4. Mix together with your hands (thoroughly).

5. Pack the mixture into a baking dish to a depth of about 4cm.

6. Beat the eggs with the remaining milk and  pour this over the top, then add the remaining almonds.

7. Bake in a preheated medium oven (180C or Gas mark 4) for 45-50 mins until the meat is cooked through and the custard on top has turned golden.

7. You may need to cover the top for the last 15-20 mins with a piece of foil to prevent the custard burning before the meat has finished cooking.

bobotie recipie

Enjoy!

Rasa xoxo

0

Creamy kale and walnut gnocchi

creamy kale and walnut gnocchi recipie

Today I made gnocchi with kale walnut and stilton cheese for lunch… yum! I love gnocchi and I did share one other recipe in “My trip to Italy” post.  Here I will share a step by step method on how to make the gnocchi itself. I used to struggle to handle the gnocchi dough while making them, but I did finally figure that it was because I was not letting the potato cool before mashing it (some of you might think DUGH!!). So yes, do cool  the potato and maybe cook them way before you even want to make gnocchi.

CREAMY KALE AND WALNUT GNOCCHI

(for gnocchi)

  • 6 medium potatoes, pealed, cooked, cooled and mashed
  • 200g flour
  • 1 egg
  • pinch of salt

(for sauce)

  • 150ml cream
  • 200g stilton cheese
  • 80g walnuts, toasted
  • salt and pepper to taste
  • handful of grated cheese

1. Mix all the ingredients for the dough and split into the balls (pic.1). roll the ball onto the floury surface (pic.2) and cut them into little pieces (pic.3). To make them textured roll each gnocchi piece against the fork ribs (pic.4). Lay them in floured plate by leaving some small gaps between them so they don’t stick together.

Gnocchi making basics step by step

creamy kale and walnut gnocchi recipie

2. Cook gnocchi in boiling water for a few minutes, and then mix them together with ready steamed kale in a baking dish.

creamy kale and walnut gnocchi recipie

3. Meanwhile make the sauce. Pour cream and crumble the cheese into the saucepan and whisk everything together until smooth while heating it on the low heat.

4. Pour the sauce over the gnocchi and kale. Scatter the cheese and walnuts on top.

creamy kale and walnut gnocchi recipie

5. Bake in preheated 200C oven for 15-20min.

creamy kale and walnut gnocchi recipie

Have a lovely week!

Rasa :-)

2

Steak and ale pies ♥

Steak and ale pies

Pies take a special place in my heart, because I can have them sweet or savoury! Steak and ale pie is Joni’s (my boyfriend’s) favourite pie to make :-). Like a proper Englishman he loves “Colman’s” mustard and local ale (“London Pride”). Brussels sprout is his favourite vegetable!

STEAK AND ALE PIES                                                                                                                                 Serves 2

  • 400g beef steak, cut into pieces
  • 2 tbsp plain flour
  • 1 tsp Colman’s mustard powder
  • salt and pepper
  • 2 tbsp olive oil
  • 150ml local dark ale
  • 2 cloves garlic, crushed and finely chopped
  • 1 onion, sliced
  • 1 carrot, chopped
  • 1 parsnip chopped
  • 1 bay leave
  • bunch of fresh thyme springs
  • 150ml beef stock
  • 1 tbsp tomato puree
  • 1 tbsp balsamic vinegar
  • 150g chestnut mushrooms, chopped
  • knob of butter
  • ready made puff pastry (because it is too much to ask to make your own)
  • egg, whisked
  • steamed brussels sprouts to serve

1.  Mix the beef with the flour, mustard powder and some salt and pepper in the bowl. Fry it in the large frying pan until it is gently browned.

2. Transfer the beef pieces back to a bowl, then add ale to the same pan and scrape up any meaty bits. Pour the liquid into the bowl of beef.

Steak and ale pie

3. In the same frying pan fry the garlic, onion and other vegetables.

4. Return the beef pieces into the pan together with the juices. Add bay leaf, thyme, beef stock, tomato puree and balsamic vinegar. Simmer everything for at least an hour.

5. Meanwhile fry the mushrooms in the butter and add it into the pan together with beef and vegetables.

6. To make a pie base use cookie cutters to cut out big enough circles to cover the base of the ramekin (pics. 1-2). Blind bake the base by placing baking paper and ceramic beans on top to stop it from rising (pic. 3).

7. Fill the pie with the beef and vegetable filling and cover it with another pastry circle (pic. 4).

Steak and Ale pies

8. Brush the pies with the whisked egg and bake them for 25min in 200C preheated oven.

steak and ale pies

Serve the pie with some brussels sprouts.

steak and ale pies

Enjoy!

Rasa :-)

3

Salad for lunch

Crispy avocado and bacon salad

I have been dreaming of salad since my overeating season have finally ended (I mean Christmas). Just needed something lighter for a change! I made warm salad today as I thought the weather is still not quite right for the traditional cold one. It’s warm, because it has crisped bacon and fried avocado. Avocado? Yes, I finally had a chance to fry avocado. I am amazed with the crispiness of it, will definitely try it again!

CRISPY AVOCADO AND BACON SALAD

(serves 1-2 people for lunch)

  • 1 red onion
  • 2 tbsp balsamic vinegar
  • 2 tbsp molasses
  • 1 tbsp olive oil + a drizzle for frying
  • 1-2 avocados
  • 1/4 cup bread crumbs
  • 1 tbsp plain flour
  • salt and pepper to taste
  • 1 egg, lightly whisked
  • 2 rashers of bacon
  • 1 handful of cherry tomatoes
  • 2 handfuls of baby leaf salad

1. First, marinate red onion (overnight is best, but 10min before serving will do). Chop the onion into “rainbow” slices and mix it together with balsamic vinegar, molasses and oil in the bowl. Set aside.

2. Prepare the breadcrumb mix by combining bread crumbs, flour, salt and pepper. Dip sliced avocados into the egg and then to breadcrumb mix.

Crispy avocado and bacon salad

3. Fry breaded avocados in well heated frying pan with a little oil.

crispy avocado and bacon salad

4. Crisp fry bacon in the same frying pan. Arrange salad by mixing baby leaf salad with tomatoes, red onion (drained) and bacon. Drizzle the liquid from the onions over the salad and arrange fried avocado pieces on top.

crispy avocado and bacon salad

Enjoy!

Rasa :-)

0

Baked Koldūnai (Lithuanian mince beef dumplings)

baked koldūnai

Baked koldūnai is a classical version of virtiniai and it taste even better when it is baked….hmm. The only thing is that when you see how much fat goes in it, that makes you go…. AaaAaa. But sometimes it is worth just to try it and enjoy it! I usually go to dance class when I feel I ate too much of rich food ;).

BAKED KOLDŪNAI

  • 250g plain flour
  • 1 egg
  • pinch of salt
  • 120ml water

(for the filling)

  • 300g mince beef
  • 200g lard (I used butter, grated)
  • 1 medium onion (shredded)
  • 2 tbsp stock (liquid)
  • 2 tsp sugar
  • 1 tsp herbes de provence
  • pepper and salt  as desired

(for sauce)

  • 100g cream
  • 50g parmesan cheese
  • pepper if desired

1. To make the dough mix all the ingredients together and knead to combine. Set it aside to rest for at least 30min.

2. Meanwhile make the filling by combining all the ingredients that goes in it.

3. Dust the ravioli/dumpling mold maker with flour, before making the dumplings. If you don’t have ravioli/dumpling maker, then check out this alternative method.

dust ravioli/dumpling mold with flour

4. Roll the dough and cover the mold with half of it. Fill each “cell” with the filling.

beef filling

5. Cover everything with the rest of the dough. Press everything with the rolling pin and “pop” all the dumplings out.

ravioli/dumpling mold

making koldūnai

6. Cook the dumplings in salted boiling water for 10min, then drain them like pasta. They should be floating on top when the are completely cooked.

7. Meanwhile make the sauce by heating the cream and stirring the cheese in. season it with black pepper.

9. Place cooked dumplings in small gratin dishes and pour cream sauce over it. Bake for 30min in preheated 200C oven.

baked koldūnai

Enjoy!

Rasa ;)

0

Beetroot soup

beetroot soup

I don’t know about you, but as soon as it becomes a little bit chilly outside I feel like eating something warming. Soups for instance are really good with warming you up :). One of my favourite is beetroot soup (after sour spinach soup)! I cook this soup with the raw beetroots including the leaves, however since I know that is more common to buy beetroot already cooked in the UK I have adapted the recipe to the ingredients available.

beetroot soup

BEETROOT SOUP

  • 100g smoked lardons
  • 1 onion
  • 2 carrots
  • 1 celery stick
  • 1.5l vegetable stock
  • 2 potatoes
  • 2 tbs tomato pure
  • 1 bay leaf
  • 3 cooked beetroots, chopped
  • 2 handfuls of spinach
  • 1 tbsp balsamic vinegar
  • salt and pepper
  1. Fry the lardons in the pot together with the diced onion, carrots and celery stick. Let it fry for about 5 min.
  2. Meanwhile peal the potatoes (if you want you can cook it with the skin) and dice them.
  3. Cover fried lardons with the stock and add the potatoes, tomato pure and a bay leaf into the soup
  4. Cook for about 20min or until potatoes cooks through.
  5. 5min before finishing the cooking, add the beetroots. When finished the cooking add the spinach, vinegar and season to your taste.

beetroot soup

You can serve this soup with the dollop of cream fraiche  and fresh herbs such as chives, dill or parsley.

Enjoy!

Rasa xoxo

0

Easy chickpea crepes

chickpea crepes

Today I had chickpea crepes for brunch (I know I know, but sometimes it is just nice to start late). I make crepes quite often in general as it is great with many fillings, can be served sweet or savoury and it is quite instant. However today I am going to speak about the chickpea crepes that have an interesting flavour twist and go really well with fresh salad, yogurt, guacamole, hummus and so on… the possibilities are endless! To make proper chickpea crepes is not that easy and quick as it is egg and gluten free and has to be prepared the night before. Therefore I did come up with this quick and easy recipe that is halfway a regular crepe and socca (chickpea crepe in french). Of course if you want to do it the proper way than check out this website, but if you want quick breakfast or lunch then continue on ;)

chickpea crepes

EASY CHICKPEA CREPES

  • 50g chickpea flour
  • 50g plain flour
  • 1 egg yolk
  • 1 tbsp olive oil
  • 1 tsp salt
  • 1 tsp ground cumin
  • about 200ml water

1.  Mix the flours, egg yolk, oil and seasoning together.

2. Gradually add water while mixing it until it becomes runny, but not too watery (something like double cream).

3. Heat up the oil in the frying pan. Tip: make sure you heat the pan properly as the crepes mixture will stick less to it.

4. Pour a spoon of the mixture to the pan and spread evenly around with the spatula (use the silicon one if you have it). Otherwise if you find it easer then swirl the whole pan to make the mixture run evenly to cover the whole pan.

5. Once the top surface is dry (nothing runs on top) then the crepe is ready to turn. I carefully slide the spatula under the crepe and flip it. You may want to try to flip it in the air by tossing the pan, but that’s if you feel brave enough…ha ha

Have fun and enjoy!

Rasa :)

2

Virtiniai (Lithuanian dumplings) with potato and bacon filling

Virtiniai:dumplings

My friends kept asking me for the Lithuanian dumplings (virtiniai) recipe.  So here it is! Although there are many fillings (the most classical is with minced beef called koldunai) , I have chose to go with potato and bacon filling, because…. well, I had all the ingredients for it here at home! But there are many more exciting fillings, including sweet ones that hopefully I will cook next time. The thing is, we usually buy it frozen as it is very convenient and quick, but making from the scratch is really fun!

VIRTINIAI WITH POTATO AND BACON FILLING

Serves 2 people

(for the dough)

  • 250g plain flour
  • 1 egg
  • pinch of salt
  • 120ml water

(for the filling)

  • 1 tbsp butter
  • 2 bacon slices (chopped)
  • 1/2 medium onion (diced)
  • 2 medium potatoes (pealed and grated)
  • pepper and salt  as desired

(for topping)

  • 1 tbsp butter (if you dare)
  • 2 tbsp sour cream
  • small bunch of chives (chopped)

1. To make the dough mix all the ingredients together and knead to combine. Set it aside to rest for at least 30min.

2. Meanwhile make a filling. Melt butter in the pan and fry onions together with the bacon. When onion is golden in colour add grated potato and fry it for a minute. Remove everything from the pan and season as desired. Let it cool.

3. Now is the time to make the dumplings. I am very lucky as I have ravioli/dumpling maker mold! So making dumplings with it is a real ease. Just roll the dough, cover the mold with half of it. Fill each “cell” with the filling, cover everything with the rest of the dough. Press everything with the rolling pin and “pop” all the dumplings out. If you don’t have this handy ravioli/dumpling maker, don’t worry as there is an alternative method…

forming dumpling1 forming dumpling2 forming dumpling3 forming dumpling4

The alternative method to make the dumplings is to roll the dough and cut it with the cookie cutter. I must say that it is quite tricky to go this way as the dough doesn’t seem to want to roll thin as it keeps shrinking back! I suppose the more often you do it the better you can handle it. So divide the filling into the cut circles and close them by folding the edges (like a pie).

alternative dumpling forming

4. Cook the dumpling in salted boiling water for 10min, then drain them and add little butter so it does not stick.

5. Serve the dumplings while still hot, topped with sour cream and chives.

virtiniai with potatoes

Enjoy!

Rasa :)

13

A taste of Eastern Europe… hmmm

The other day me and my friend Vicki have been visiting some good friends who just had a baby girl (very quite one by the way!). I offered to cook as I realized that they might be already busy with hosting (and the baby of course). As I wanted to cook something we traditionally eat in Lithuania I decided to go with goulash. I know it may not be exactly Lithuanian (originally Hungarian), but we cook that a lot as it is so warming for the cold weather (it’s like a comfort food for me). There are soooo many versions of goulash as a soup (traditionally) or a stew with many vegetables or just with onion. But I must say that my favorite is with apples as it gives such a zest to it! Paprika stays as the vital ingredient of course but you can change traditionally used beef with turkey if you like. Here is my version of goulash. I hope you enjoy it ;)

WARMING GOULASH

500g beef (diced)
2 onions
2 carrots
1 red pepper (or which ever colour you prefer)
2 apples
1 tsp paprika
2 tbsp tomato puree
Salt, pepper
400ml stock (I like chicken stock)
25g butter
1tbls flour
150g cream fraiche (and more if you love it)
fresh parsley

1. Heat up a large pan and fry the beef (in batches) in a little oil (I try not to use any oil as I have this belief that oil turns toxic when heated, instead I splash some water over it to stop beef pieces from sticking to the pan).
2. Remove and put aside fried beef and in the same pan (where the beef released its fats and juices) fry diced onions, shredded carrots, sliced pepper and chopped apple until golden brown (again, I use no oil as the beef juices should keep it from burning). Add paprika, tomato puree, pepper and salt to taste.
3. Return beef pieces to pan and add the stock. Bring it to boil, reduce the heat and relax (but watch out for hungry people who keeps sneaking in and asking “Is it ready yet?”, “When is it going to be ready? and so on). This simmering goes on for at least an hour. Only when the beef is ready (means it is soft, not chewy) – the goulash is ready for the next step.
4. The perfect goulash needs to be thickened (in England I noticed the corn flour is used for that, but in Lithuania we just use normal wheat flour). So in separate small frying pan melt butter and fry wheat flour on the low heat (keep whisking while adding flour until it becomes like a paste). Pour the mixture into the goulash pan and turn off the heat.
5. The last bit of course is to taste it if all the flavors are combined well (add salt if needed). Then mix in cream fraiche and fresh parsley. Serve with mashed potatoes.

Gero Apetito (or Enjoy your meal in eng.)

Rasa :)

2