Top

Archive | Blog

Make your own custom chocolates

make your own chocolates

Joni often ask me what is my favourite chocolate. Well… I do like chocolate! I definitely prefer ones that have something in it like nuts. But I do like experimenting with different flavours ;-).

I made these chocolates few days ago. I went with with “chocolate bark” approach! So I melted some chocolate (about 150g), poured it into the silicon chocolate moulds and added honey roasted/salted almonds on top. Quite simple you may say! Well, it’s up to you ;-). You can make it as custom as you want. You can melt different types of chocolate and you can add all kind of candies and even crisps on top!

make your own chocolates

Freezer works the best when you want to harden these chocolates in no time!

make your own chocolates make your own chocolates

Just think how cute these chocolates be as a gift! Yey :-).

make your own chocolates

Have fun with experimenting ;-)

Rasa

0

Scented hearts instead of chocolate ones ;-)

Scented Rice Hearts DIY step by step instructions

Today I have been making scented rice hearts! I love this idea of putting these little heart shaped sachets into the box and gifting them instead of box of chocolate. These are cute, practical and last much longer than chocolate (you know why!). Ok, ok… I did sneak in some chocolate in this box…

Scented rice hearts with chocolate

And this is how. Cut few hearts in tissue paper (pic 1), stitch around leaving big enough gap to fit the chocolate through (pic 2). Once the chocolate is inside, close the gap by stitching on it (pics 3-4).

making paper pacaging for chocolates

So now you know my secret ;-). Click here to see how scented rice hearts has been made.

scented rice hearts DIY

Wishing you the best weekend ever ;-)

Rasa xoxo

0

Banoffee Cheesecake

Banoffee cheesecake

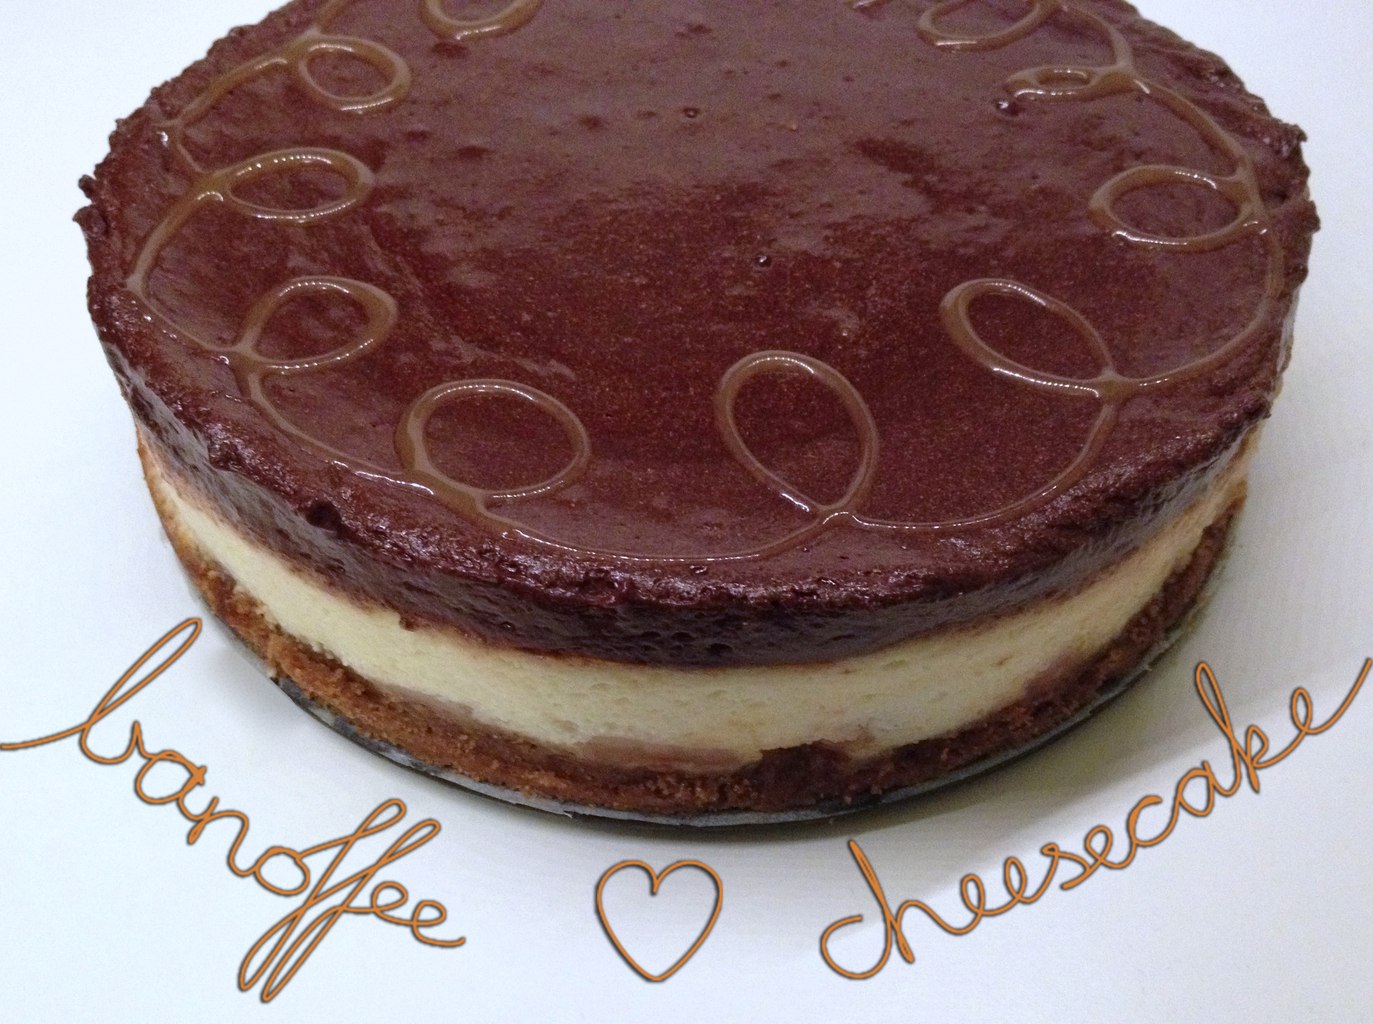
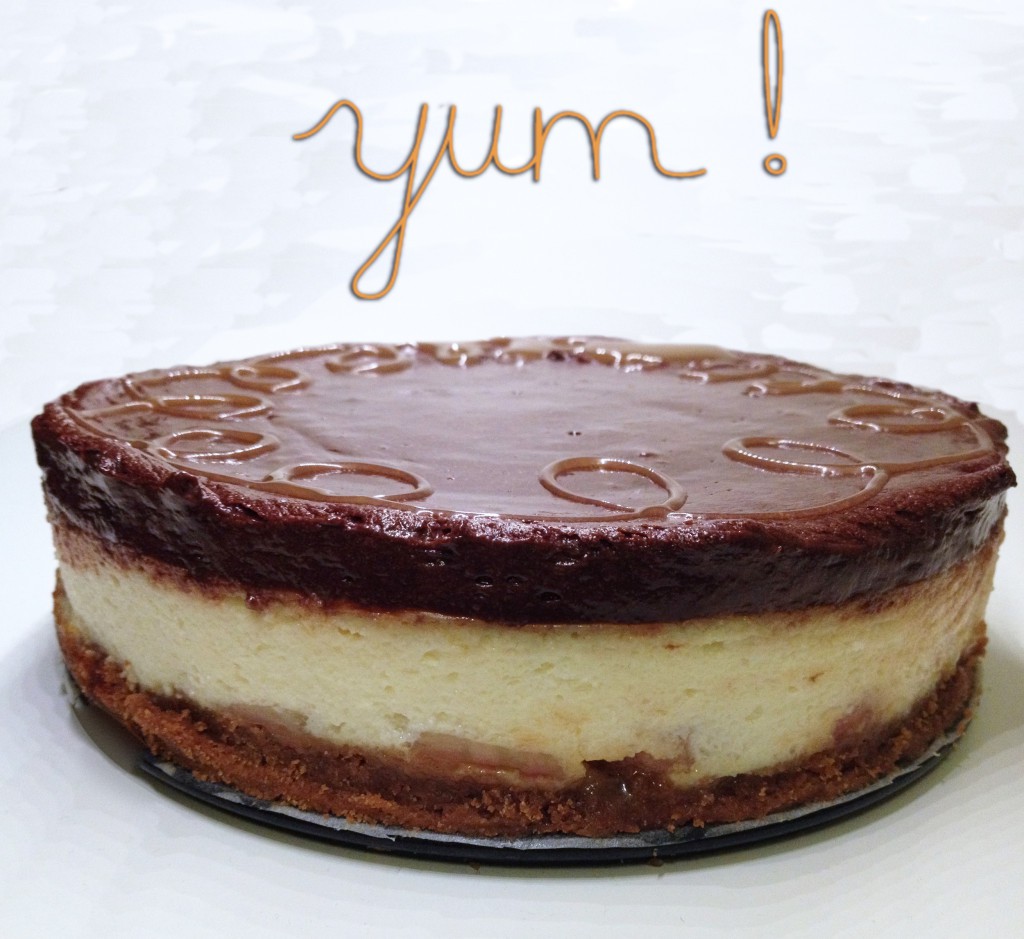
I will admit, my ultimate desert is Banoffee pie. I know I know, this may not be the most exquisite cake, but the match between toffee and banana is perfection! At least in my opinion.

I baked this cheesecake, inspired by Gü Puds chocolate banofees that I ate so many in the past (still eating them sometimes). You can find an evidence in my cupboard that is full of Gü Puds glass remekins!
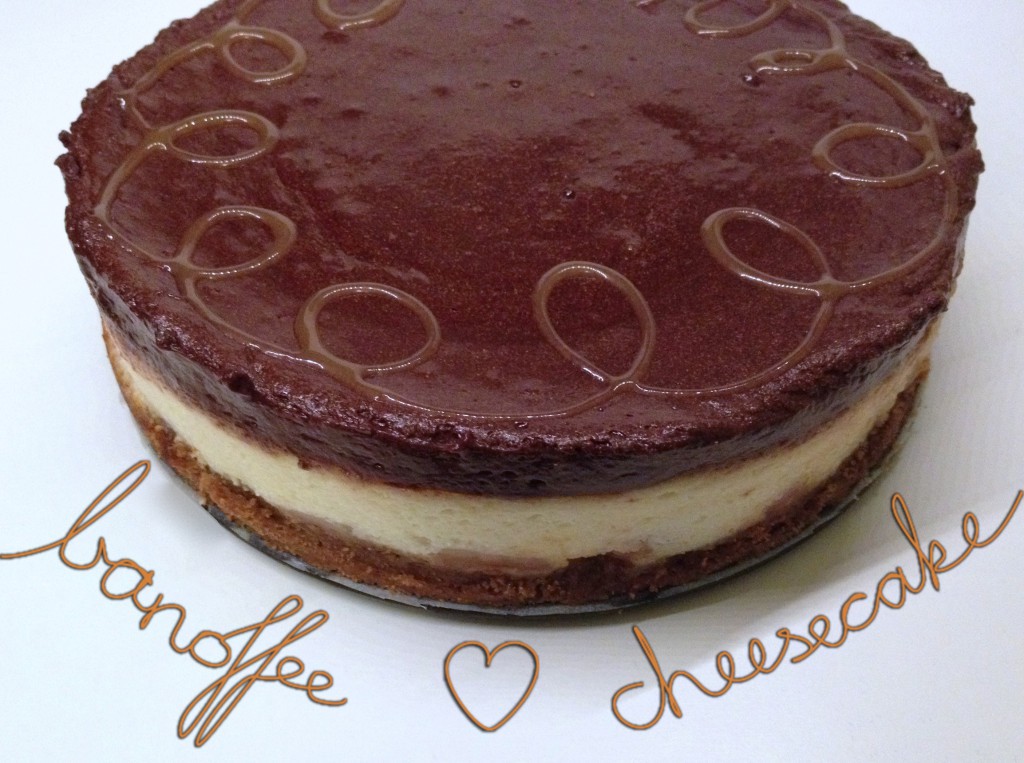
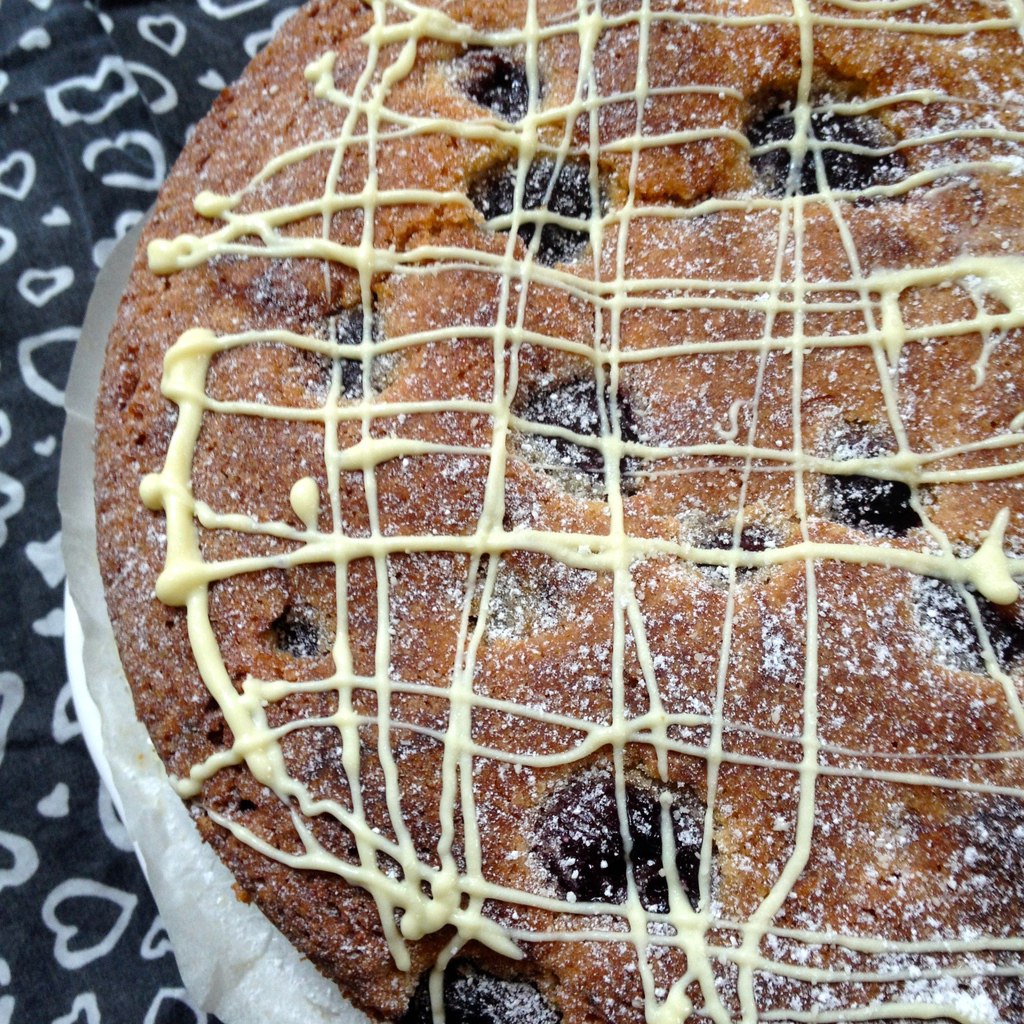
Banoffee cheesecake

BANOFFEE CHEESECAKE

(for the base)

  • 150g digestives
  • 75g butter
  • 2 ripe bananas
  • 100g toffee sauce

(for the filling)

  • 600g cream cheese
  • 175g sugar
  • 4 eggs
  • 1/2  tsp lemon juice

(for chocolate mousse)

  • 200g dark chocolate
  • 4tbsp double cream
  • 3 eggs
  • 4tbsp sugar

1. First make the base by crumbling the digestives and mixing them together with the butter. Press this mixture into the prepared spring form tin base (lined with baking paper).

2. Slice bananas on the base and drizzle toffee sauce on top evenly.

3. Now make the filling. In the food processor mix cream cheese, sugar, eggs and lemon juice.

4. Pour in the filling mixture and pop in a large baking tin. Boil the kettle and fill the tin until the water comes half-way up the side of the tin. Bake in the preheated 170C oven for around 1 1/4 hours, until the cheesecake is set on top but still wobbles a little in the middle.

5. Meanwhile make the chocolate mousse. Melt the chocolate and mix it with double cream.

6. Separate egg yolks from whites (reserve the whites in separate bowl). Add sugar to the egg yolks and whisk it until it becomes pale. Gradually add it to melted chocolate mixture.

7. Whisk the egg whites until it forms stiff peaks. Add it gradually into the chocolate mixture by folding and don’t overwork it as it would let all the air out!

8. Pour the chocolate mousse onto the cooled cheesecake and let it set in the fridge (after when it is completely cooled) for 4 hours while still in the spring form tin.

9. When the cheesecake is ready remove it carefully from the tin.

Enjoy!

Rasa :-)

3

Creamy kale and walnut gnocchi

creamy kale and walnut gnocchi recipie

Today I made gnocchi with kale walnut and stilton cheese for lunch… yum! I love gnocchi and I did share one other recipe in “My trip to Italy” post.  Here I will share a step by step method on how to make the gnocchi itself. I used to struggle to handle the gnocchi dough while making them, but I did finally figure that it was because I was not letting the potato cool before mashing it (some of you might think DUGH!!). So yes, do cool  the potato and maybe cook them way before you even want to make gnocchi.

CREAMY KALE AND WALNUT GNOCCHI

(for gnocchi)

  • 6 medium potatoes, pealed, cooked, cooled and mashed
  • 200g flour
  • 1 egg
  • pinch of salt

(for sauce)

  • 150ml cream
  • 200g stilton cheese
  • 80g walnuts, toasted
  • salt and pepper to taste
  • handful of grated cheese

1. Mix all the ingredients for the dough and split into the balls (pic.1). roll the ball onto the floury surface (pic.2) and cut them into little pieces (pic.3). To make them textured roll each gnocchi piece against the fork ribs (pic.4). Lay them in floured plate by leaving some small gaps between them so they don’t stick together.

Gnocchi making basics step by step

creamy kale and walnut gnocchi recipie

2. Cook gnocchi in boiling water for a few minutes, and then mix them together with ready steamed kale in a baking dish.

creamy kale and walnut gnocchi recipie

3. Meanwhile make the sauce. Pour cream and crumble the cheese into the saucepan and whisk everything together until smooth while heating it on the low heat.

4. Pour the sauce over the gnocchi and kale. Scatter the cheese and walnuts on top.

creamy kale and walnut gnocchi recipie

5. Bake in preheated 200C oven for 15-20min.

creamy kale and walnut gnocchi recipie

Have a lovely week!

Rasa :-)

2

♥ ♥ ♥ Love is in the air ♥ ♥ ♥

Hey! it’s February already (doesn’t the time flies??) and I thought it is time to gear up for Valentines day. So first things first, I started to get the bakery ready with new bake lines. So pop-in when you are in need for something sweet :-).

Friendly Nettle Bakery

I am still in love with the hot beverages (still very cold outside).  If you are the same, then check out this spiked cinnamon malted drink. I am sure you will love it ;-)

spiked cinnamon malted drink

If sweet is not your thing, then it can be savoury. Check out this steak and ale pies… super yum!

Steak and ale pies

I am thinking to make more soap. I thought these citrusy heart shaped soap bars are great as gifts.

citronella, lemon and orange soap DIY

And finally, if you are planning to bake your own cake then you should defiantly try to make these cake toppers that I have recently created :-).

Heart cake toppers DIY... using washi tape!

Have fun with Valentine’s day preparation!

Rasa xoxo

0

Time to organise your handbag!


cometic bag DIY

We, ladies, love to organise (or most of us)! Our overfilled/have everything you need handbags are no exception!  I do admit, sometimes I wonder if I take more time organising or doing actual tasks. Last year I made the cosmetic bag that Vickie loved. This year I have decided to made a book pouch. Because books deserve to be protected from the rest of the stuff in the handbag! For this easy DIY go here ;-).

Easy to make envelope pouch DIY

Happy organising!

Rasa ;-)

1

Making Cake Toppers

Heart shaped cake topper DIY.... using washi tape!!

Cake toppers are amazing when you want to make cake look more festive or just little bit special ;-). And they are not that difficult to make! Here is heart shaped cake topper DIY project (click here to access it) that only needs some colourful washi tapes and wooden skewers.

Heart cake toppers DIY... using washi tape!

Heart cake toppers DIY... using washi tape!

Have fun!

Rasa x

0

Cherry nut cake

Cherry nut cake recipie

I am currently obsessed with cherries. No, I am not baking or making anything with them. I just like having cherries as a snack with my tea (or hot chocolate). In fact, I can actually go through the whole box in one go!

So today it was my first time when I actually baked a cake with the cherries (first time this year as I baked cherry related cakes before). My favourite part was pitting the stones out. It was exciting to try out this cherry pitter that I have just bought!

Cherry nut cake recipie

The other part (not as fun) that was quite an important part is to grind the hazelnuts. Unfortunately there are no ready ground hazelnut available in shops, so this is the only option. You can of course replace the hazelnuts with the ready ground almonds. But be warned, you will be missing out on this amazing hazelnut flavour. Your choice ;-).

CHERRY NUT CAKE

  • 180g butter, softened
  • 250g sugar
  • 3 eggs
  • 100g plain flour
  • 2tsp baking powder
  • 100g hazelnut, ground
  • 150g ready ground almond
  • 450g cherries, pitted
  • white chocolate for drizzle (optional)
  • icing sugar for dusting (optional)

1. Cream the butter with sugar until pale in colour

2. Gradually add eggs and mix everything together to combine.

3. Add the flour, baking powder and the ground nuts and mix the mixture well.

4. Spoon out the mixture into ready lined baking tin and push the cherries on top.

Cherry nut cake recipie

5. Bake the cake in preheated 180C oven for 50min.

Cherry nut cake recipie

6. Cool the cake down before drizzling melted white chocolate or dusting icing sugar on top.

Cherry nut cake recipie Cherry nut cake recipie

Enjoy!

Rasa xoxo

0

Knitting basic socks (part 1)

knitting socks step by step

In my opinion, woollen socks are not only for winter. They are great for a rainy spring day worn under wellies and are really comfortable at home as the slippers :-). Knitting them is also quite enjoyable. And it is not as difficult as it looks! I use 5 double pointed needles to knit in circle, but if you find it easer you can use circular needles for that too. So are you ready to begin? Click here for step by step instructions.

knitting socks basics Knitting socks basics

By the way, big thanks to Vicki’s mum who helped me to put the size chart together for these socks (even if she doesn’t know it).

Rasa xoxo

1

Ale and cheese bread

Ale and cheese bread recipie

Having previously made steak and ale pies, I had some ale left. I have decided to make bread with that leftover! The cool thing is when you know bread baking basic, you can customise your recipe as much as you want. I added some cheese together with that ale leftover to mine! The outcome? Strong flavour bread, tasting like “Marmite”! You either love it or hate it ;-).

ALE AND CHEESE BREAD

  • 150g wholemeal flour
  • 350g white bread flour
  • 7g fast acting dry yeast
  • 10g fine salt
  • 300ml ale (warmed in the bath of hot water)
  • 50g (or more) cheddar cheese, grated
  • 1 tbsp melted butter (1 tbsp extra for handling the dough)

1. Measure all the dry ingredients in the bowl and pour the ale over it. It should be bubbly as in the picture bellow :-).

Ale and cheese bread recipe

2. Add cheese + butter and mix everything well. Give good 10min kneading, this works well as a workout!

3. Shape the dough into the round. I rub my hands into the fat (butter in this case) so the dough does not stick to my fingers while handling it.

Ale and cheese bread recipe

4. Place the dough round back into the clean bowl. Cover it with cling film and let it rise in warmth for 1-1.5 hours. The dough should double (if not triple) in size.

Ale and cheese bread recipe Ale and cheese bread recipe Ale and cheese bread recipe

5. Deflate the dough and let it rise again for another 30min or so. I use proving basket at this stage.

Ale and cheese bread recipe Ale and cheese bread recipe Ale and cheese bread recipe

6. Cross slash the top of the bread. This is my first time doing it too! This really helped to produce more civilised looking bread as it did not crack wherever it wanted when rising in oven :-D. Bake in preheated 200C oven for 45min.

Ale and cheese bread recipe

Ale and cheese bread recipe Ale and cheese bread recipe Ale and cheese bread with raspberry jam

Now, I will tell you little secret. I know this might sound odd, but I did enjoy this bread best as a toast with some raspberry jam… can’t get enough of it!

Rasa xoxo

0

Missing Bruno

No, I am not missing a dark Spanish man! If you have been following me (past couple of months), than you probably have been acquainted with my cat (named Bruno). Sadly, Bruno left me a month ago, he just never returned :-(. There is still hope they say, but today I decided to let it go for now. I thought I will share my favourite video of him…

Enjoy!

Rasa xoxo

0

Steak and ale pies ♥

Steak and ale pies

Pies take a special place in my heart, because I can have them sweet or savoury! Steak and ale pie is Joni’s (my boyfriend’s) favourite pie to make :-). Like a proper Englishman he loves “Colman’s” mustard and local ale (“London Pride”). Brussels sprout is his favourite vegetable!

STEAK AND ALE PIES                                                                                                                                 Serves 2

  • 400g beef steak, cut into pieces
  • 2 tbsp plain flour
  • 1 tsp Colman’s mustard powder
  • salt and pepper
  • 2 tbsp olive oil
  • 150ml local dark ale
  • 2 cloves garlic, crushed and finely chopped
  • 1 onion, sliced
  • 1 carrot, chopped
  • 1 parsnip chopped
  • 1 bay leave
  • bunch of fresh thyme springs
  • 150ml beef stock
  • 1 tbsp tomato puree
  • 1 tbsp balsamic vinegar
  • 150g chestnut mushrooms, chopped
  • knob of butter
  • ready made puff pastry (because it is too much to ask to make your own)
  • egg, whisked
  • steamed brussels sprouts to serve

1.  Mix the beef with the flour, mustard powder and some salt and pepper in the bowl. Fry it in the large frying pan until it is gently browned.

2. Transfer the beef pieces back to a bowl, then add ale to the same pan and scrape up any meaty bits. Pour the liquid into the bowl of beef.

Steak and ale pie

3. In the same frying pan fry the garlic, onion and other vegetables.

4. Return the beef pieces into the pan together with the juices. Add bay leaf, thyme, beef stock, tomato puree and balsamic vinegar. Simmer everything for at least an hour.

5. Meanwhile fry the mushrooms in the butter and add it into the pan together with beef and vegetables.

6. To make a pie base use cookie cutters to cut out big enough circles to cover the base of the ramekin (pics. 1-2). Blind bake the base by placing baking paper and ceramic beans on top to stop it from rising (pic. 3).

7. Fill the pie with the beef and vegetable filling and cover it with another pastry circle (pic. 4).

Steak and Ale pies

8. Brush the pies with the whisked egg and bake them for 25min in 200C preheated oven.

steak and ale pies

Serve the pie with some brussels sprouts.

steak and ale pies

Enjoy!

Rasa :-)

3

Cable sweater

Cable sweater

I finally completed the cable sweater I have been knitting since last year (beginning of this winter)! I know I know, this might be a little late! But if you put your mind to it, you can knit your own in no time ;-). This Sweater is loose knit and chunky, therefore really easy and fun to knit. Click here for the pattern.

Cable Sweaterknit your own cable sweater

Enjoy your week :-)

Rasa

2

Salad for lunch

Crispy avocado and bacon salad

I have been dreaming of salad since my overeating season have finally ended (I mean Christmas). Just needed something lighter for a change! I made warm salad today as I thought the weather is still not quite right for the traditional cold one. It’s warm, because it has crisped bacon and fried avocado. Avocado? Yes, I finally had a chance to fry avocado. I am amazed with the crispiness of it, will definitely try it again!

CRISPY AVOCADO AND BACON SALAD

(serves 1-2 people for lunch)

  • 1 red onion
  • 2 tbsp balsamic vinegar
  • 2 tbsp molasses
  • 1 tbsp olive oil + a drizzle for frying
  • 1-2 avocados
  • 1/4 cup bread crumbs
  • 1 tbsp plain flour
  • salt and pepper to taste
  • 1 egg, lightly whisked
  • 2 rashers of bacon
  • 1 handful of cherry tomatoes
  • 2 handfuls of baby leaf salad

1. First, marinate red onion (overnight is best, but 10min before serving will do). Chop the onion into “rainbow” slices and mix it together with balsamic vinegar, molasses and oil in the bowl. Set aside.

2. Prepare the breadcrumb mix by combining bread crumbs, flour, salt and pepper. Dip sliced avocados into the egg and then to breadcrumb mix.

Crispy avocado and bacon salad

3. Fry breaded avocados in well heated frying pan with a little oil.

crispy avocado and bacon salad

4. Crisp fry bacon in the same frying pan. Arrange salad by mixing baby leaf salad with tomatoes, red onion (drained) and bacon. Drizzle the liquid from the onions over the salad and arrange fried avocado pieces on top.

crispy avocado and bacon salad

Enjoy!

Rasa :-)

0