Top

Archive | Savoury Delights

Unconventional Pancake Day

Zemaiciu pancakes

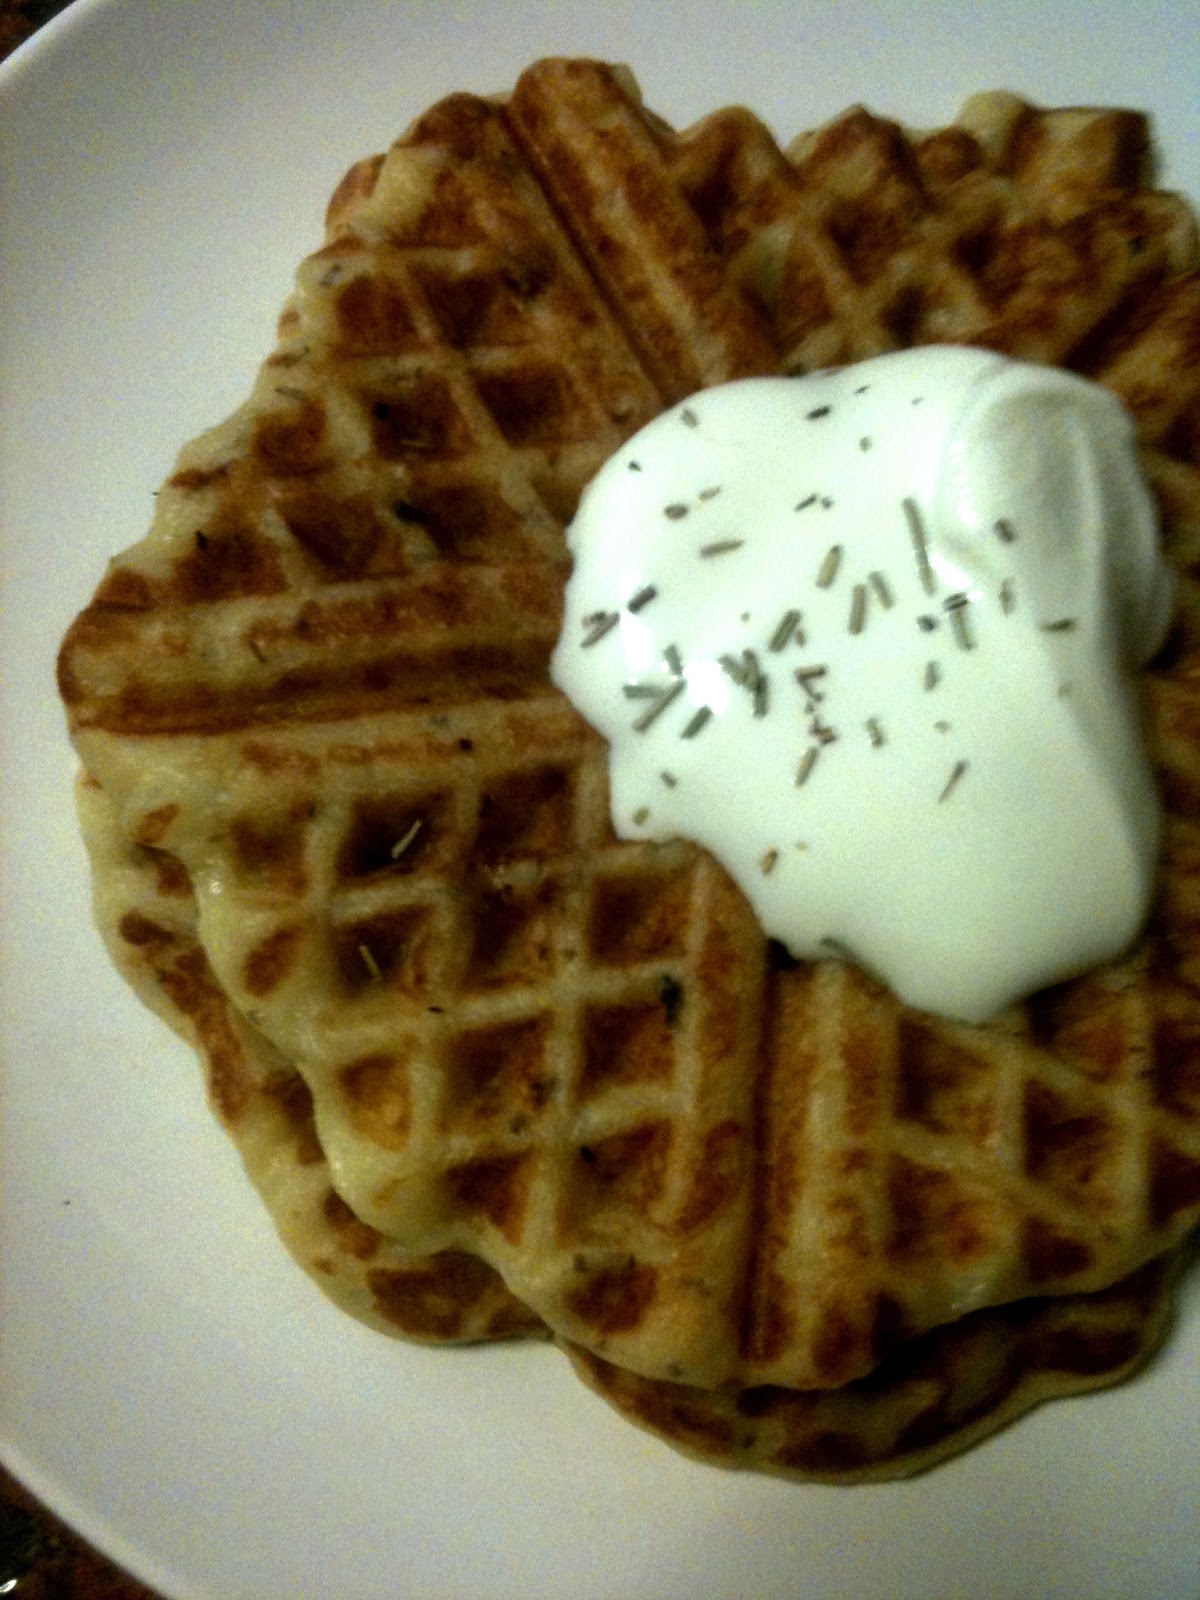
First of all, happy Pancakes Day! You are probably looking for pancakes recipes right now… Although these pancakes are not the sweet ones, they offer more than an afternoon treat. They are great for dinner too! Žemaičių pancakes have originated from Lithuania, the region where my Grandma lives. They have meaty filling in the potato case. Basically, worth to try ;-).

Zemaiciu Pancakes

ŽEMAIČIŲ PANCAKES

  • 800g potatoes (cooked, mashed and cooled)
  • 1 egg
  • salt and pepper
  • 1 tbsp corn starch
  • 1 tbsp plain flour
  • oil for frying

(for filling)

  • 200g pork meat (cooked and minced)
  • 1 carrot (cooked and mashed)
  • 1 onion, chopped
  • 1 tbsp butter

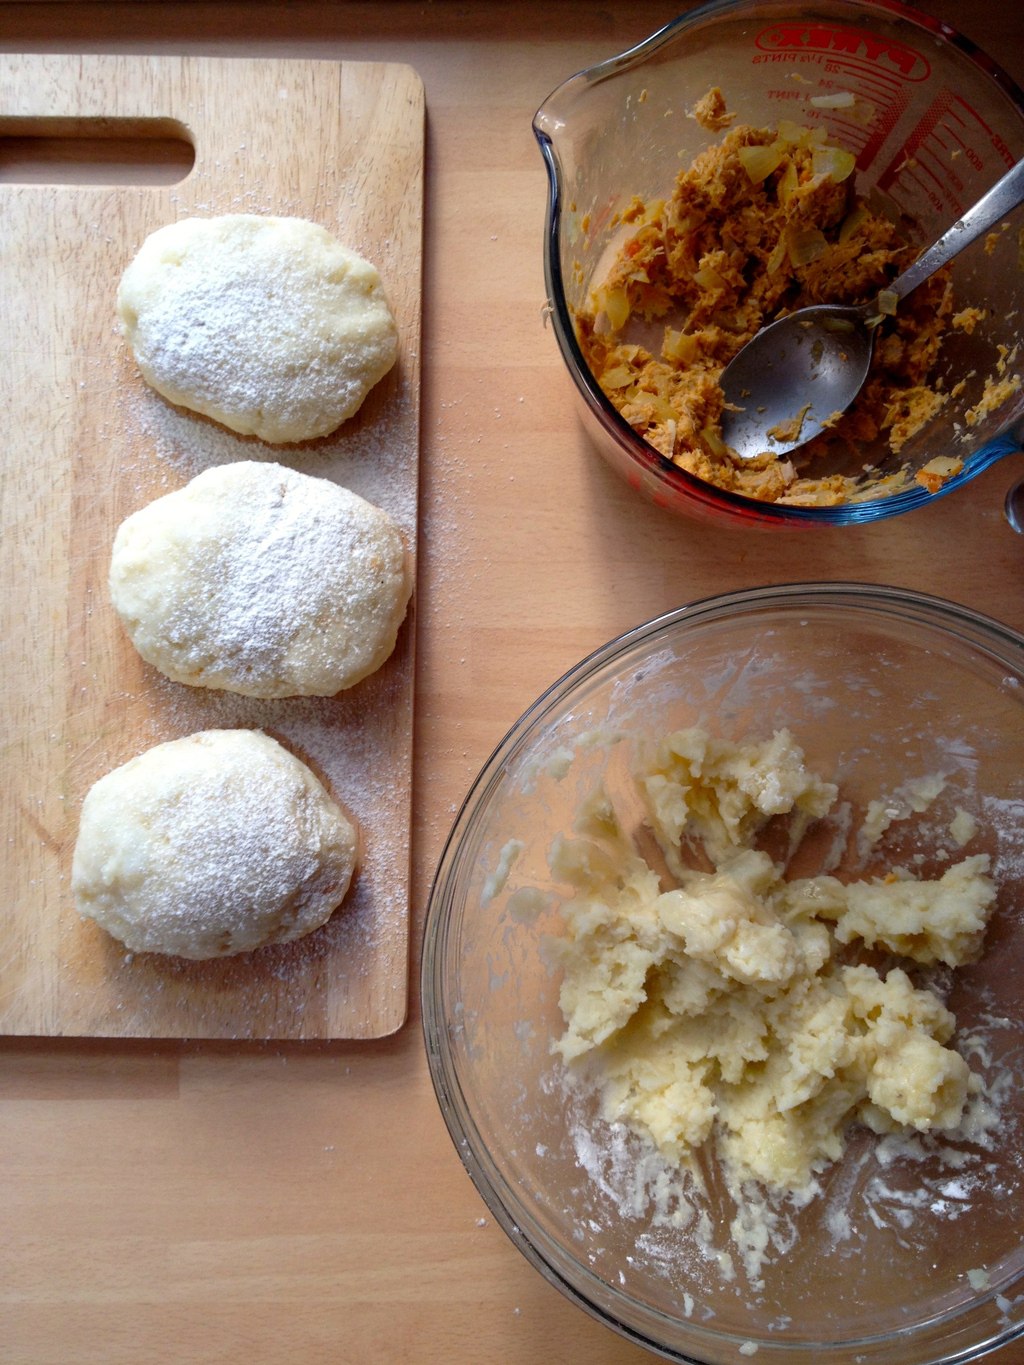
1. Make the filling by frying an onion with butter and mixing it with the rest of the ingredients. Season everything well!

2. Make the pancake dough by combining the ingredients together.

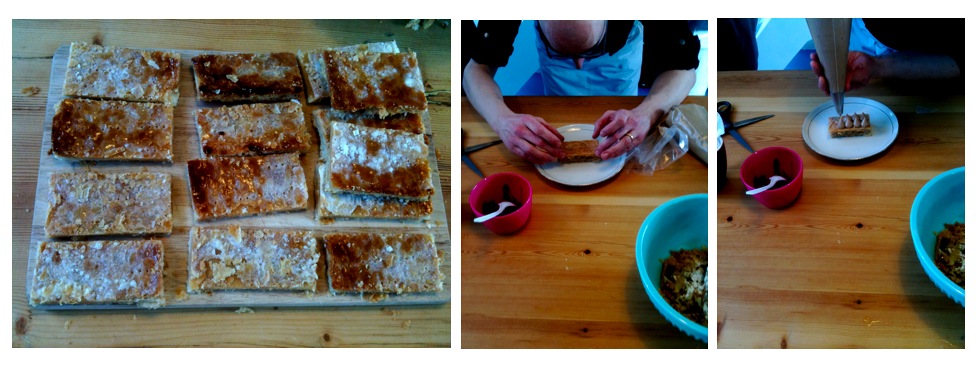
3. Take a lump of pancake dough, flatten it in the hand and insert some filling in the middle. Fold the filling in by covering with another small lump of dough.

Zemaiciu pancakes

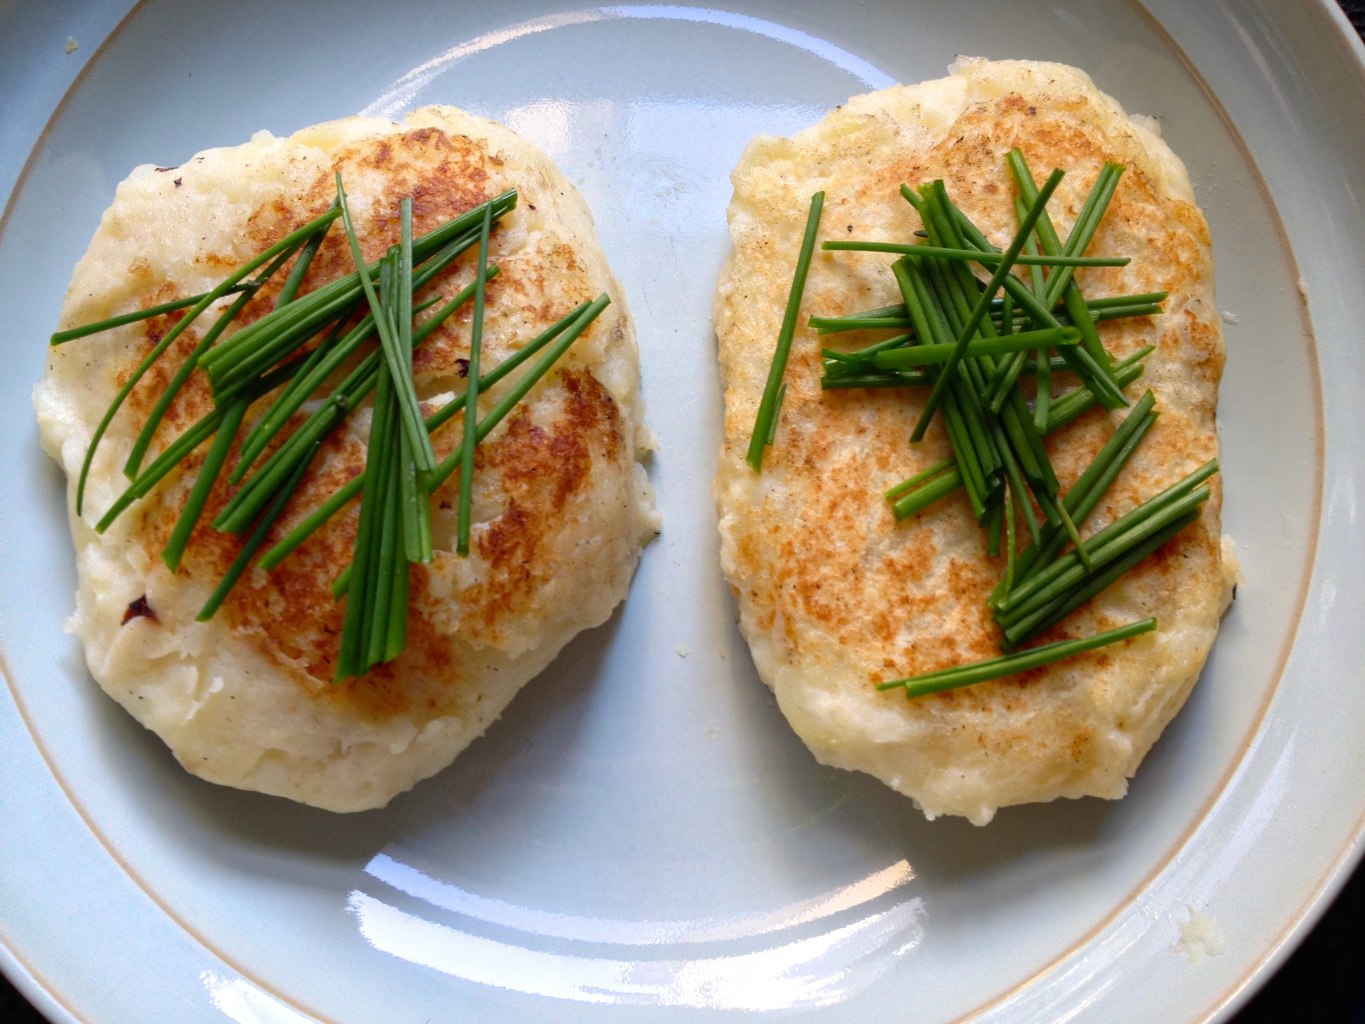
4. Fry the Pancakes on the medium heat flipping sides until both of them turns golden.

Zemaiciu Pancakes

Enjoy your pancakes today ;-)

Rasa xoxo

3

♥ ♥ ♥ Love is in the air ♥ ♥ ♥

Hey! it’s February already (doesn’t the time flies??) and I thought it is time to gear up for Valentines day. So first things first, I started to get the bakery ready with new bake lines. So pop-in when you are in need for something sweet :-).

Friendly Nettle Bakery

I am still in love with the hot beverages (still very cold outside).  If you are the same, then check out this spiked cinnamon malted drink. I am sure you will love it ;-)

spiked cinnamon malted drink

If sweet is not your thing, then it can be savoury. Check out this steak and ale pies… super yum!

Steak and ale pies

I am thinking to make more soap. I thought these citrusy heart shaped soap bars are great as gifts.

citronella, lemon and orange soap DIY

And finally, if you are planning to bake your own cake then you should defiantly try to make these cake toppers that I have recently created :-).

Heart cake toppers DIY... using washi tape!

Have fun with Valentine’s day preparation!

Rasa xoxo

0

Lost and found recipies

Apple and potato rosti

Recently I have been going through my old diary and came across this recipe for apple and potato rosti. The funny thing is that I don’t even remember writing it, but I do recognise my scribbles :D. Has this ever happened to you?

Anyhow, I went ahead and tried this recipe for brunch and it turned out a treat!

apple and potato rosti

APPLE AND POTATO ROSTI

(will serve at least 4 people)

  • 6 tbsp oil
  • 3 potatoes (pealed and grated)
  • 1 apple (pealed, cored and grated)
  • 4 tbsp flour
  • 1 egg (beaten)
  • 2 tbsp chives
  • salt and pepper to taste
  • 8-12 grilled bacon rashers to serve

apple and potato rosti

1. preheat oil in the frying pan.

2. mix all the ingredients except bacon and spoon out the mixture into frying pan. Make sure there is enough of space between every rosti. Fry for 1-2 minutes on each side.

3. Serve on top of bacon rasher.

Enjoy!

Rasa :)

0

Something for Bonfire Night

Spanish Tortilla with pasta

So what are your plans for tonight? Are you going to watch the fireworks or are you settling in for private party with bonfire? Whatever you are doing, making snack size tortilla is always a good way to go! Here is how I have made mine today, with pasta, leeks and bacon. You can pretty much substitute any ingredient with something that you already have in the fridge and this is why I love this dish! I believe every food deserves a second chance ;).

PASTA TORTILLA WITH LEEK AND BACON

  • 6 eggs
  • 1tsp dijon mustard
  • 3 cooked bacon rashers
  • 20g grated cheese (I used parmesan)
  • 1tbsp chopped chives
  • 130g cooked pasta
  • 1 leek (chopped and fried)
  • 2 tbsp rapeseed oil
  • 20 cheery tomatoes
  • a handful of fresh spinach leaves

1. Beat the eggs with the mustard and some seasoning if you would like, then add bacon, chives, pasta and leek.

2. Set the grill on high. Heat the oil in medium frying pan (iron pan preferably). Cook the egg mixture on low heat for about 5-10min.

spanish tortilla with pasta

3. Once the tortilla is set in the pan, place the pan under the grill to finish off cooking the top.

spanish tortilla with pasta

4. Remove the tortilla by placing plate or chopping board on top and flip it.

spanish tortilla with pasta

5. Slice the tortilla into the squares and serve it with spinach and cherry tomato skewers on top.

picking food

Enjoy your Bonfire Night!

Rasa :)

1

Easy chickpea crepes

chickpea crepes

Today I had chickpea crepes for brunch (I know I know, but sometimes it is just nice to start late). I make crepes quite often in general as it is great with many fillings, can be served sweet or savoury and it is quite instant. However today I am going to speak about the chickpea crepes that have an interesting flavour twist and go really well with fresh salad, yogurt, guacamole, hummus and so on… the possibilities are endless! To make proper chickpea crepes is not that easy and quick as it is egg and gluten free and has to be prepared the night before. Therefore I did come up with this quick and easy recipe that is halfway a regular crepe and socca (chickpea crepe in french). Of course if you want to do it the proper way than check out this website, but if you want quick breakfast or lunch then continue on ;)

chickpea crepes

EASY CHICKPEA CREPES

  • 50g chickpea flour
  • 50g plain flour
  • 1 egg yolk
  • 1 tbsp olive oil
  • 1 tsp salt
  • 1 tsp ground cumin
  • about 200ml water

1.  Mix the flours, egg yolk, oil and seasoning together.

2. Gradually add water while mixing it until it becomes runny, but not too watery (something like double cream).

3. Heat up the oil in the frying pan. Tip: make sure you heat the pan properly as the crepes mixture will stick less to it.

4. Pour a spoon of the mixture to the pan and spread evenly around with the spatula (use the silicon one if you have it). Otherwise if you find it easer then swirl the whole pan to make the mixture run evenly to cover the whole pan.

5. Once the top surface is dry (nothing runs on top) then the crepe is ready to turn. I carefully slide the spatula under the crepe and flip it. You may want to try to flip it in the air by tossing the pan, but that’s if you feel brave enough…ha ha

Have fun and enjoy!

Rasa :)

2

Courgette crisps

IMG_4812

Today, as I was picking the vegetables from my garden, I found one courgette that has overgrown it’s regular size. I bet, you won’t find a courgette in the shop that big! So this is why I thought of making courgette crisps :).

IMG_4787

First of all, courgette that big produces a good size chips! So this was one of the biggest reasons for my decision…

IMG_4794

COURGETTE CRISPS

  • 1 courgette
  • olive oil
  • salt and pepper
  • fresh rosemary (optional)

1. Slice the courgette into thin slices and lay it over lined baking tray. Brush the slices with a little bit of oil.

2. Chop fresh rosemary if using and sprinkle it  over the courgette slices together with salt and pepper.

IMG_4799

IMG_4802

3. Bake in preheated 100C oven for about an hour. Turn and bake for another hour again.

4. Cool it and ready to serve.

Oh… and completely forgot. Happy Vegetarian Day! These courgette crisps are dedicated to you :).

Rasa xoxo

0

Rye Bread

IMG_3867

So as I promised on the Bicycle trip to Richmond post, here I will share my recipe for a yummy rye bread.  I think it is the closest match to the bread we buy in Lithuania and surprisingly there is no sourdough starter needed.

IMG_3866

RYE BREAD

  • 145g rye flour
  • 100g white strong flour
  • 20g dark brown sugar
  • 1.5 tsp crushed fennel seeds
  • 1 tsp caraway seeds
  • 6g salt
  • 4g active dry yeast
  • 200g water
  1. mix dry ingredients with luke warm water until it is incorporated.
  2. Cover the dough with plastic and let rest for 15min. After 15min mix again for a minute or two and repeat the same process one more time.
  3. Cover the bowl with the plastic again and let it sit at room temperature for 2-3 hours.
  4. After 2-3 hour proof, stretch and fold the dough and shape into the loaf. There is a strange trick I use for this: I dip my fingers in the oil so that the dough doesn’t stick to my hands while I am shaping it
  5. Cover again with plastic and proof in the room temperature for another 45min-1hour.
  6. Preheat your oven to 200C half an hour before baking
  7. bake the bread for 30-45min

IMG_38718. Baked bread goes with many toppings like radish butter & roast beef or just butter, avocado, tomato & basil combination (my family’s favourite).

Enjoy

Rasa xox

0

Courgette flowers for lunch :b

Courget flowers

I am so blessed to have my dear friend Alex staying over at my home as he gives me so many cool ideas. Like the other day when he saw courgettes in my garden he suggested that we should eat their flowers! And I replied “are you insane?” and he went on to explain that in Italy where he is from it is actually a delicacy to eat them stuffed. So I tried frying them today according to his mum’s recipe and I loved them! The only thing is that I only had three flowers, but I suggest you have at least 4-6 per person.

stuffed courgette flowers

STUFFED COURGETTE FLOWERS

  • 6 flowers
  • 100g cream cheese (with herbs or garlic)
  • 1 egg
  • 100g flour
  • 2tbsp olive oil
  • lemon wedge to serve

1. Stuff the flowers with the cream cheese.

stuffing the flowers

2. Whisk the eggs in one bowl and place some flour in another. Dip the courgette flower in the egg and then roll it in the flour.

Dip the flowers in egg and flour

3. Heat the oil in the pan and fry stuffed flowers.

frying stuffed flowers

4. Serve still hot drizzled with lemon!

You must try this out!

Rasa ;)

0

Lentil Moussaka: Something really tasty from Alex Mackay’s cookbook

Just wanted to say how surprisingly amazing this book is! I cooked couple of things from it and whatever I was eating I was never disappointed. Today I cooked this lentil ‘moussaka’… hmm!

LENTIL MOUSSAKA

For the braised lentils

  • 1 onion
  • 2 garlic cloves
  • 1 tbsp extra virgin olive oil
  • 350ml water
  • 2 tbsp tomato puree
  • 200ml red wine (I used white wine as red one could not be found!)
  • 115g Puy lentils (used basic greens, but I am sure Puy lentils are better)
  • 200 tinned chopped tomatoes
  • 1 bay leaf
  • salt, pepper, sugar (used dark brown and quite a lot by accident, but turned out really really great)
  • 2 tbsp orange juice (oopst! I missed read that! I used the whole orange juice… oh never mind!)
For ‘moussaka’
  • 1 large aubergine
  • 2 tbsp extra virgin olive oil
  • 2tsp wine vinegar (I used balsamic vinegar as I am just little addicted to that)
  • 1/2 orange zest
  • 2 tbsp chilly powder
  • 2 tbsp ground coriander seeds
  • 125 mascarpone
  • 60g grated cheddar cheese
  • some parsley for deco (my own touch)
So I began with the lentils as that takes more than an hour…
I started with frying the onion and garlic, then added tomato puree after 7min or so. Then added wine and lentils.
Then I added tinned tomatoes, bay leaf and water and put it into the preheated oven (170C) covered (had to switch the pots as the one pictured above was not suitable for oven, one more reason why I should read the recipe before cooking!). After 30 min I have removed the lid as instructed and carried on cooking it in the oven for another 30min. When finished I just added sugar, salt, pepper and orange juice. This is the result…
Next, I cut the aubergine in four slices (lengthwise) and brushed it with vinegar and olive oil which then got baked for 20min in oven at 230C.
Meanwhile I prepared all the little things like ‘cheese sauce’ (mascarpone and cheddar cheese mix) and orange zest mixture (zest, chilly and coriander).
Oh,  and you might be asking why I still have orange juice in this picture, did’t it go into the lentils? Well… I made this mixture way before everything (sorry to be so confusing).
So, once I got the aubergines out of the oven I started layering. This went like this: first two aubergine slices, than the lentils, then orange zest sprinkles, then the second aubergine slices, then the cheese mix, then the orange zest mix… got the picture? Really useful tip from Alex Mackay in regards to spreading cheese mix: heat the butter knife in the hot water as this makes the spreading much easer!
And now into the oven for 20 min.
Enjoy!
Rasa :)
0

Pickled Cucumbers (the Lithuanian Way)!!


As the barbecue season is soon approaching I felt like making cucumber pickles. I pickles in my burger!  Anyway, what I really like is the Lithuanian version as there are no vinegar used in the process, therefore it taste really yummy without any harsh taste. I called my dad for the tips and here is what I did…

PICKLED CUCUMBERS

Ingredients5 cucumbers (I bought them from green groceries as the long
                                          cucumbers in the supermarket would not work)
                   2 handfuls of dill (very important)
                   1 handful of blackcurrant leaves (my dad said this is important, 
                                                                       but I could not find so I did not add)
                   1 handful of cherry leaves (optional and I did not have any anyways)
                   1 hanful of oak leaves (optional, do you know any oak tree in London?)
                   1 sprinkle of fennel seeds (optional)
                   5 pepper corns
                   3 garlic cloves
                   lots and lots of salt
                   1l boiled water, cooled down to lukewarm 

So first thing first (very simple), put all the ingredients into one pot, glass jar or a bucket (I used a vase actually)… whatever!

I used ceramic baking beans on the saucer to weigh the contents down (the cucumbers tend to float). My dad usually use a stone, but I did not find any suitable. The important thing is not to seal them as it might explode due to gases passing through (I know that sounds creepy, but it’s worthy!). After just a few days here come the results!
Now you only need other components for the burger like coleslaw (try sunflower oil with caraway seeds instead of mayonnaise), sliced tomatoes with sour cream and chives + most importantly fried onions (I like it caramelised with some balsamic vinegar and sugar).
As for buns I baked them all from scratch sprinkled with some caraway seeds again (can’t have too much of it!)
 And finally the burgers – have them which ever way ;)
Rasa xo
1

Happy New Year’s day!… Waffles anyone?

I have finally got an old fashion waffle pan that I have been searching for quite a while now! Luckily my grandma had it in her attic, perfect for my new “culinary” experiments…. So since I came back to London I have been making waffles like mad: starting from basics until I got carried away with the most random ingredients (good combinations however!). The beginning have been quite challenging of course as you would expect. In fact we have a saying in Lithuanian that sounds something like this “first pancake never comes out right”, which describes my trial very well. Now when I nailed it I can make waffles (on the old fashioned cast iron waffle pan), while chatting or playing Sims online (really embarrassed by that). So far I made plain waffles, blueberry waffles, bacon cornmeal waffles and rosemary-garlic potato waffles. My friends loved bacon cornmeal waffles that taste like America. However I am voting for the rosemary-garlic potato waffles which reminds me of Lithuanian potato pancakes with the Italian twist. Try it for yourself (regular waffle maker will do)!

ROSEMARY-GARLIC POTATO WAFFLES
Serves 3-4 people

Ingredients: 2 medium sized potatos
2 eggs
125g plain flour
60ml olive oil
1 onion (peeled and finely chopped)
160ml milk
4 garlic cloves (peeled)
1/2 tbsp rosemary
salt and pepper to taste

1. Peel, wash and cut the potatoes into uniform small pieces. Put potatoes and garlic in a large pot with cold water to cover. Add a pinch of salt and bring to a boil. Then lower heat and cook until potatoes can be pierced easily with a fork drain, reserving about 60ml of potato/garlic water.

2. While potatoes cook, heat olive oil, rosemary and chopped onion in a small frying pan over low heat just until onion softens a bit. Transfer potatoes to a large mixing bowl. Pour oil and onion over drained potatoes.

3. Add milk to still-warm frying pan – just to take chill off – then pour milk over potatoes. Using a fork, a potato masher or a spatula, mash potatoes with oil and milk.

4. Add potato/garlic water and continue to mash until mixture is smooth.

5. Taste potatoes and season liberally with salt and freshly ground pepper. Preheat waffle iron and finish batter by beating eggs into potatoes with a whisk or handheld mixer. Combine together flour and potato mixture.

6. Lightly butter or spray waffle iron grids. (You can skip this step with well-seasoned or non-stick materials.) Scrape batter by half-cup measure onto hot iron, smoothing batter evenly almost to edge of grids.

7. Close iron and bake until brown and crisp.

I suggest you serve it with cream fresh to make it more Lithuanian-ish ;)

Rasa xox

1

My trip to Italy

I will start with the official news that I am back to London and the fact that I am experiencing mild writer’s block condition (not that I consider myself a writer). So beware of this minor problem as I progress with writing my quick story. Also would like to mention that I no longer work in the cafe… who knows what the future will bring? But for now am focusing on settling in London whilst still feeling really privileged for my year experiences in Windsor.

Anyway… moving on! I had a short gap between moving to London and leaving the cafe job so I did little bit of traveling. I visited Italy, Greece and Lithuania (of course!). What I am going to talk about now however is Italy since it is what the title is suggesting. And since I am only telling short story I will only focus on FOOD. And believe me food was the biggest part of this trip! At least in my opinion…

And the most amazing thing is that we were staying at our friend’s Alex house! You see, I was able to witness the real Italian cuisine. Thanks to Alex’s mum as she was really wonderful hostess and cooked three course meal every time. She even showed me how to make gnocchi which is my favorite! I mean, I knew how to make these potato dumplings before, however that used to take me forever. This time I defiantly feel more confident as Alex’s mum (sadly forgot her name) demonstrated a good technique how to make them quicker. I am also amazed that her recipe had some ricotta cheese which made gnocchi even more soft and tasty! Try it for yourself….

GNOCCHI WITH PEAS AND PROSCIUTTO HAM

Ingredients (feeds 4 gnocchi lovers):  300g ricotta cheese
2 egg yolks
250g potatoes (boiled, pealed and mashed)
130g flour plus some for rolling
100g hard cheese like Parmesan
1tbs butter
1 leek
200g sweet peas (can be from frozen)
250ml vegetable stock
4tbsp cream
4 slices prosciutto ham
olive oil
salt and pepper

1. First, make the dough by mixing ricotta cheese, egg yolks, potatoes, flour and Parmesan together.
2. Then, prepare the sauce. Chop the leeks and fry them with butter. Then add peas, stock and whiz it up all together with hand food processor. Let it cook for further 2-3min and after taking it of the heat add the cream and season to your taste. Set aside.
3. Make the gnocchi by rolling the pieces of dough on the floury surface and then cutting them into little pieces (see picture above). To make them textured roll each gnocchi piece against the fork ribs. Lay them in floured plate by leaving some small gaps between them as they really like to stick together.
4. Lay prosciutto ham slices onto foil and bake for around 15 min until it is slightly golden. Take it out to dry.
5. Cook gnocchi in lightly salted boiling water. But don’t go away too far away as the little pieces of gnocchi soon rises up to the top and that’s when you should fish them out.
6. To serve mix gnocchi with sauce, little olive oil and dish them up. On top of each plate add crispy prosciutto slice and maybe some Parmesan of course.

Buon appetitio!

Rasa xox

2

"Little Paris Kitchen": the breakfast treats

“Little Paris Kitchen” is the new program on tee-vee that made me to forget my beloved “Desperate Housewives”. And it’s not that there is anything to compare between them two! I used to be really devoted to watching a little of Wisteria Lane mysteries, but now I am just dazzled by this grand appearance of Rachel Khoo and her wonderfully looking food, style sense and her little kitchen. I love her lifestyle so much… in fact I even feel a little bit jealous.

Even though there have been only two series, I have managed to try some of “Little Paris Kitchen” recipes myself: two breakfast treats! First I tried Croque Madame muffins as seeing it how it was created really inspired me!

Then I made these Eggs in pots (oeufs en cocotte)…

And I can say that I finally found something better for breakfast than Eggs Benedict…. and it is easier to make! Except I used bacon instead of lumpfish roe since is really difficult to find it in UK. Here is the recipe.

EGGS IN POTS

Ingrediants:    150g creme fraiche
                       salt and freshly ground black pepper
                       pinch nutmeg
                       handful of chopped dill
                       4eggs
                       1 rasher of bacon
  1. Preheat the oven to 180C
  2. Season the creme fraiche with salt, freshly ground pepper and a pinch of nutmeg.
  3. Place a heaped tablespoon of creme fraiche in the bottom of a ramekin, followed by a little dill.
  4. Crack an egg on top, add a second tablespoon of creme fraiche and sprinkle with a pinch each of salt, pepper and nutmeg. Add small tear of bacon on top. Repeat all this with three more ramekins.
  5. Place the ramekins in a baking dish and pour enough lukewarm water into the dish to come halfway up the sides of the ramekins.
  6. Bake for 15 minutes or until the egg yolks are set to your liking.
  7. Finish each serving with some dill.

Bon Appetit

Rasa ;)

2

My French pastry baking class

I know we are coming to the end of the week, but guess what I did last weekend! You obviously thinking: “of course it is going to be a French pastry course, since you have written that on the title”! Yes yes… that is exactly what I did and it’s because I wanted to face my fear and finally be able to bake all these complicated pastries (especially puff pastry since it is more time consuming than I thought). Our tutor Pino Ficara taught us to bake Praline Mille Feuille (Napaleon Pastry)…

…Chocolate Eclair, Madeleine…

… and Creme Brulle….hmmm!

I was particularly happy to see savory option there as after all this sweet I felt a little too overwhelmed (I had cake before the class – really bad idea). Here it comes….

“PISSALADIERE” OR SAVORY PASTRY TART

Ingredients: 250g puff pastry
1 onion, thinly sliced
1 courgette, quartered and sliced
1 aubergine, quartered and sliced
1 red pepper,  cut into julienne
oil, butter, salt, sugar, pepper

1. Pre-cook vegetables: in deep pot over low heat add butter and olive oil, add onions, pinch of salt and about 1 tablespoon of sugar. Let onion cook gently without coloration, remove onto tray lined with foil and let cool.
2. In a oven tray add enough oil to barely cover bottom and over medium heat cook all the vegetables separately until tender. let it cool.
3. Preheat the oven at 200C. Roll puff pastry into square, place on the tray lined with baking paper and with a fork prick dough well to prevent it from puffing too high when cooking.
4. Place cooled onion onto ready pastry,

then arrange the other cooked vegetables.

Brush the sides with the egg yolk for the glaze…

Bake immediately until golden, let cool a few minutes before slicing and serving.
If you would like to attend the french pastry class yourself like me, go to  http://www.bakewithmaria.com/courses/
Rasa :)
1

My bumpy ride on learning how to bake the perfect bread…..

As I my plans to open a Cafe becoming more and more real I have started thinking about the menu. So I thought to myself: “what Cafe is without sandwiches and what sandwiches are without nice bread?”. At that time I have decided to learn how to bake the bread. Yes, I can bake cakes, but to bake bread is the whole new game. The only bread baking I have done in the past is by bread making machine. Should this count? I actually don’t like machine bread anymore as it always comes out square shaped and taste like any other bread. I like the rustic look and that’s what I want to achieve with my sandwiches as well.  So firstly I checked out few courses and I did find them super expensive (this is probably why I have no formal training on cooking or baking). However I came across this blog where the blogger (Maria) offers courses at her own house and that’s definitely cheaper! Anyhow I have bought loads of book for bread baking as I could not wait for my next lesson. As I really got bored with basic bread (probably because of the baking machine I have) I went for this Hungarian potato bread recipe (picture above). Sounds amazing, but sooo messy. You see, the dough was so sticky that I kept adding flour which did not help much. Also, I started in the evening and I did not realize that this would take me 4 hours! I thought I would leave it to rise (from yeast) overnight, but then the book warned that it may over-rise if I leave it for more than two hours so I got stuck with it for a night (I kept alarm clock so I could wake up to do another step for the bread cycle). I also got really sick as I have this really bad habit to taste everything I cook or bake so I did the same with the bread dough (I know, I know really bad, but I have done it with the cake dough and I was fine). And they say that it is unhealthy to eat warm bread, but this must have been worst! Eventually I got the result, which was not too bad, only that the crust was super thick and a little bit burned. Never mind I will get it improved! It is only my first time and nobody can judge me for the bumpy start! Therefore I am not giving away the recipe until I am super confident about it. For now I will give a recipe for the sandwich that I made with that bread. I must say I have enjoyed and was proudly eating during the lunch time. It was so good that I forgot to eat my soup that I usually eat with the sandwich!

PARMA HAM, FIG & MOZZARELLA SANDWICH
Ingredients: small bunch rocket salad
                    3 ripe figs (cut in quarters)
                    175g mozzarella cheese (thorn into pieces)

3 slices Parma ham (thorn into smaller pieces)
1tbsp honey
1tbsp lemon juice
fresh ground black pepper
butter for spreading
4-6 bread slices (or more, it all depends on how much of sandwich filler you put on one slice)

1. combine all the ingredients except the bread and butter
2. Butter the bread slices (very important as butter stops sandwich from becoming soggy)
3. Apply Sandwich filler!

The end ;)

Rasa

1