Top

Archive | Sustainable Living

Kitchen organisation ideas: jars

Kitchen organisation ideas: jarsOur kitchen completion is so so close that I can almost taste it! It’s those small little details that takes forever to finish, I don’t know why is it often like that. In order for us to move into our new kitchen (we are lucky to have an old kitchen in other part of the house), we still need to fill some gaps, touch paint, silicone and fit the shelves.

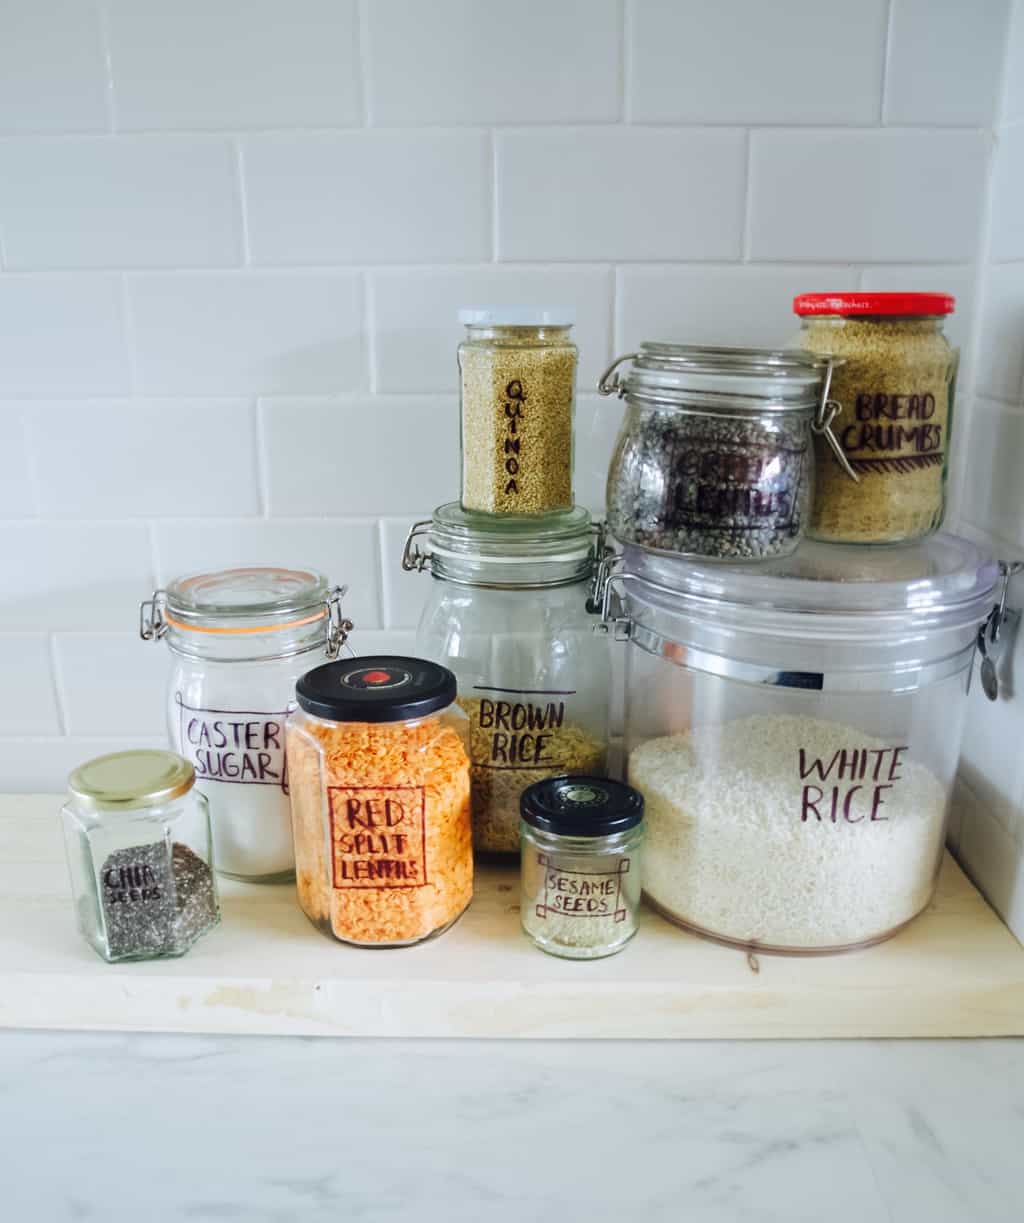
I am so excited about the shelves though! I love the open display plan. I already started preparing storage solutions that looks good and is a decoration itself. You guessed it right, jars are going to be my focus!

Jar storage solution is not a new invention, it’s just got really trendy in recent years. You can buy mason jars easily anywhere, however I don’t believe you need them to achieve the look. Although I do own few mason type of jars, majority of my jars comes from recycling. That’s right! I use a lot of jars that had were storing pickles in their past life. I think reusing these type of jars is so much better than recycling itself. It’s better for your pocket too!Kitchen organisation ideas: jars
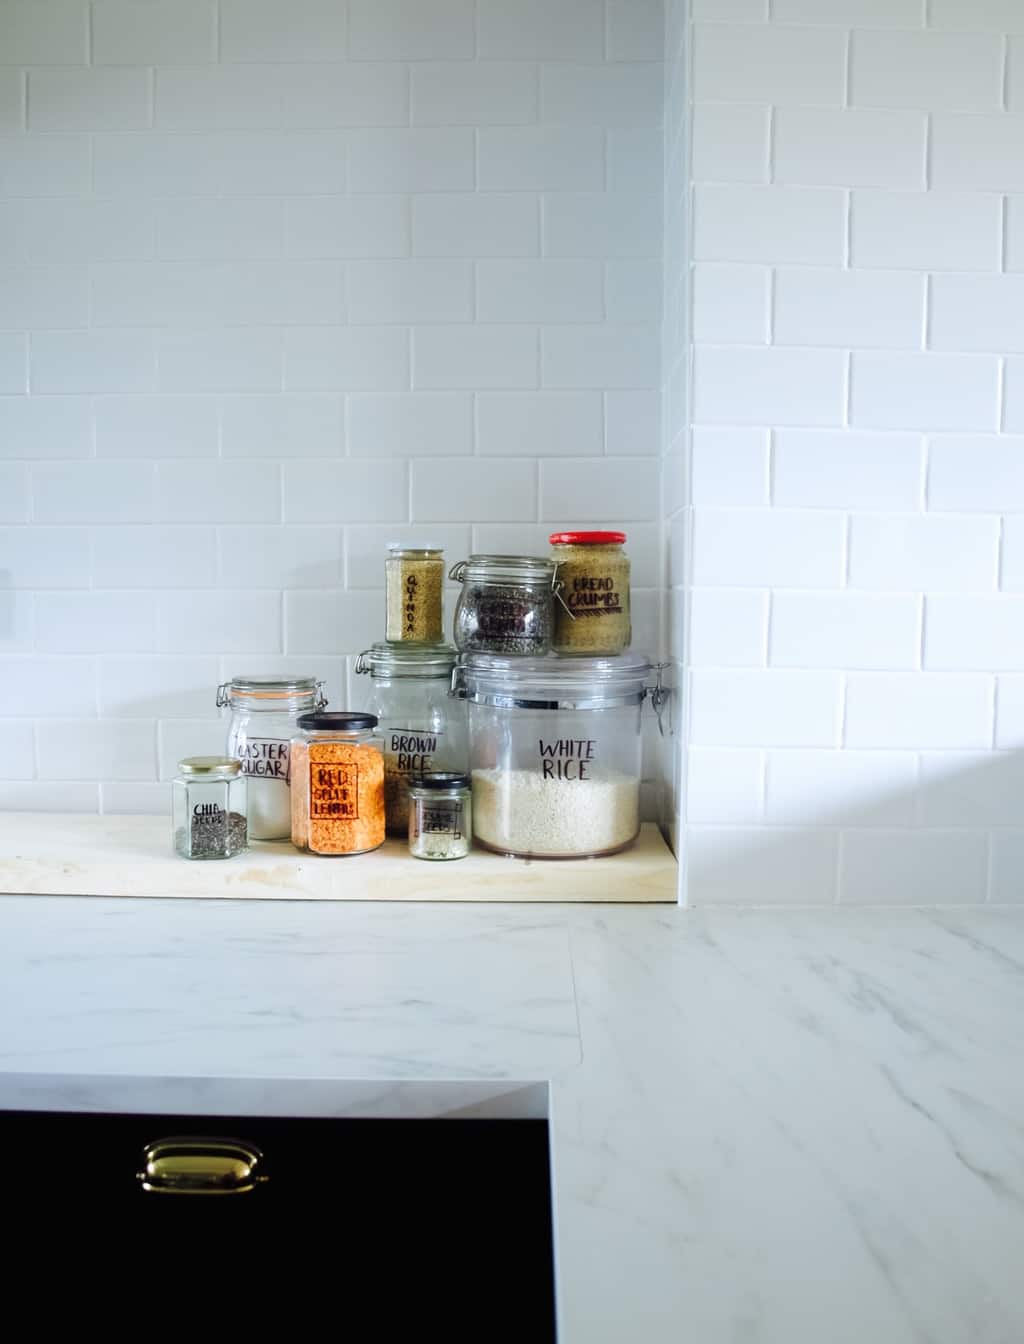
To begin with I started sorting out our grains, sugar, flour, seeds etc etc. I looked through lots of loose bags and I was little surprised to find some stuff that I did not even know I had (like quinoa). I stored these into right size jars according to the amounts, the use and the size I tend to buy them in the shop. For example, I hardly ever eat quinoa (don’t really like the taste of it) so it ended up in the tiniest jar the whole lot could fit. It’s different with the brown sugar and although I had a tiny amount of it left I stored it in a lager jar.Kitchen organisation ideas: jars
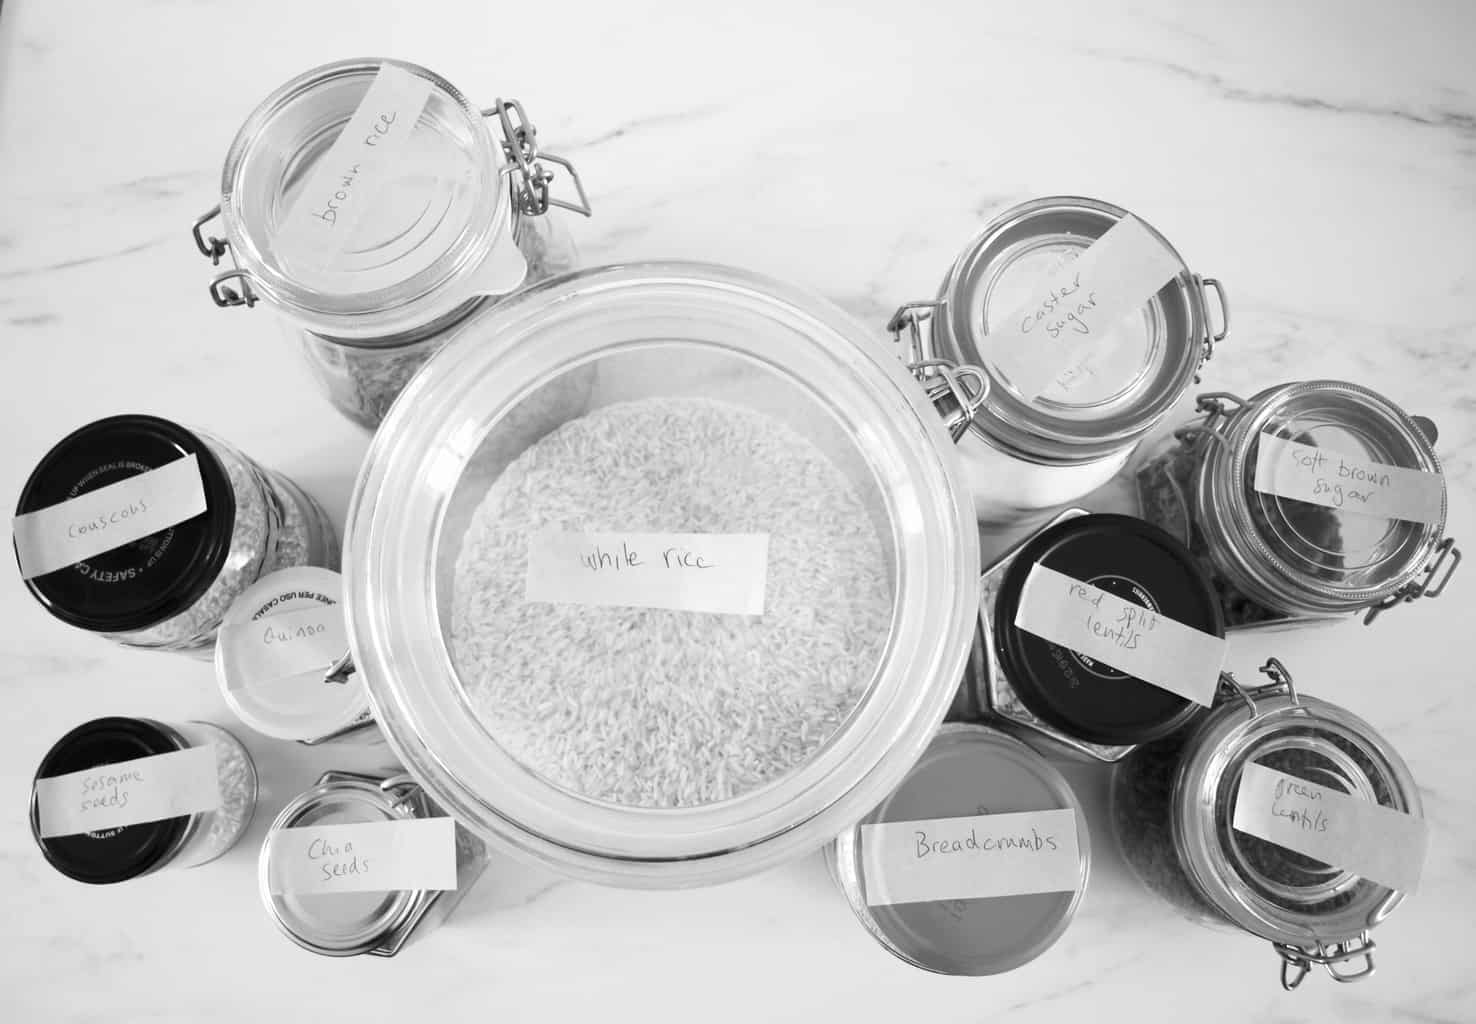
As for labels I decided to go paperless. I got inspired by these and since my handwriting improved I thought I will give a go. I used basic black permanent pens instead of oil based paint pens. I experimented on the paper before going ahead and scribbling on the jar.Kitchen organisation ideas: jars 
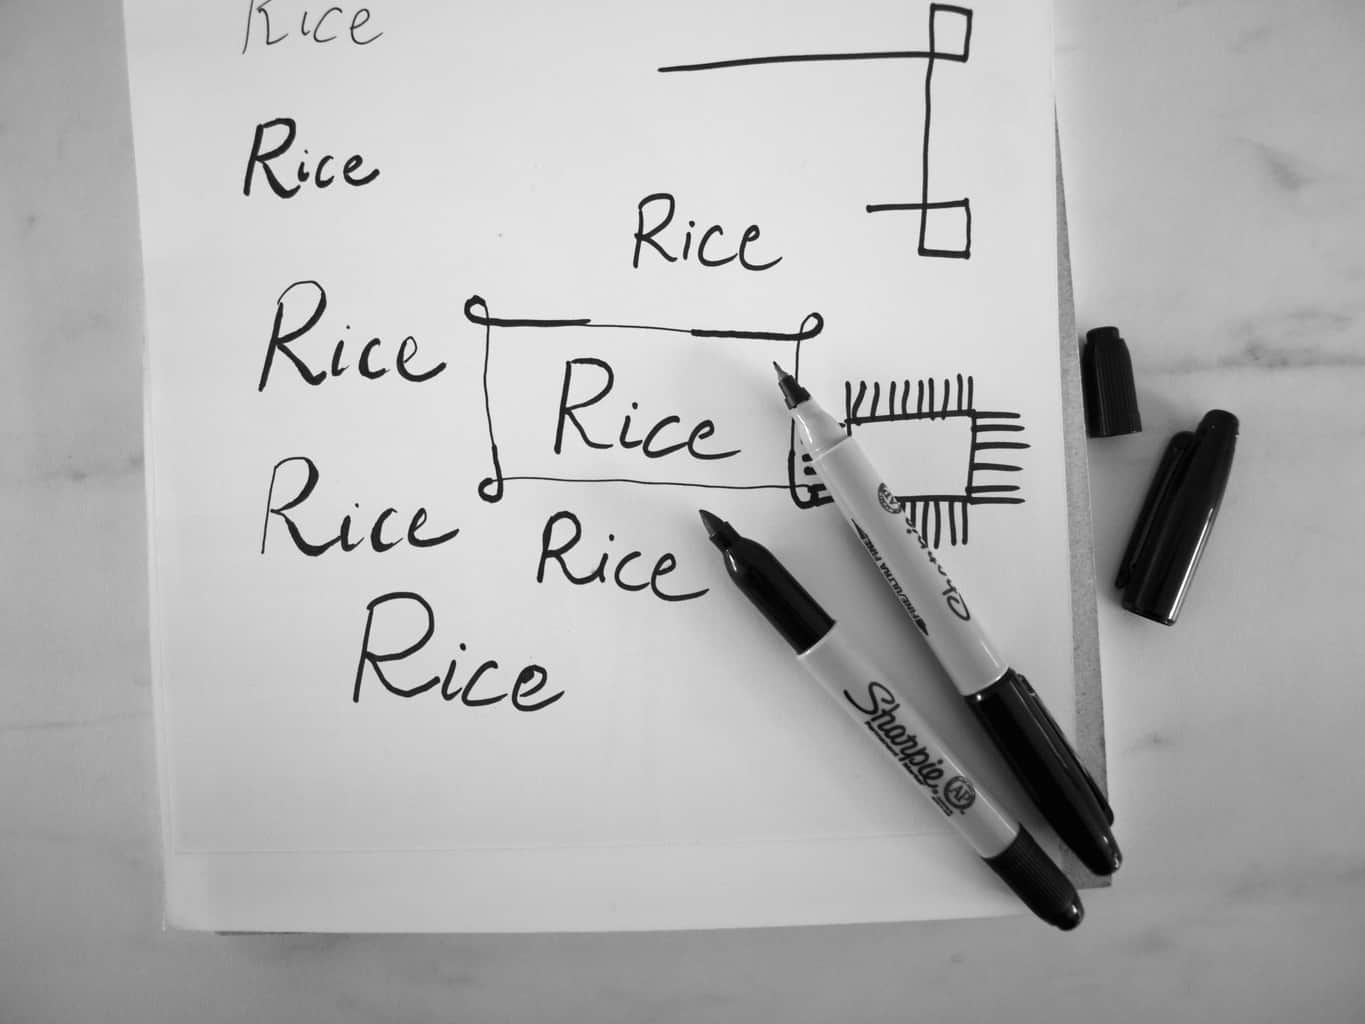
Although the pens are permanent, it can be easily wiped out with some acetone or other type of solvent.Kitchen organisation ideas: jarsKitchen organisation ideas: jars
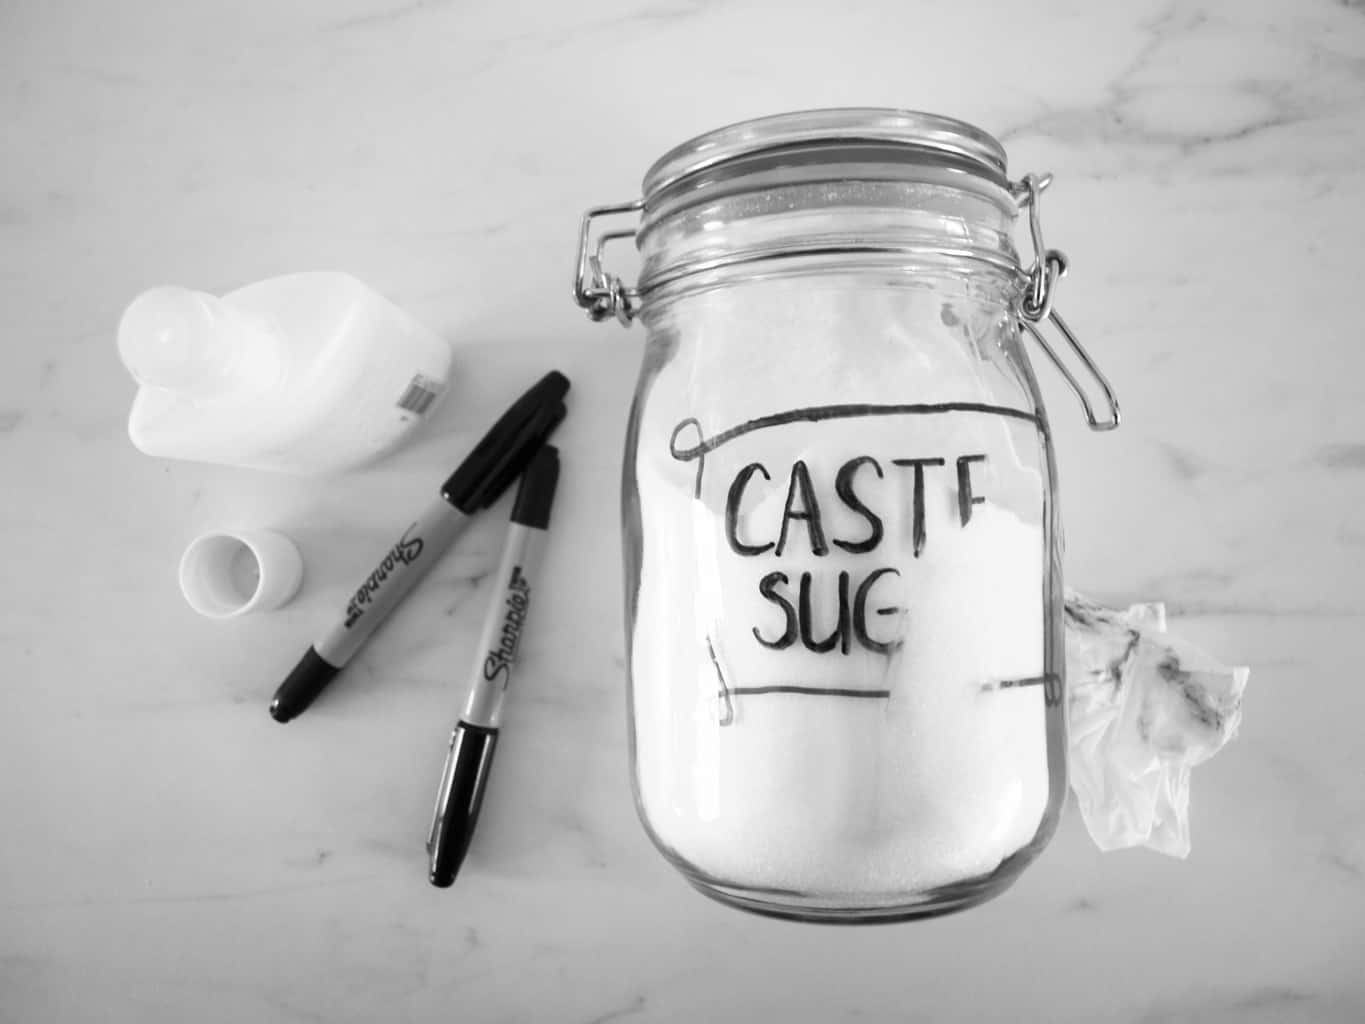
Hope you like my jar organisation idea and get to adopt it at your home.

Rasa xoxo

1

Quick and easy liquid hand soap recipe

Quick and easy liquid hand soap recipeI have a little confession to make. When I go shopping for cleaning products or cosmetics I often judge it by its cover. I feel very very embarrassed by it as I made very bad (spontaneous) decision few weeks ago. I saw this handwash in a pretty packaging at Aldi and without much research or checking ingredients label I went and bought it…. Just because it looked stylish! I placed this bottle of hand soap by our kitchen sink and after first use I was hugely disappointed. A hand soap that supposed to smell like grapefruit stunk like cheap perfume. Not something you want to smell when preparing the food. This is when I decided to make my own liquid hand wash.

Now I made liquid soap before my friends, but honestly that recipe I used before never been used again. Why? Because it was not easy enough to make! I knew I needed a recipe that is quick to make and I could just mix something up when I run out. I was hoping to make soap in small quantities that does not need to be stored. After some research I came up with the recipe that is simple and easy and hopefully uses ingredients you already have (if you made any cleaning products before like this laundry liquid). I realised that the magical combination for perfect liquid hand soap is liquid castle soap, oil, essential oil (for a lovely smell) and water. For oil you can use glycerol or even fractionated coconut oil to make antibacterial soap. For water I saw people often use distilled water, but I used cooled boiled water instead.Quick and easy liquid hand soap recipe To make your own hand soap you will need:

  • about 300ml soap dispenser
  • 130ml liquid Castile soap
  • 70ml oil (I used glycerol instead as I had some already)
  • 15 drops essential oil (I used lavender)
  • cooled boiled water

Quick and easy liquid hand soap recipe Pour the Castile soap, oil and essential oils into the dispenser bottle.Quick and easy liquid hand soap recipe Fill up the rest of the dispenser with water.Quick and easy liquid hand soap recipe Voila, it is that easy!Quick and easy liquid hand soap recipeHope this has been useful

Rasa ;-)

0

How to make your own laundry liquid

All natural laundry liquid recipeLiving sustainably does not mean going extreme, I believe every little bit helps (oops, did not mean to sound like Tesco slogan). I dream to be completely sustainable one day, but for now I only choose the steps towards it that have immediate benefits for us (like reusable food wraps I made last month).

So this month I have been researching about cleaning products (all natural as possible of course!!!). I am very sensitive to synthetic and strong smells, so this was my main driver for going ahead and making some myself. Because I thought I could make cleaning products that smell nice and do not break the bank.

I made laundry liquid first because I was keen to make something for Tomas who has eczema. I heard that added perfumes and other nasty bits can make eczema worse! I looked at a few laundry liquid recipes and decided on the ingredient combination that I though would work best and that are easily accessible in UK (so you won’t find any borax in my ingredient list!). I added some lavender essential oil so now my laundry liquid smells very similar to the Ecover liquid that we tend to buy. All natural laundry liquid recipeTo make your own laundry liquid you will need:

  • 240g soda crystals (similar to Borax but not the same)
  • 50g bicarbonate soda (can be baking type)
  • 150ml liquid Castile soap
  • 800 ml boiling water (it needs to dissolve soda mix)
  • 20 drops essential oil of your choice (I used lavender)
  • large bowl or a jug
  • whisk

All natural laundry liquid recipeMix soda crystals with bicarbonate soda. Gradually add boiling water and the Castile soap while whisking. Continue whisking till it combines well and the soda is dissolved. You should end up with foam on top.All natural laundry liquid recipeLet the laundry liquid cool down and then add essential oil if using.All natural laundry liquid recipePour the laundry liquid into jars or bottles. Use half a cup per wash, so the recipe last for about 12 loads. I already did a few washes and I must admit I can’t see much of a difference between shop bought and mine, except the homemade one is much cheaper. Besides this laundry liquid is so quick to make and uses similar ingredients that other cleaning products need. So essentially you only need a few basic ingredients to make many cleaning products for around the house!All natural laundry liquid recipeHope you found this useful ;-)

Rasa xoxo

1

How to make reusable food wraps (to replace cling film)

Reusable food wrap DIY (with wax and resin)The thing is that I always dreamed of living sustainably, even before it be became popular. Sometimes I succeeded and sometimes business just took over my life and I had to cut some corners. The bottom line is I passionately hate waste and I feel like my heart bleeds when I see stuff wasted when it could have had another life (hope I don’t sound like a hoarder, because I am definitely not!!).

When it comes to sustainable living I believe it comes to choosing the products that should also benefit us directly (not only the earth). You see I dislike wasting money too (or even seeing somebody else wasting theirs). Which is why I always look out for things I could make myself and save money that way. For instance, last week I made some reusable food cloths, because I thought it would be lovely not to use as much cling film. I know, I know, this is not our biggest household waste (nappies and baby wipes are), but you’ve got to begin somewhere! I researched quite a few recipes and methods, so trust me you are getting the best here! Although after making some wraps I had a few other ideas how to make it even easier and cheaper.

To make these reusable food wraps you will need:

  • 130g wax (I used some wax thats been given to me by my mother in law who keeps the bees)
  • 26g pine rosin (or any other tree resin)
  • 4tsp jojoba oil
  • about 5-7 squares of light, woven cotton
  • pinking shears
  • old pot
  • old paint brush (optional, you will only be using it just for this)
  • baking paper
  • iron with the ironing board

Reusable food wrap DIY (with wax and resin)First cut your fabric to size. I used pinking shears as this really helps to stop fabric from fraying

Put the wax, rosin, and oil into the pot and while stirring heat all the ingredients till melted. I think because I used not well filtered wax it had few black bits in it. It did not cause too many problems in the end result but it did leave a few black speckles on the cloth.Reusable food wrap DIY (with wax and resin)As you brush the wax mixture onto the fabric it hardens very very quickly. I think I was too generous with it (so be stingy). The excess wax created lots and lots of mess later. I felt like a brush is not necessary here as the wax hardened after few strokes. I think I will try just dipping the fabric straight into hot wax next time. I imagine that should give good coverage without the wax hardening onto the surface. But of course I could be wrong!Reusable food wrap DIY (with wax and resin)So here comes the mess I was talking about. In order to impregnate the fabric with the wax mixture completely, the fabric needs to be reheated. When I researched how to make reusable food wraps it seemed that one of the most popular methods to reheat the wax in the fabric is to stick it into the oven. That seemed a bit limited by oven size and I imagined it would be messy (plus the oven tray to clean up). I guess I failed to avoid the later! I used baking paper to sandwich the waxed cloth and heated the wax and the fabric once again by ironing it. In my case the excess wax spilled everywhere: the floor, another layer of baking sheets (I wasted whole roll!!), and the ironing board (thankfully not the iron itself). This wax mixture was very sticky to clean because of the resin (special ingredient to make the cloths clingy). Definitely NOT applying that much wax liquid on the fabric next time!!!Reusable food wrap DIY (with wax and resin) The cloth cools almost immediately and can be used a few minutes after making it.Reusable food wrap DIY (with wax and resin) As I mentioned before the resin mixed in with the wax makes the wrap slightly sticky against itself which is why you can use this exactly as you would use cling film.Reusable food wrap DIY (with wax and resin)Hope you found this very useful and you can learn from my mistakes.

Rasa ;-)

2