Top

Archive | Sweet Treats

Super easy fresh strawberry ice-cream

Super easy strawberry ice-cream, only three ingredientsWhile in Italy I fall in love with strawberry ice-cream, otherwise called gelato alla fragola. You might think this is very basic, but actually it taste really refreshing as it taste of real strawberry! Sadly, I often find the shop bought strawberry ice-cream taste like candy powder.  Super easy strawberry ice-cream, only three ingredients
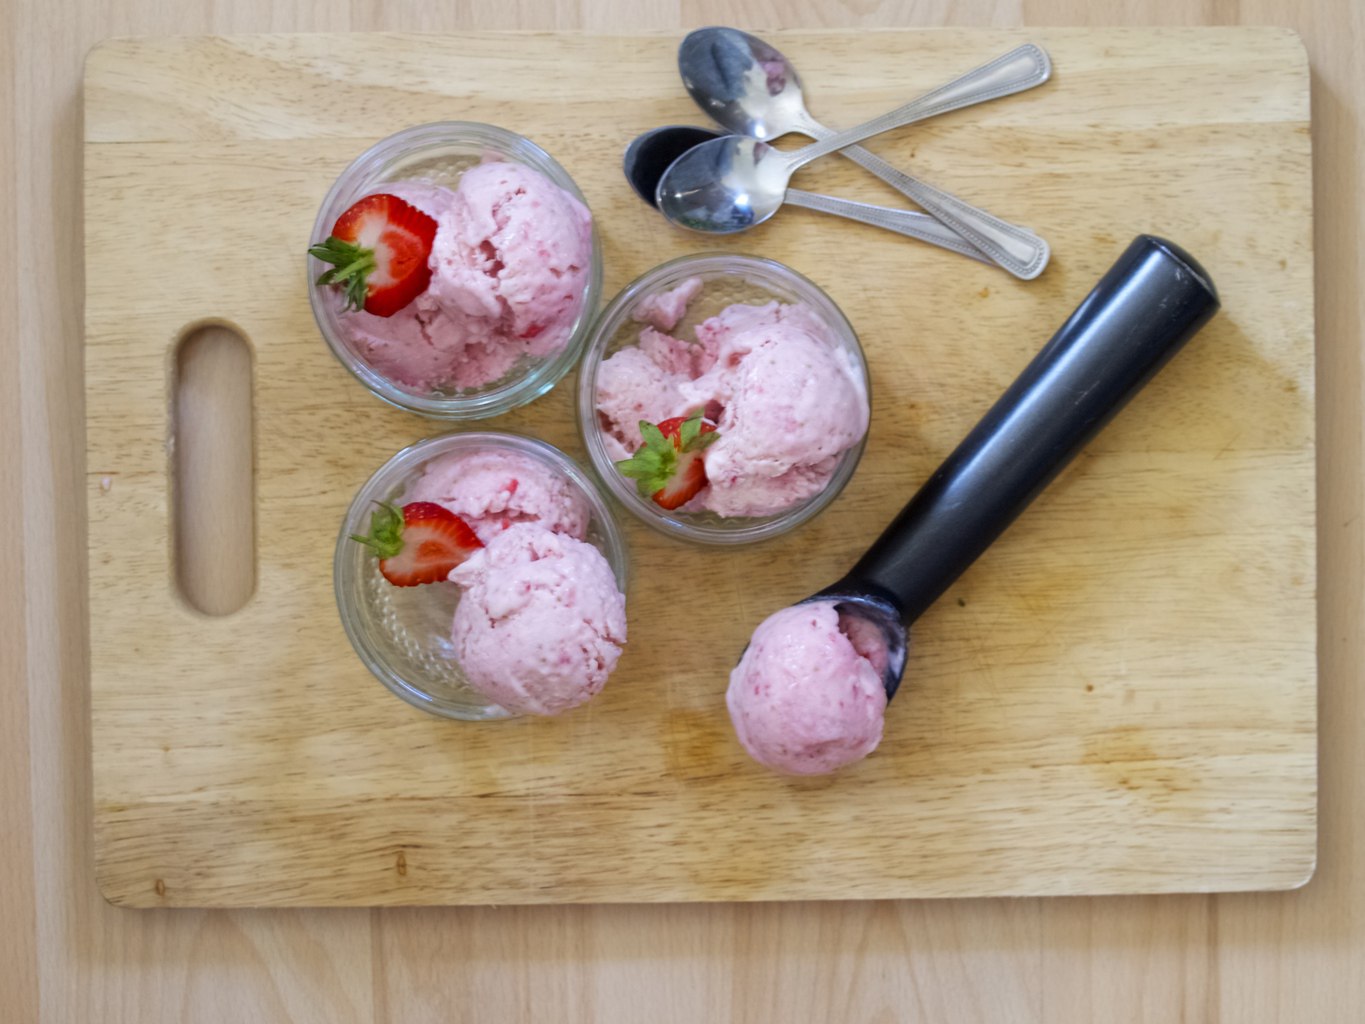
This strawberry ice-cream might not be traditional Italian, but it is really easy to make as it requires little effort. Unlike other ice-cream I made it doesn’t contain any egg and there is no need to keep mixing it while freezing!

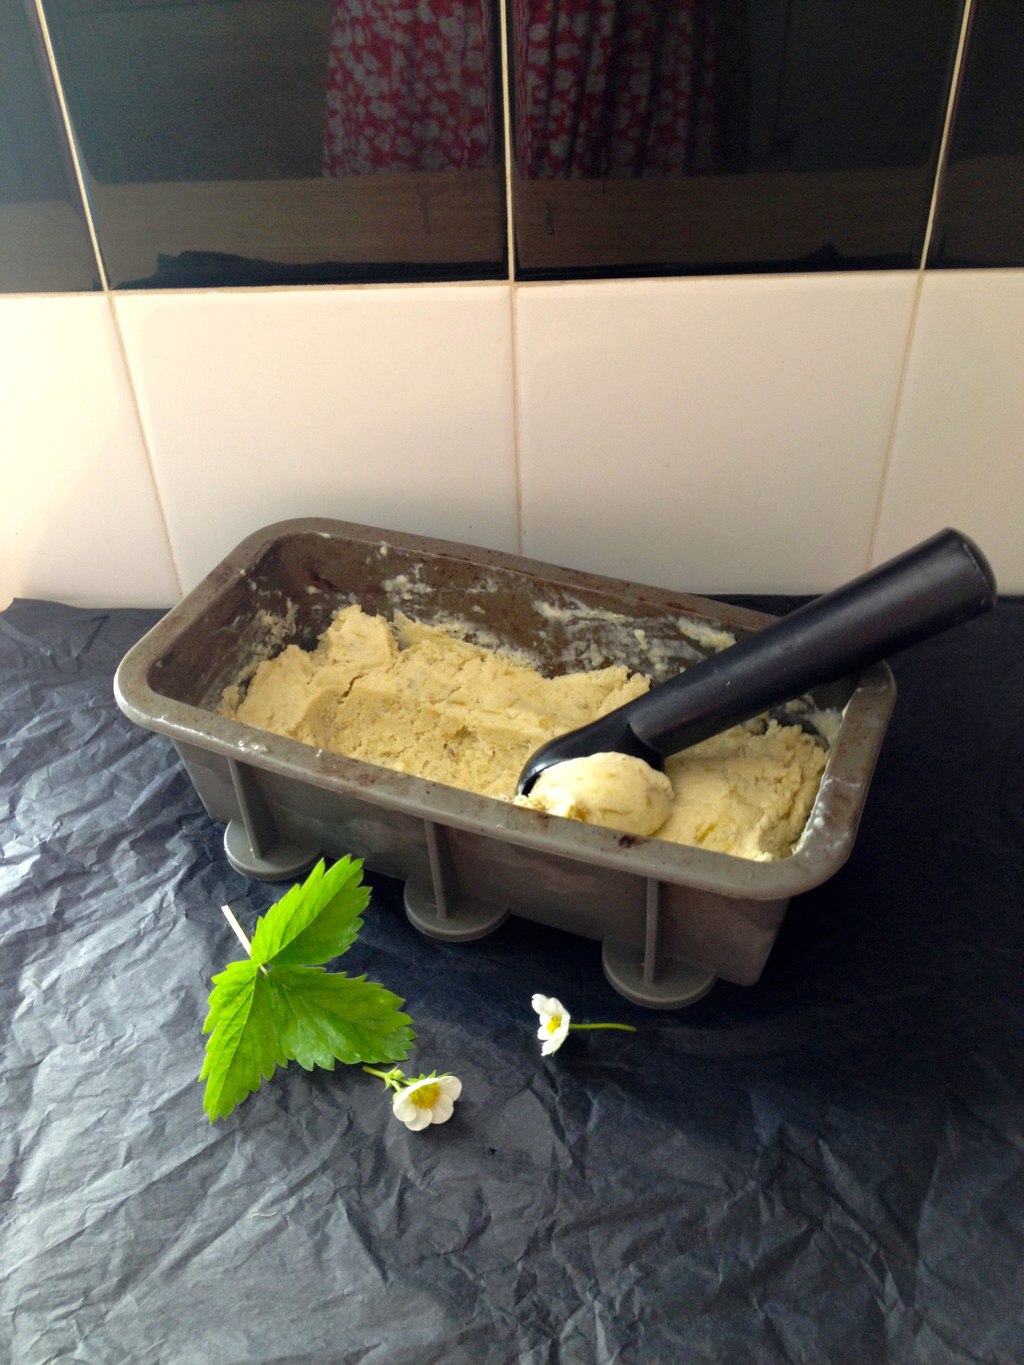
FRESH STRAWBERRY ICE-CREAM

  • 500ml whipping cream
  • 1 can condensed milk (397g)
  • 400g-700g fresh strawberries

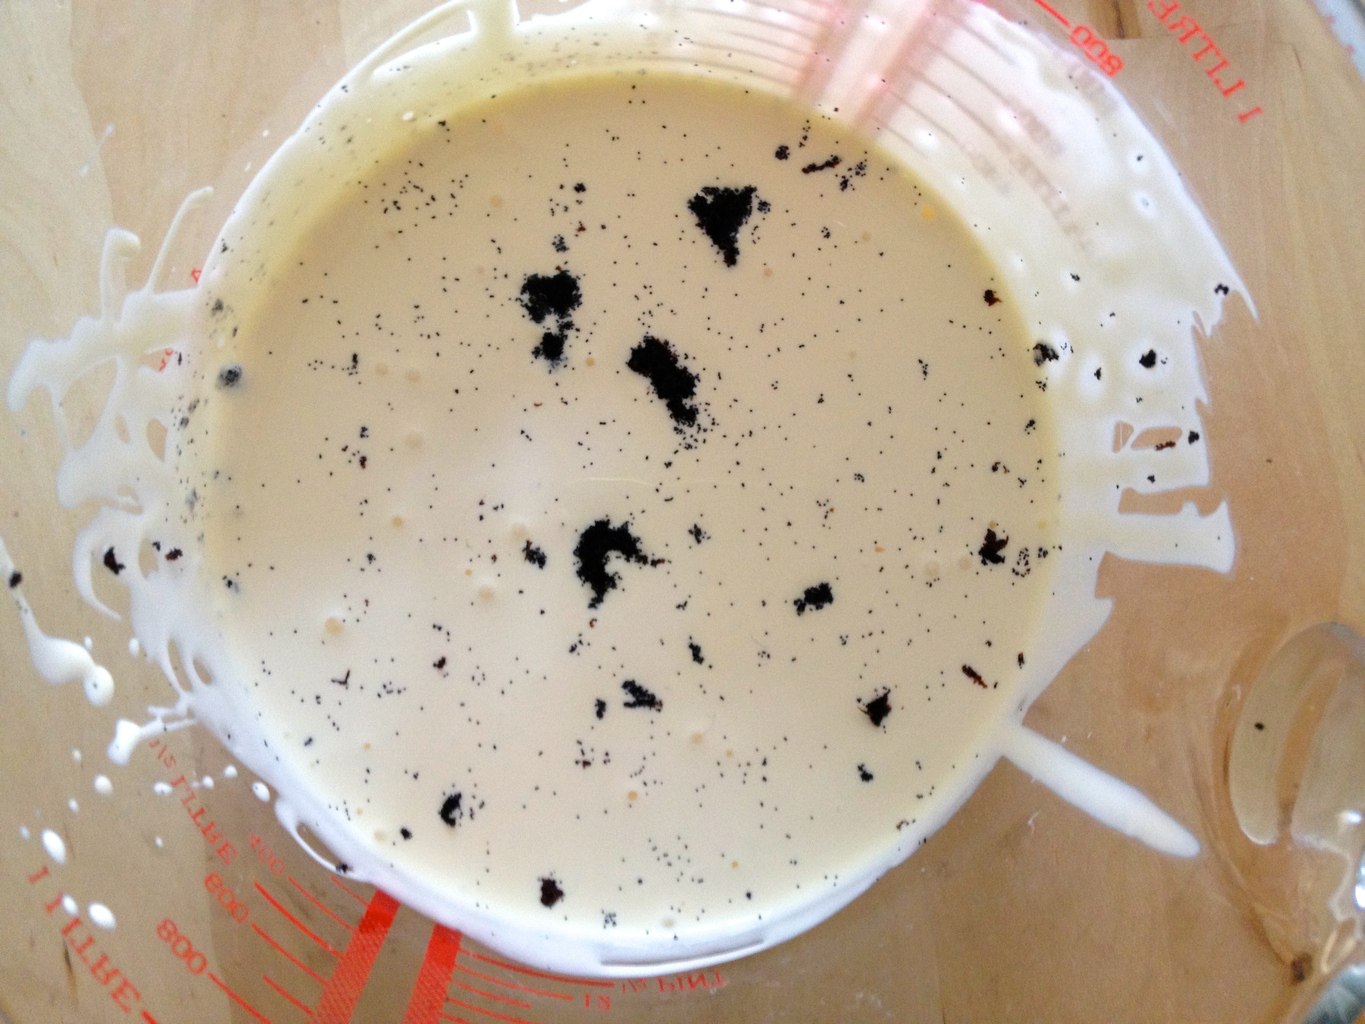
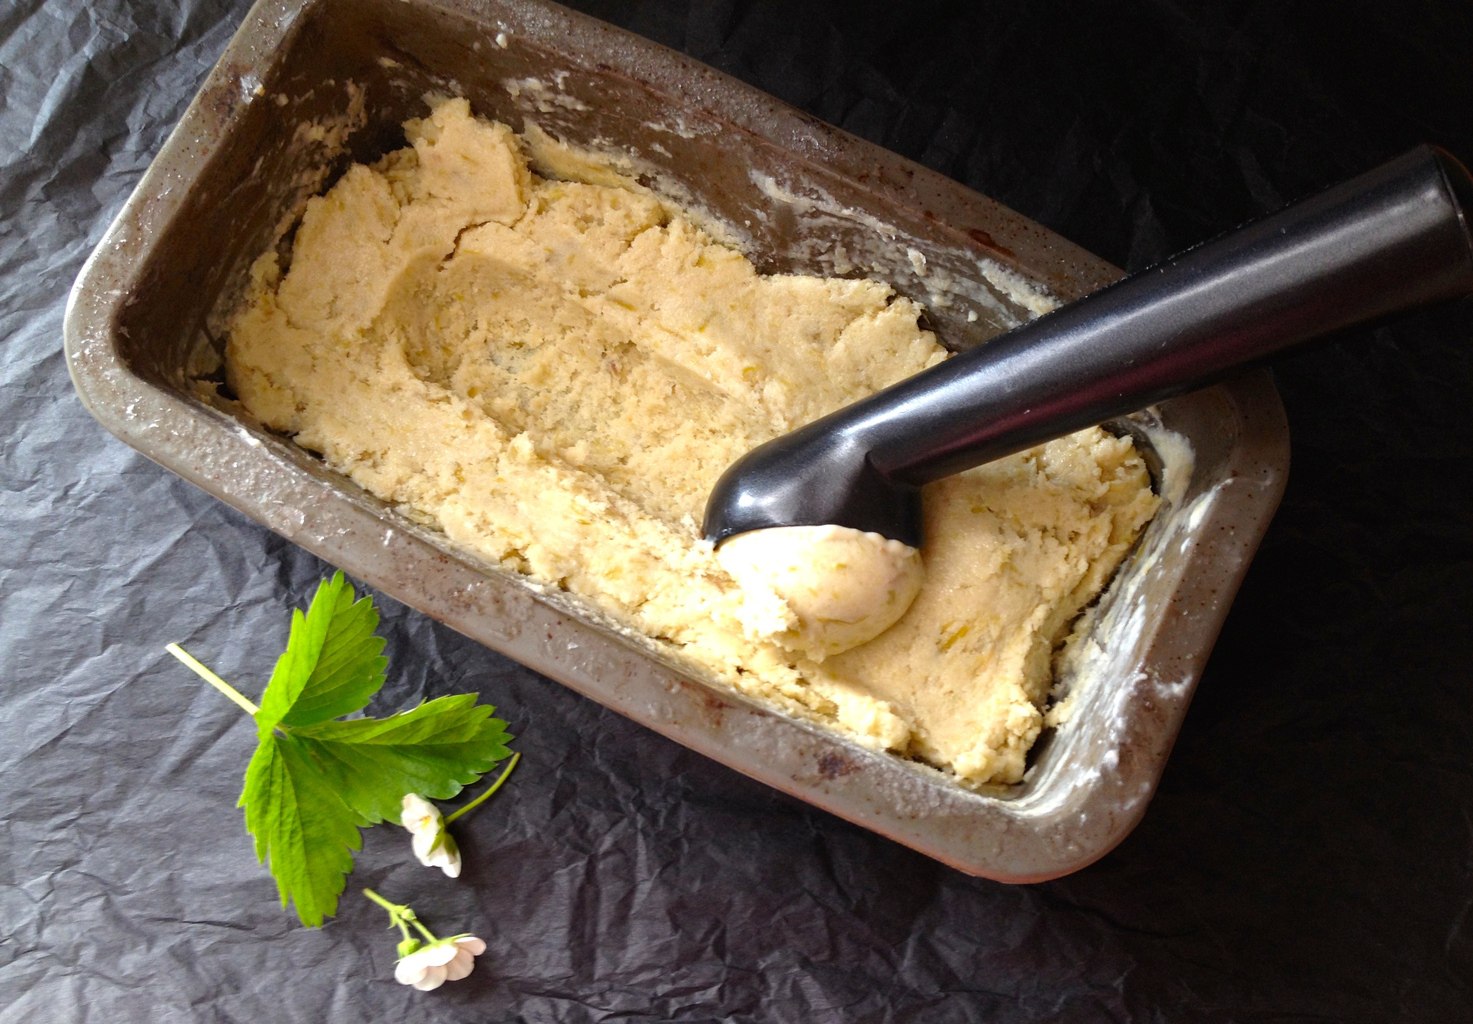
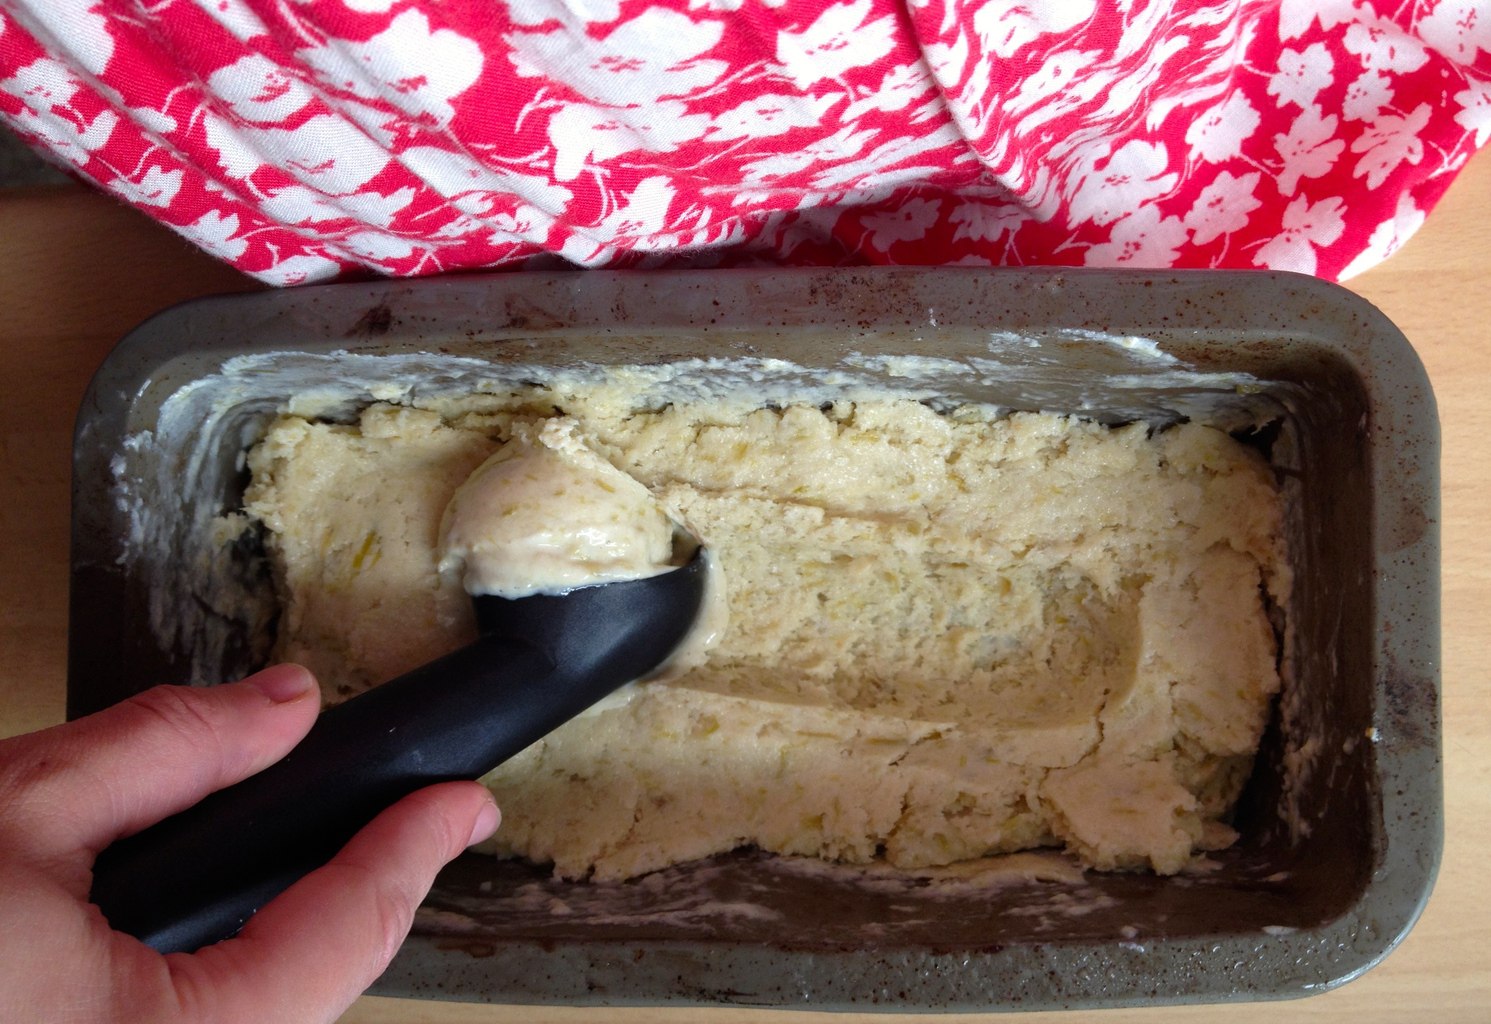
1. Whip the cream and carefully combine it with condensed milk and pureed strawberries (can also be finely shopped).Super easy strawberry ice-cream, only three ingredients
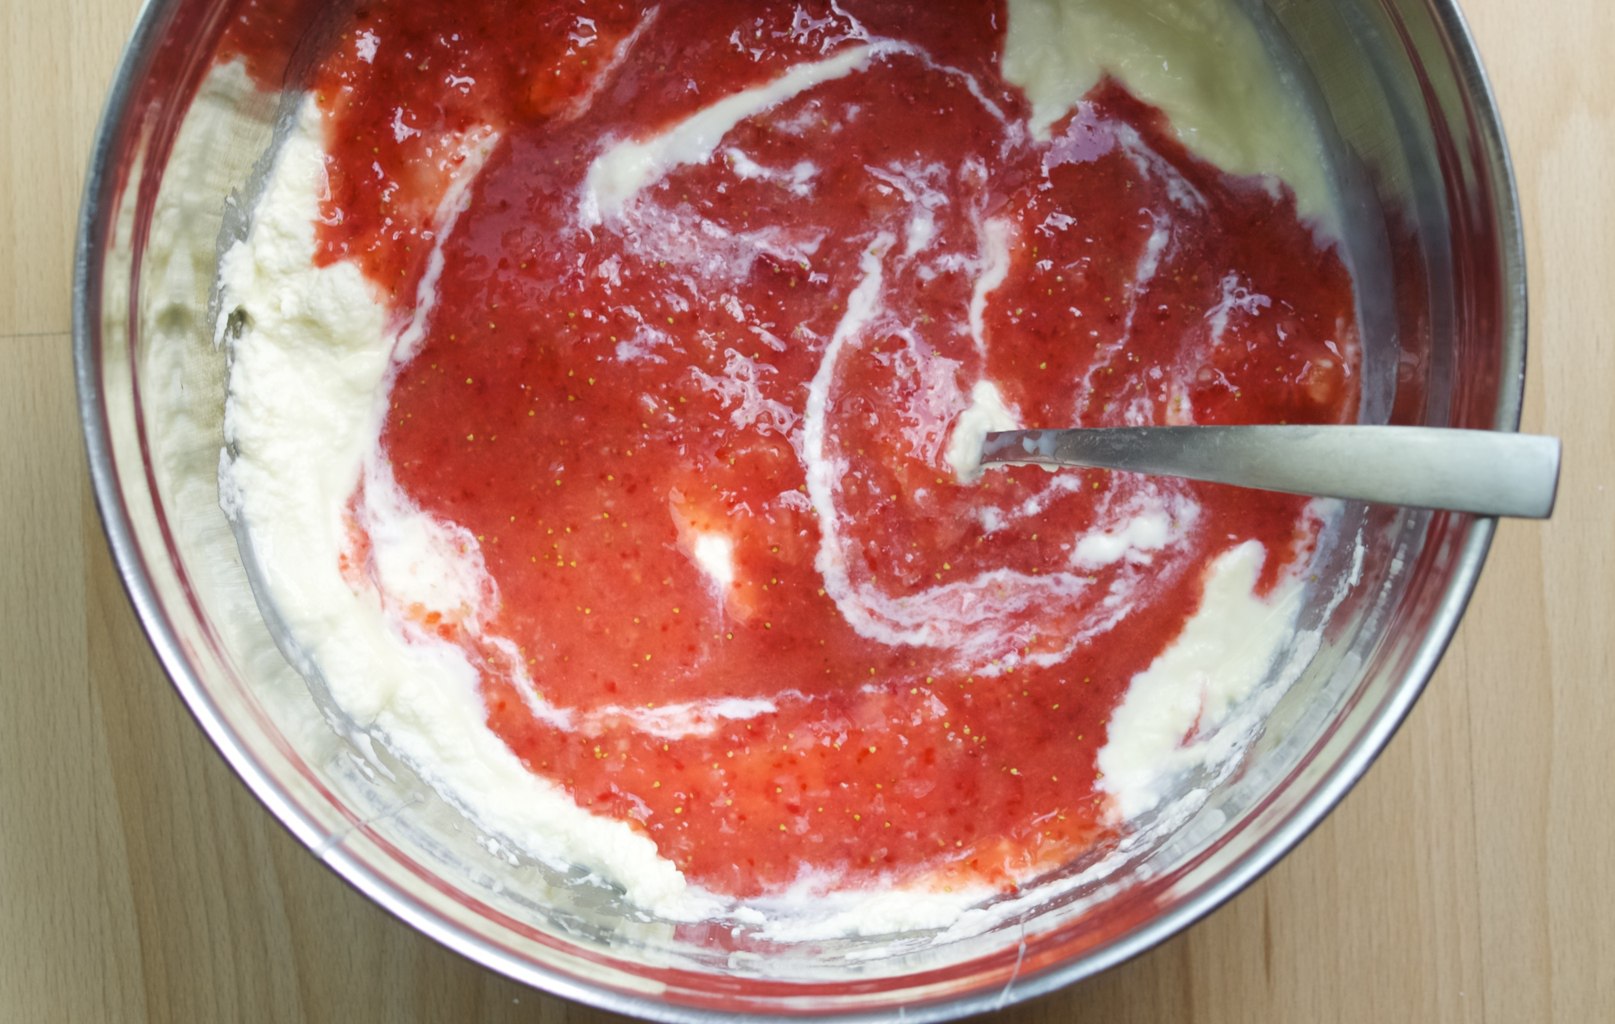
2. Once the ice-cream mixture is combined pour it into plastic container and freeze it for at least 4 hours. Super easy strawberry ice-cream, only three ingredients
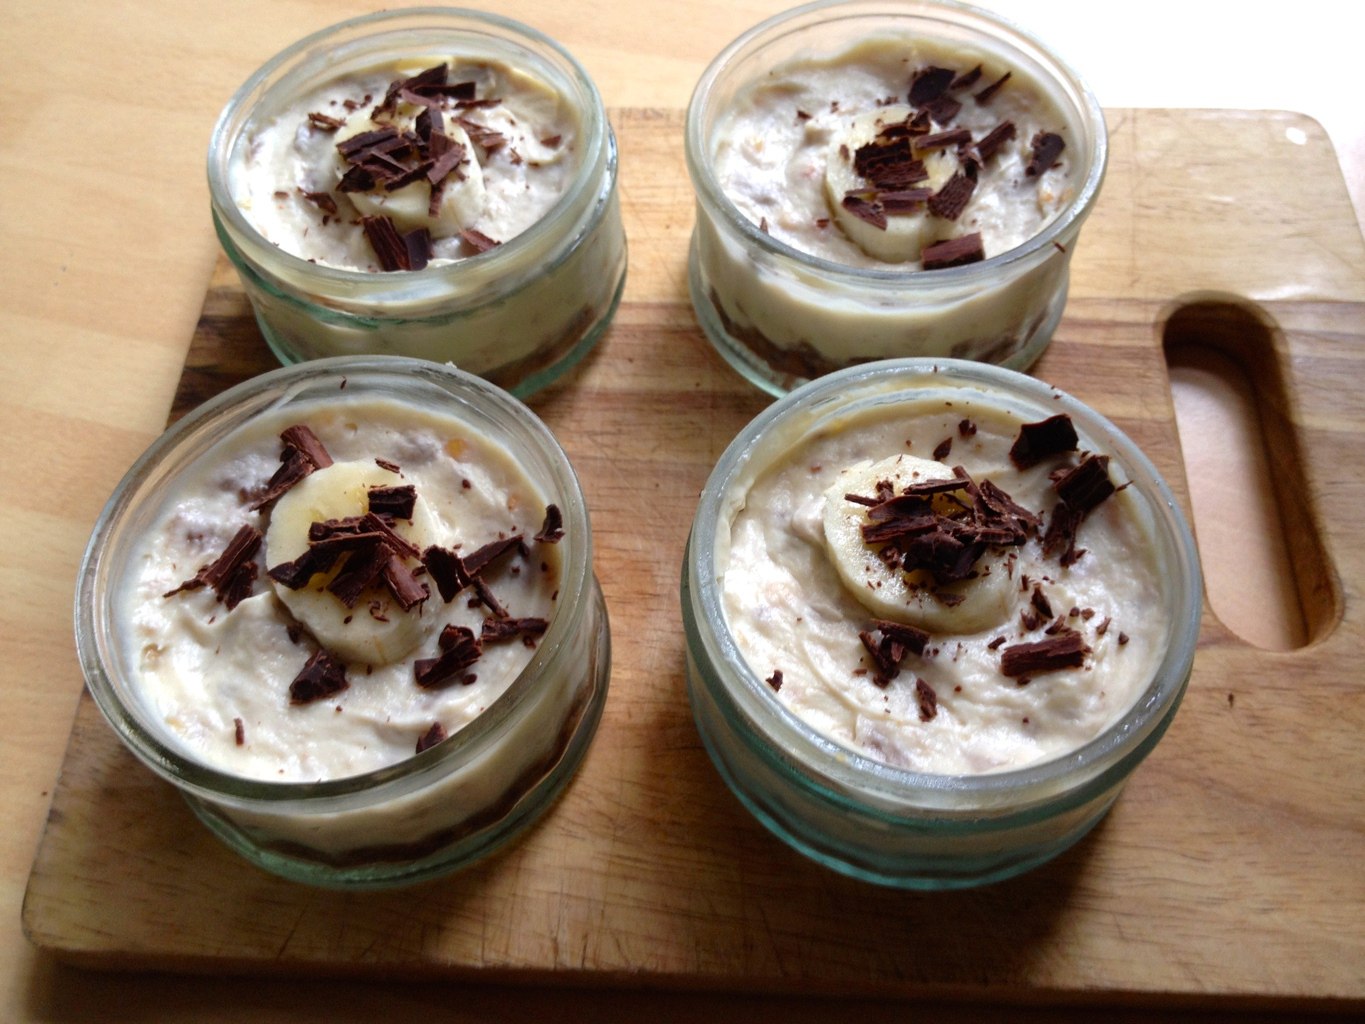
3. Serve ice-cream in your favourite cups or glass jars ;-).

Super easy to make fresh strawberry ice-cream with aged balsamic vinegar if you dear! Only three ingredients needed..
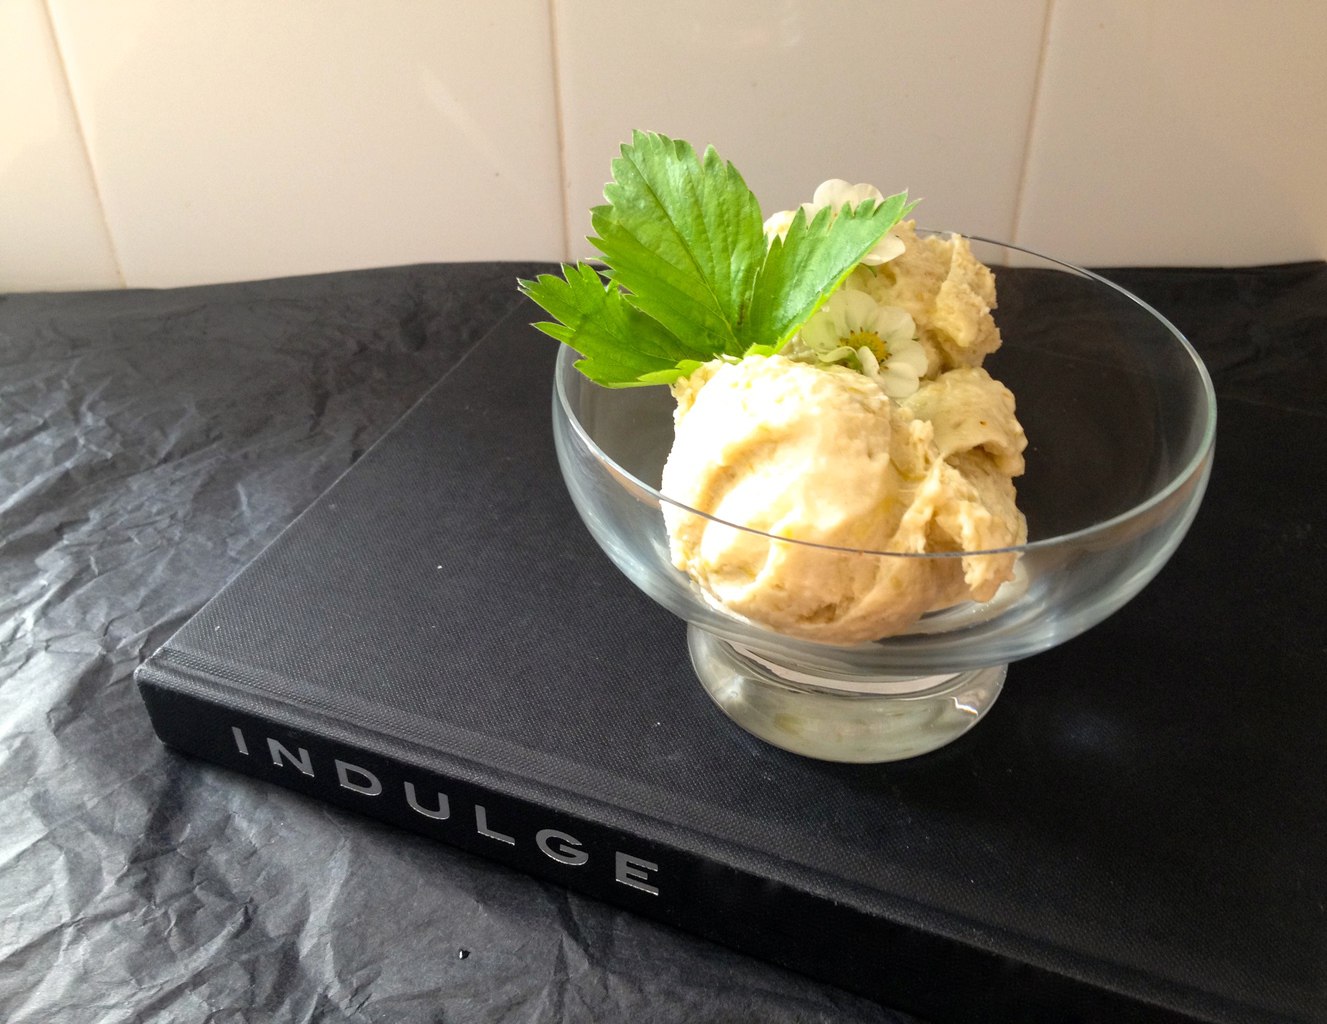
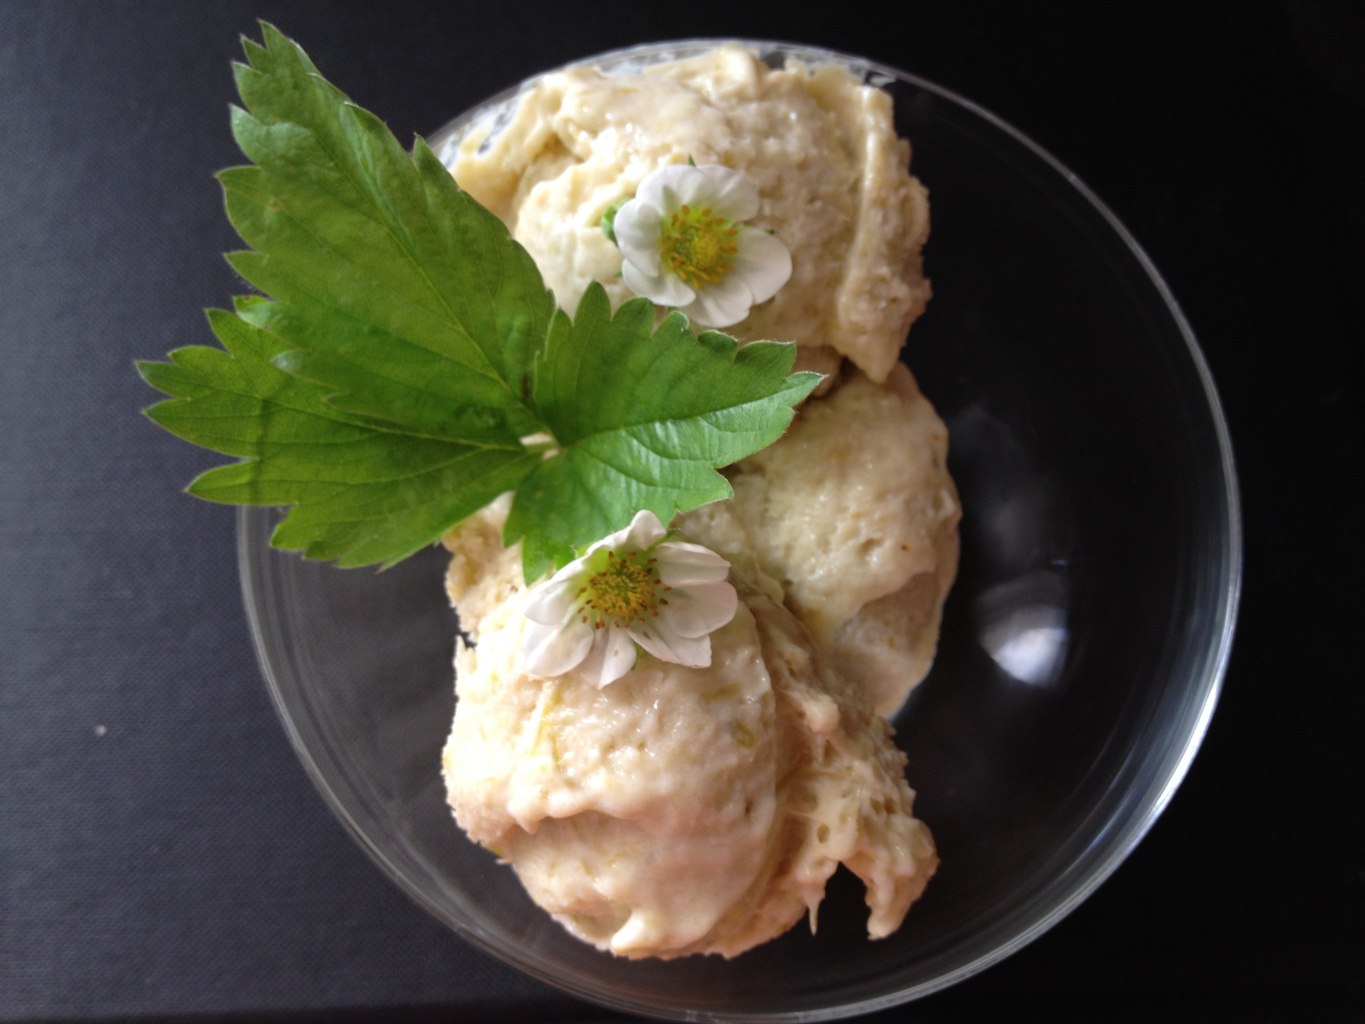
I have recently discovered that aged balsamic vinegar goes really well with ice-cream. I dare you to try it!
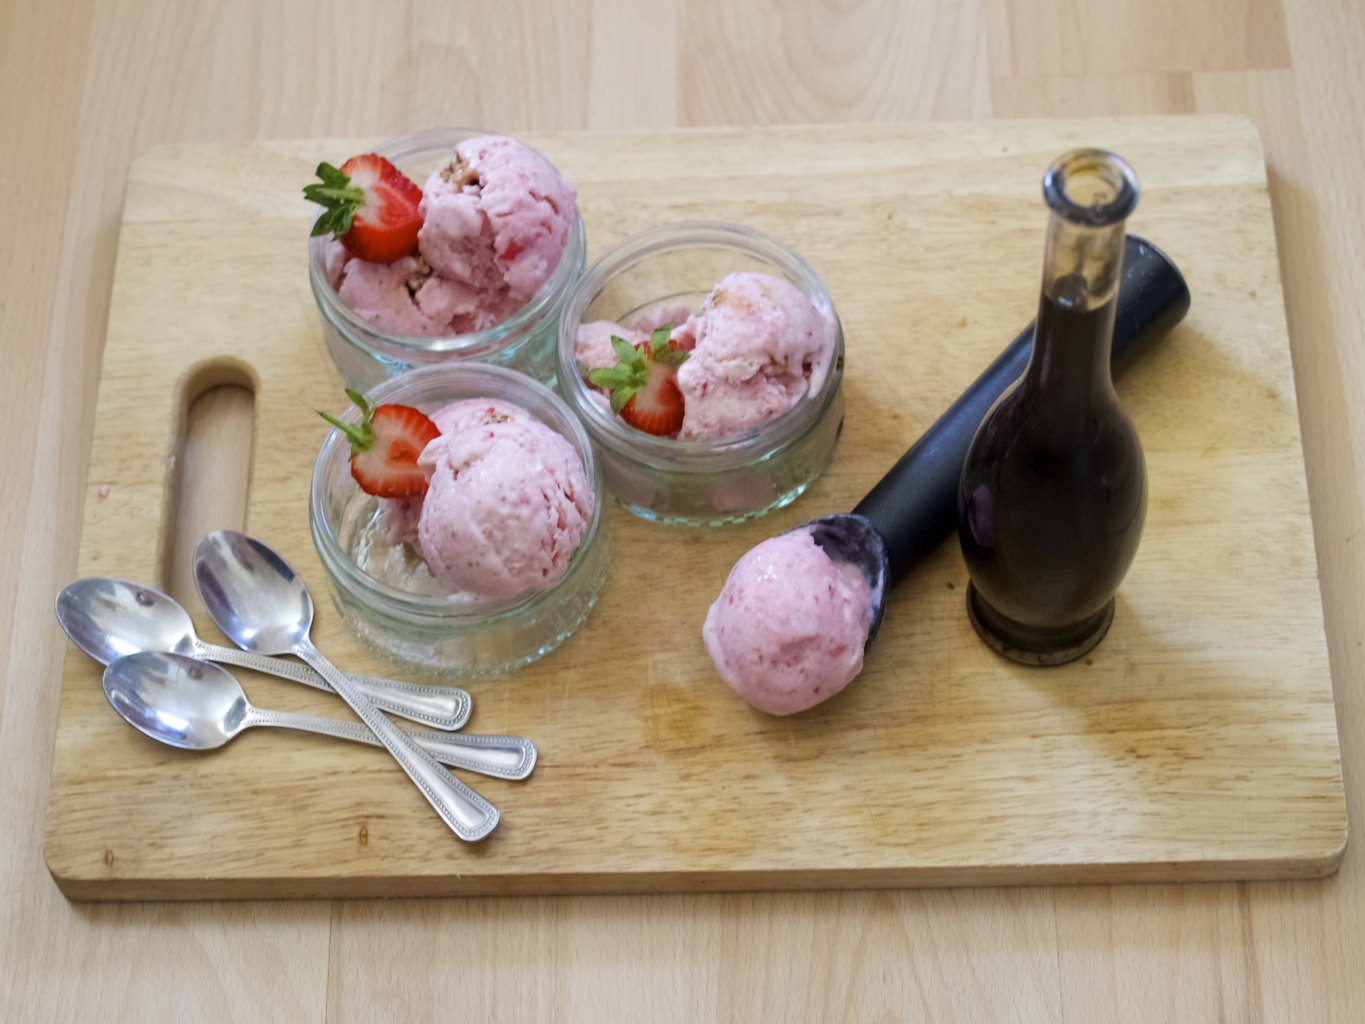
Super easy strawberry ice-cream, only three ingredients

Enjoy!

Rasa xoxo

0

Joni’s birthday cupcakes

chocolate beer cupcakes with vanilla bean cream toppingLast friday Joni turned 30 and we have been celebrating this the whole weekend! I made cupcakes… and not just any cupcakes, I tried to make it reeeeeaaaly MANLY ones ;-). First of all I have used beer, in fact I got many type of beers, but Joni is still very loyal to his favourite London Pride beer. However I have used Guinness for its chocolaty notes.chocolate beer cupcakes with vanilla bean cream toppingCHOCOLATE BEER CUPCAKES WITH VANILLA BEAN CREAM TOPPING

  • 60g butter, softened
  • 250g soft brown sugar
  • 1 egg
  • 240ml Stout (such as Guinness)
  • 60g cocoa powder
  • 125g flour
  • 1 tsp baking powder

(for the topping)

  • 360ml whipping cream
  • 3 tbsp icing sugar
  • 1-2 vanilla pods scrapped off
  • bunch of blackberries (optional)

chocolate beer cupcakes with vanilla bean cream topping1. Make the cake mixture by creaming butter with sugar and combining with the rest of the ingredients.

2.Spoon the mixture into prepared muffin pan and bake in preheated 180C oven for 15-20min

3. Meanwhile make the cream topping. Whisk whipping cream together with vanilla seeds and icing sugar until it becomes stiff. Vanilla bean cream toping for cupcakes4. Pipe the cream topping onto baked cupcakes. Optionally top with blackberries as well. chocolate beer cupcakes with vanilla bean cream topping

I really love these starred black candles, they go perfectly with the theme :-).

chocolate beer cupcakes with vanilla bean cream topping chocolate beer cupcakes with vanilla bean cream topping chocolate beer cupcakes with vanilla bean cream topping

Have a lovely week :)

Rasa xoxo

0

Goat’s milk and roasted rhubarb ice cream

Goat milk and rhubarb ice cream

All I could do today is eat the ice cream: hot days are finally here!! I love to experiment with flavours, so I thought goat’s milk and rhubarb will go well. I have seen goat’s milk and chocolate ice-cream before (did not taste it as I don’t like the chocolate ice-cream) and I really liked the idea of using goat’s milk to make the ice-cream. After making this twice, I think I reached the perfection!

Goat milk and rhubarb ice creamGOAT MILK AND RHUBARB ICE CREAM

  • 3-5 rhubarb stalks (chopped) + 35g sugar+ 1/2 lemon juice
  • 2 egg yolks
  • 100g sugar
  • 250ml goat’s milk
  • 125g goat’s yogurt

1. Roast rhubarb with sugar and lemon juice in 200C oven for 20-30min.

roasting rhubarb for goat milk ice cream

2. Meanwhile make the cream by whisking the eggs with sugar. Heat the milk in the saucepan (do not let it reach the boiling point) and pour it over egg yolks.Mix the egg milk well and pour it back to the saucepan. Cook it on the small heat (just in case as it is very important not to get it boiled) and mix continuously until it becomes thick (about 10 min). At this stage it is best to cool the mixture down by placing the pot in the cold water as when you get the right consistency it is best not to overcook it.

3. Puree roasted rhubarb and combine it together with yogurt and egg cream.

4. Pour the mixture into the shallow container and put it into freezer. Every hour or so scrape off the sides of the container and fluff  the ice-cream with the fork. Repeat this 3-5times and after that you can let it stay in the freezer until it is completely frozen or the time when you want to have a cool sweet treat.

Goat milk and rhubarb ice cream

Goat milk and rhubarb ice cream

Goat milk and rhubarb ice cream

Enjoy the sunshine ;-)

Rasa x


0

Earl Grey cake with Elderflower buttercream

Earl Grey cake with Elderflower Buttercream recipieWhen someone, who is Tottenham Hotspurs fan, have visited me yesterday to redeem their gift token, I have decided to be experimental and try something really new. Earl Grey and Elderflower have popped into my head as both flavours are fragrant and delicate (well… maybe both fragrant not in the same way, but still worth to try I thought).Earl Grey cake with Elderflower Buttercream recipieSo this is how I made it…Earl Grey cake with Elderflower Buttercream recipie EARL GREY CAKE WITH ELDERFLOWER BUTTERCREAM

(for the cake)

  • 340g caster sugar
  • 16 Earl Grey tea bags (removed from the bags)
  • 8 eggs
  • 3 tbsp. olive oil
  • 4 tbsp buttermilk
  • 2 tsp vanilla extract
  • 250g plain flour
  • 2 tsp baking powder
  • 1 tsp salt

(for the buttercream)

1. Preheat oven to 180C.  Line thee round sandwich tins (I used spring form tins) with baking paper.

2. In a large bowl beat the eggs, then add sugar, tea leaves (from the tea bags), oil, buttermilk and vanilla extract. Mix well!

3. Sift together flour, baking powder and salt.  Slowly add to the liquid ingredients.  Mix until well combined.

4. Pour mixture into prepared pans and tilt pan to distribute the mixture evenly.

5. Bake for 12-15 minutes. Check at 12 minutes. Cake is done when it springs back when pressed with fingers.

6. Meanwhile make the buttercream by creaming the butter with icing sugar. Add elderflower cordial gradually by constantly mixing the cream.

7. Turn cake out and let cool completely. Earl Grey cake with Elderflower Buttercream recipie8. Layer the cake with the butter cream in between. Cover the cake with buttercream and lightly brush it over the sides as well.

9. Decorate the cake with thyme or edible flowers like rose or pansies. This is completely optional, but it is worth the look you get from it.Earl Grey cake with Elderflower Buttercream recipie Earl Grey cake with Elderflower Buttercream recipie Earl Grey cake with Elderflower Buttercream recipie Earl Grey cake with Elderflower Buttercream recipieEnjoy!

Rasa xoxo

0

Yummy mug cakes

Yummy mug cakes

Anybody who have a very sweet tooth like me would understand that a piece of fruit just doesn’t do. In emergencies I tried everything including all those mug cakes that seem so hyped up at this moment. I am however disappointed that they are often a little dry.

Here is my version of yummy mug cakes ;-). They are moist and can be served with many type of toppings such as fruit, jam or chocolate sauce!

Yummy mug cakes

I developed these yummies from Joni’s mum’s microwavable syrup sponge recipe (which is one of my favourites!).  Single serving in the mug is a perfect way to kill that sweet tooth craving!

Yummy mug cakes

YUMMY MUG CAKE (single serving)

  • 2tbsp butter
  • 2tbsp sugar
  • 1 medium egg
  • 5.5tbsp self rising flour
  • 2 tbsp coco powder (optional to make a chocolate sponge)
  • syrup to cover the top (I like golden syrup the best)
  • toppings such as chocolate sauce, jam, fruits, berries or even poppy seeds

1. Cream the butter with sugar. Gradually mix the dough with egg, flour and coco powder (if using).

2. Spoon the dough into the mug (if not mixed the dough in the mug already). Cover the top with some syrup.

Yummy mug cakes

3. Microwave the mug for 5 min.

Yummy mug cakes

4. Top the cake with more syrup and other toppings.

Yummy mug cakes

Enjoy while it is still warm!

Yummy mug cakes Yummy mug cakes

Rasa xoxo

4

Banana & peanut butter mini cheesecakes

I came across this recipe in GoodFood mag many years ago, when one of my flatmates had a subscription for this yummy magazine (good old days!). I absolutely loved it and wanted to make more, but I could not, because I moved out and lost that recipe :-(. Luckily I found it again! So I made mini cheesecakes, they were super cute for the party ;-).

I must warn you that these cheesecakes might not be to everyone’s taste! My friends actually commented that this is not my best sweet creation. Well… It taste quite rich and it is really sweet so I suppose  some people might find it too much… Why do I think so? Because I love it as much as before when I tasted it for the first time. Your choice ;-).

banana & peanut butter mini cheesecakes recipie

BANANA & PEANUT BUTTER MINI CHEESECAKES

(adapted from BBCGoodFood)

  • 3 small bananas
  • 50g butter, melted
  • 10 digestives, crushed to crumbs (I baked my own)
  • 142ml double cream
  • 140 icing sugar
  • 400 soft cheese
  • 237g crunchy peanut butter

1. Several hours before, place 2 bananas in the freezer until the skins go black, then remove and defrost. You’ll be left with really soft bananas. Peel, then mash well and set aside.

2. Mix the butter and biscuits together, then press into 10 small ramekins.

3. Whip the cream until it just holds its shape. In a separate bowl, beat the sugar, soft cheese and vanilla together until completely combined. In another bowl, beat the peanut butter to loosen it.

4. Fold the cheese mixture into the peanut butter, then tip in the mashed banana and gently fold in the cream. Spread the mix over the biscuit base and smooth the top.

banana & peanut butter mini cheesecakes recipie

5. Freeze for several hours or preferably overnight. To serve, leave the cake in the fridge for 20 mins. Slice the remaining banana and use to decorate the cheesecake. Optionally you can sprinkle some chocolate flakes on top.

banana & peanut butter mini cheesecakes recipie

Enjoy!

Rasa xoxo

0

Searching for a perfect sponge cake…

almond Victoria sponge cake recipe

I have recently been searching for a perfect sponge cake base for our wedding torte. Although there are many to still try out, here is one I really liked: almond Victoria sponge. I particularly like the added almonds! I have decided to go with cream cheese frosting as that would last much longer then whipped cream and it tastes better too. I also opted for fresh fruit layer (in this case strawberries) instead of jam. Yum! try it for yourself ;-).

almond Victoria sponge cake recipe

ALMOND VICTORIA SPONGE CAKE

  • 400g butter
  • 400g sugar
  • 6 eggs
  • 90g yogurt
  • 360g flour
  • 100g ground almonds
  • 3tsp baking powder

(for the frosting)

  • 100 butter, softened
  • 100 cream cheese (room temperature)
  • 150g icing sugar
  • berries such as strawberries, blackberries, blueberries and raspberries

almond Victoria sponge cake recipe

1. Cream butter with sugar until its pail in colour.

2. Gradually add eggs and mix the dough well.

3. Add the rest of the ingredients and combine everything well.

4. Divide he cake mixture into two prepared cake tins and bake them in 180C preheated oven.

6. Meanwhile make the frosting by combining all the ingredients into smooth creamy paste.

7. When the sponge cakes are cooled, spread some cream cheese frosting on one of them and cover it with fresh berries. Place another cake on top and repeat the same again (if you want, I did slightly different for decorational purposes). Dust the top with icing sugar for an extra umf factor ;-)

almond Victoria sponge cake recipe

Enjoy!

Rasa xoxo

0

Chocolate spoons

Chocolate spoon DIY

Today I have been making chocolate spoons! Why? Because the Mums and Daughter’s tea party is on and it’s chocolate themed! Ahh…. and I love chocolate!

Chocolate Spoons DIY

I know I know, these chocolate spoons are not a brand new idea. this has been phenomenal for quite a while and now it is just classic. But these are still a really good idea for a party!

Chocolate Spoons DIY

Most importantly its easy and fun to make and it can work as just a party sweat treat or a hot chocolate drink.

IMG_8552

All you need to do is melt the chocolate which can be dark or milk or white hot chocolate. Then just dip the spoons and decorate them with drizzles, sprinkles or even marshmallows. The possibilities are endless!

Enjoy the sweetness ;-)

Rasa xoxo

1

Banoffee ice-cream sandwiches

Banoffee Icecream Sandwiches recipie

Only few weeks ago I have posted a recipe for the digestives. I have already found many uses for these simple biscuits! I used them as banoffee cheesecake base in the past while today I have crafted banoffee ice-cream sandwiches. Ahh… there is never enough of banoffee pie ;-).

Banoffee Icecream Sandwiches recipie

BANOFFEE ICE-CREAM SANDWICHES                                                                                               Makes 6 sandwiches

  • 3 egg yolks
  • 100g caster sugar
  • 150ml double cream
  • 100ml milk
  • 200g yogurt
  • 2 medium sized bananas, mashed
  • 12 chocolate covered digestives
  • 100g caramel

1. First make banana ice-cream (this can be done long time ahead). Prepare egg cream by mixing egg yolks with sugar and whisking until it becomes pale.

2. Put double cream and milk together into the sauce-pan and heat it up, but don’t let it to boil. Then reduce the heat and add egg yolk mixture into the pan. Cook it on the small heat (just in case as it is very important not to get it boiled as then you would get an omelet, not an ice-cream) and mix continuously until it becomes thick (about 10 min).

3. At this stage it is best to cool the mixture down by placing the pot in the cold water as when you get the right consistency it is best not to overcook it.

4. When the egg cream has cooled add yogurt and mashed bananas and combine everything well. Pour the mixture into the plastic container (or even baking tin lined with baking paper) and place it into freezer.

5. After two hours scrape off the sides of the container and mix it with the fork. Repeat this after three hours and after that you can let it stay there until it is completely frozen.

Banoffee Icecream Sandwiches recipie

6. Remove frozen ice-cream out of the container or tin and lay it onto the chopping board. Using cookie cutter cut out circles in the ice-cream block.

Banoffee Icecream Sandwiches recipie

7. Make the ice-cream sandwiches: spread some caramel on the digestive, stick ice-cream round on top and cover everything with another digestive.

Banoffee Icecream Sandwiches recipie

Enjoy!

Rasa xoxo

1

Cake decorating for Vicki’s birthday!

Chocolate amaretto cake decorated with sugar glazed fruits

It’s Vickies Birthday today! Yey! Good occasion to decorate a cake of course :).

I have decorated a cake many times before and as I mentioned in my past cake decorating post, I love when cakes are decorated with fruits. This one is no exception! I just followed my ” natural” instinct and picked a cake that I thought Vicki would like, the one that have all the chocolate and some alcohol. Some things never change ;-).

Chocolate amaretto cake decorated with sugar glazed fruits

So I chose to go with chocolate amaretto cake. I tripled the amounts for the cake base mixture and baked two different size round cakes from it to make one big tiered cake. I placed the smaller cake on the bigger one and realised that it is not small enough to define the cake tiers. So I put the small plate on top to use it as a circle guide and cut around with the sharp knife.

Cake shaping before applying icing or glaze

Then I made amaretto chocolate glaze and poured it over the cake.

Great chocolate glaze for the cake

I used plastic spatular to spread the chocolate glaze over the cake.

Applying chocolate glaze on the cake

I took a challenge and sugar glazed the plums. Unlike figs, plums are really watery, so the effect does not last that long. I dipped the plums into the sugar and placed them on a baking sheet lined with aluminium foil. Using a kitchen torch, I caramelised each plum half.

caramelising plums using blow torch

While the chocolate glaze on the cake is still warm and soft, I decorated it with sugar glazed plums, grapes and chocolate flakes.

Chocolate amaretto cake decorated with sugar glazed fruits

Happy Birthday, my dear friend Vicki!

Rasa xoxo

0

Bake your own digestives!

bake your own digestives

Sometimes simple things in life are best! So are the digestives with cup of tea ;-).

I don’t know if you knew, but it is possible to bake your own digestives! They taste even nicer than shop bought.

bake your own digestives

HOMEMADE DIGESTIVES

  • 115g unsalted butter
  • 90g light brown sugar
  • 1 tbsp honey
  • 100g wholemeal flour
  • 60g plain flour
  • 20g milled flax seeds (alternatively can use bran, oatmeal or wheat germ)
  • 1/2 tsp salt

1. Cream butter with sugar then combine it with the rest of the ingredients.

2. Roll the dough to 5mm thickness and using cookie cutter cut out rounds from it. Pile the rounds with the baking paper in between and place them in to the freezer for 20min.

3. Just before baking remove the dough rounds from the freezer and poke them with fork couple of times.

bake your own digestives

4. Bake the digestives in preheated 180C oven for 9-12min until it turns golden in colour.

bake your own digestives

5. Optionally you could dip the digestives into melted chocolate to make them extra yummy ;-).

bake your own digestives bake your own digestives bake your own digestives

Enjoy!

Rasa xoxo

1

♥ Beetroot Marshmallow Hearts ♥

How to make beetroot marshmallows

Marshmallows a supper great for campfire treats and they make hot drinks look extra special (not only hot chocolate). Beetroot here is mostly used for pastel pink colour rather than taste, so don’t worry if you think that is weird.  And what’s more is that these are really easy to make and the results are amazing!

BEETROOT MARSHMALLOW HEARTS

  • 1tbsp corn flour and 1tbsp icing sugar sifted together
  • 6 leaves gelatine (soaked in cold water)
  • 285g caster sugar
  • 3tbsp golden syrup
  • 50ml beetroot juice (from raw beetroots)
  • 100ml water
  • 3 egg whites + 1tbsp caster sugar

1. Line baking tin with grease paper and dust it with corn flour and icing sugar mix.

IMG_8057

2. Combine caster sugar and golden syrup in the saucepan together with beetroot juice and water. Heat the saucepan on the medium heat until sugar is melted and it reaches 110C on the thermometer (I use prong thermometer). Remove saucepan from the heat and once it is slightly cooled then melt gelatine leaves in it.

3. Whisk eggs with 1tbsp of sugar until it forms stiff peaks. While whisking gradually add warm syrup.

4. Pour the mixture into the prepared baking tin and let it set for at least 4 hours.

How to make beetroot marshmallows

5. Remove marshmallow from the tin and lightly dust the top. Using cookie cutters cut-out little heart shapes.

How to make beetroot marshmallows beetroot marshmallows

Rasa xoxo

0

Make your own custom chocolates

make your own chocolates

Joni often ask me what is my favourite chocolate. Well… I do like chocolate! I definitely prefer ones that have something in it like nuts. But I do like experimenting with different flavours ;-).

I made these chocolates few days ago. I went with with “chocolate bark” approach! So I melted some chocolate (about 150g), poured it into the silicon chocolate moulds and added honey roasted/salted almonds on top. Quite simple you may say! Well, it’s up to you ;-). You can make it as custom as you want. You can melt different types of chocolate and you can add all kind of candies and even crisps on top!

make your own chocolates

Freezer works the best when you want to harden these chocolates in no time!

make your own chocolates make your own chocolates

Just think how cute these chocolates be as a gift! Yey :-).

make your own chocolates

Have fun with experimenting ;-)

Rasa

0

Scented hearts instead of chocolate ones ;-)

Scented Rice Hearts DIY step by step instructions

Today I have been making scented rice hearts! I love this idea of putting these little heart shaped sachets into the box and gifting them instead of box of chocolate. These are cute, practical and last much longer than chocolate (you know why!). Ok, ok… I did sneak in some chocolate in this box…

Scented rice hearts with chocolate

And this is how. Cut few hearts in tissue paper (pic 1), stitch around leaving big enough gap to fit the chocolate through (pic 2). Once the chocolate is inside, close the gap by stitching on it (pics 3-4).

making paper pacaging for chocolates

So now you know my secret ;-). Click here to see how scented rice hearts has been made.

scented rice hearts DIY

Wishing you the best weekend ever ;-)

Rasa xoxo

0

Banoffee Cheesecake

Banoffee cheesecake

I will admit, my ultimate desert is Banoffee pie. I know I know, this may not be the most exquisite cake, but the match between toffee and banana is perfection! At least in my opinion.

I baked this cheesecake, inspired by Gü Puds chocolate banofees that I ate so many in the past (still eating them sometimes). You can find an evidence in my cupboard that is full of Gü Puds glass remekins!

Banoffee cheesecake

BANOFFEE CHEESECAKE

(for the base)

  • 150g digestives
  • 75g butter
  • 2 ripe bananas
  • 100g toffee sauce

(for the filling)

  • 600g cream cheese
  • 175g sugar
  • 4 eggs
  • 1/2  tsp lemon juice

(for chocolate mousse)

  • 200g dark chocolate
  • 4tbsp double cream
  • 3 eggs
  • 4tbsp sugar

1. First make the base by crumbling the digestives and mixing them together with the butter. Press this mixture into the prepared spring form tin base (lined with baking paper).

2. Slice bananas on the base and drizzle toffee sauce on top evenly.

3. Now make the filling. In the food processor mix cream cheese, sugar, eggs and lemon juice.

4. Pour in the filling mixture and pop in a large baking tin. Boil the kettle and fill the tin until the water comes half-way up the side of the tin. Bake in the preheated 170C oven for around 1 1/4 hours, until the cheesecake is set on top but still wobbles a little in the middle.

5. Meanwhile make the chocolate mousse. Melt the chocolate and mix it with double cream.

6. Separate egg yolks from whites (reserve the whites in separate bowl). Add sugar to the egg yolks and whisk it until it becomes pale. Gradually add it to melted chocolate mixture.

7. Whisk the egg whites until it forms stiff peaks. Add it gradually into the chocolate mixture by folding and don’t overwork it as it would let all the air out!

8. Pour the chocolate mousse onto the cooled cheesecake and let it set in the fridge (after when it is completely cooled) for 4 hours while still in the spring form tin.

9. When the cheesecake is ready remove it carefully from the tin.

Enjoy!

Rasa :-)

3