Top

Archive | Paper Crafts

Date night in: paper and pen games

Idea for date night in: paper and pen games table layoutMe and Joni have not gone out for ages. When you got kids it’s just not easy. Everyone who have young kids I am sure can relate how difficult it is to find a babysitter! And when you do find a babysitter this once in the while outgoing can cost you at least £40. Am I right or am I wrong?

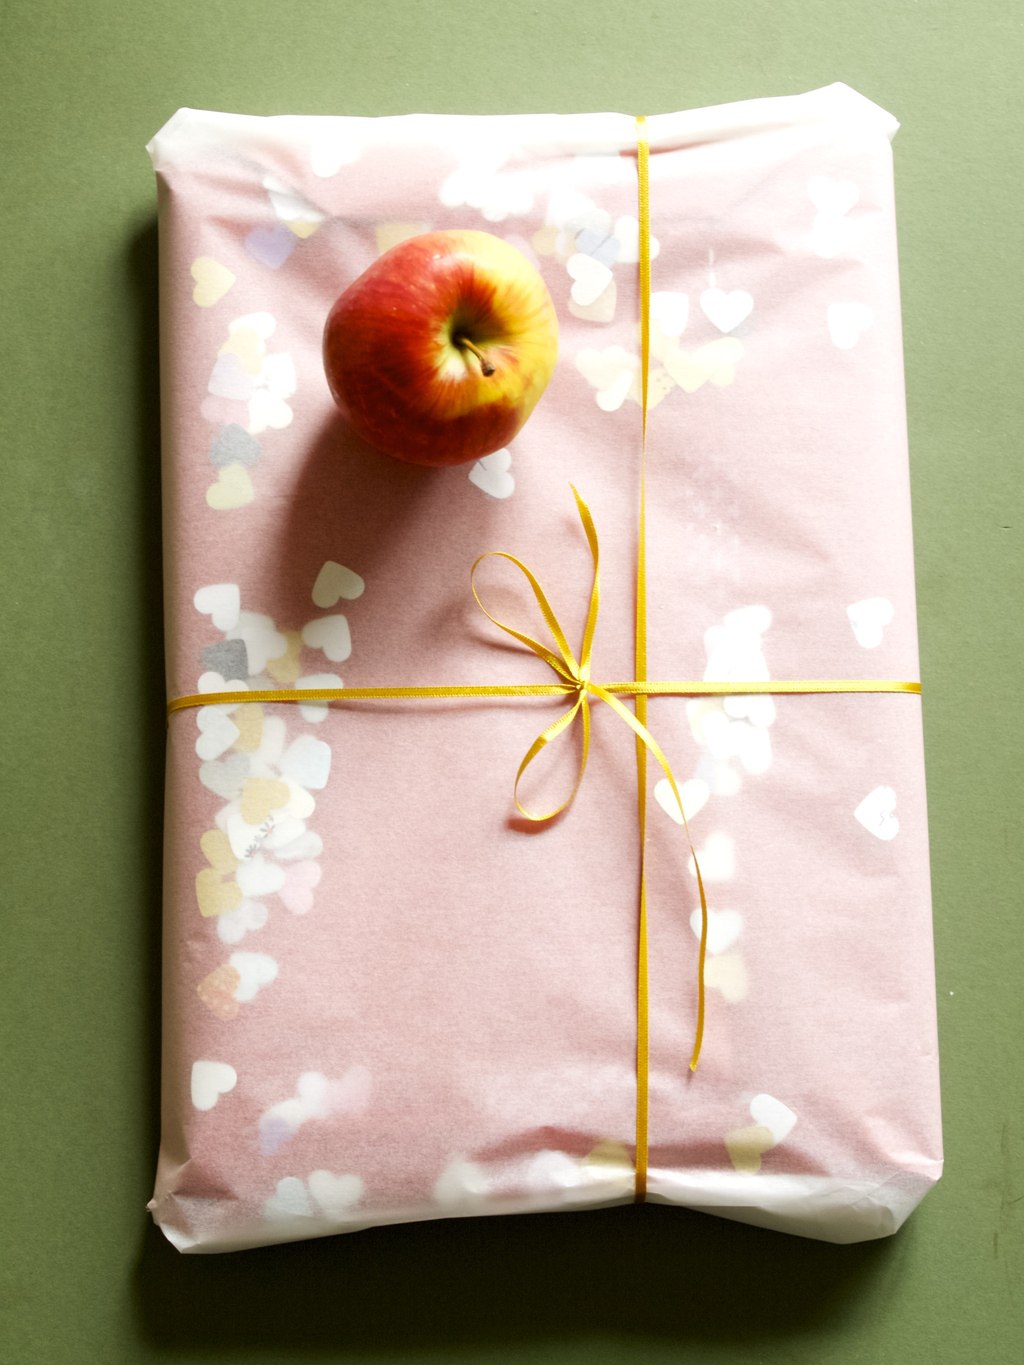
Recently Joni had an idea to have date nights in. And that changed the dating game completely! We set to have the date night in every Friday and we reduced the amount of tasks we need to do that day so we are free. This gives me something to look forward every week! Since the Valentines day is coming up I though I will share how we do these night ins ;-).

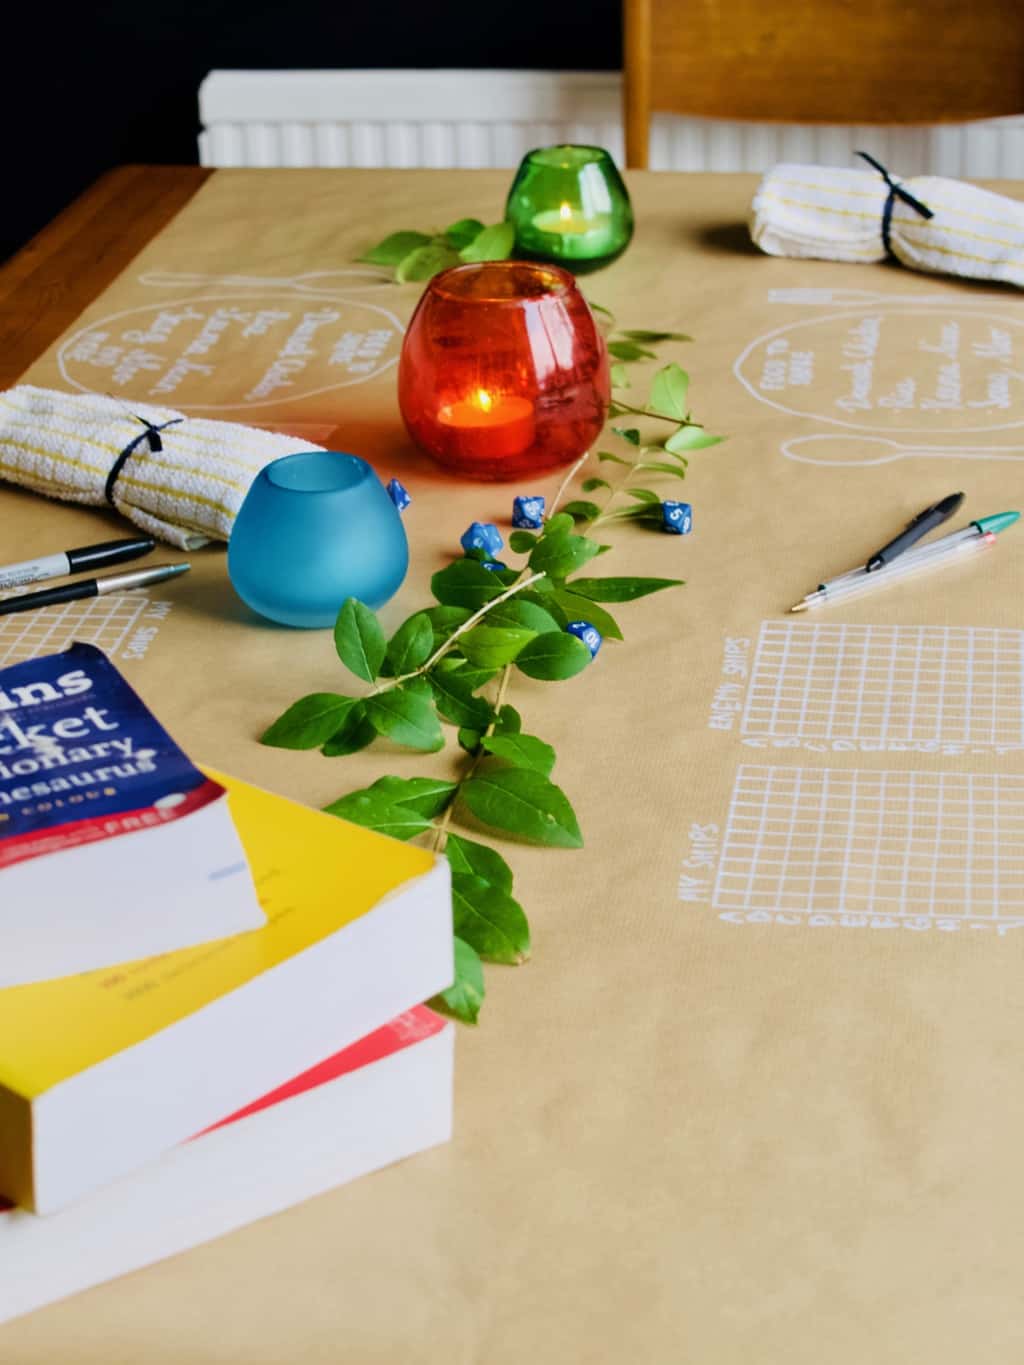
Me and Joni take turns who organises the date. If any money spend we budget into our own budgets. This time it was my turn therefore I could share the preview with you. I picked games theme and this is often what we like to do on our dates. We (I mean me) get a bit competitive sometimes!Idea for date night in: paper and pen games table layout
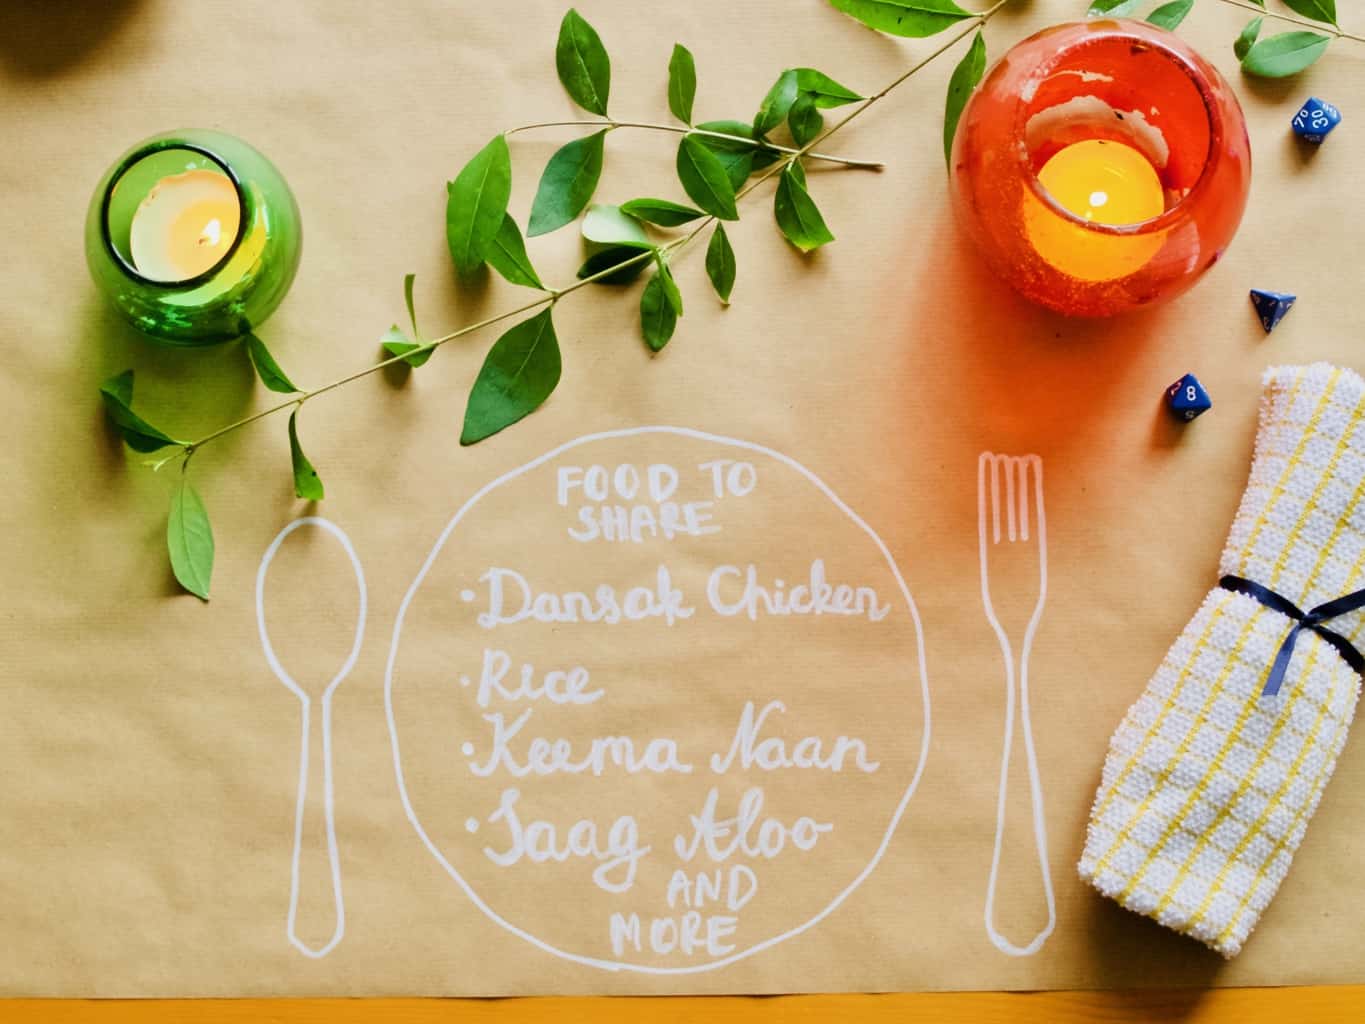
Since I decided to do paper and pen games this time round I used craft brown paper for the table layout. To be honest I don’t even have that many dining table setup props! This is why I mostly used what I already have. Kitchen towels instead of napkins for instance was one of those replacements when I did not want to buy something I may not use again.

First I rolled brown craft paper out on the table and drew what is needed using permanent oil pen. I am sure you can use any other pen you like. I was tempted to use metallic pens and I used black marker pens before. I used plates and cutlery to trace out the table layout. I wrote out the menu here as well.Idea for date night in: paper and pen games table layout
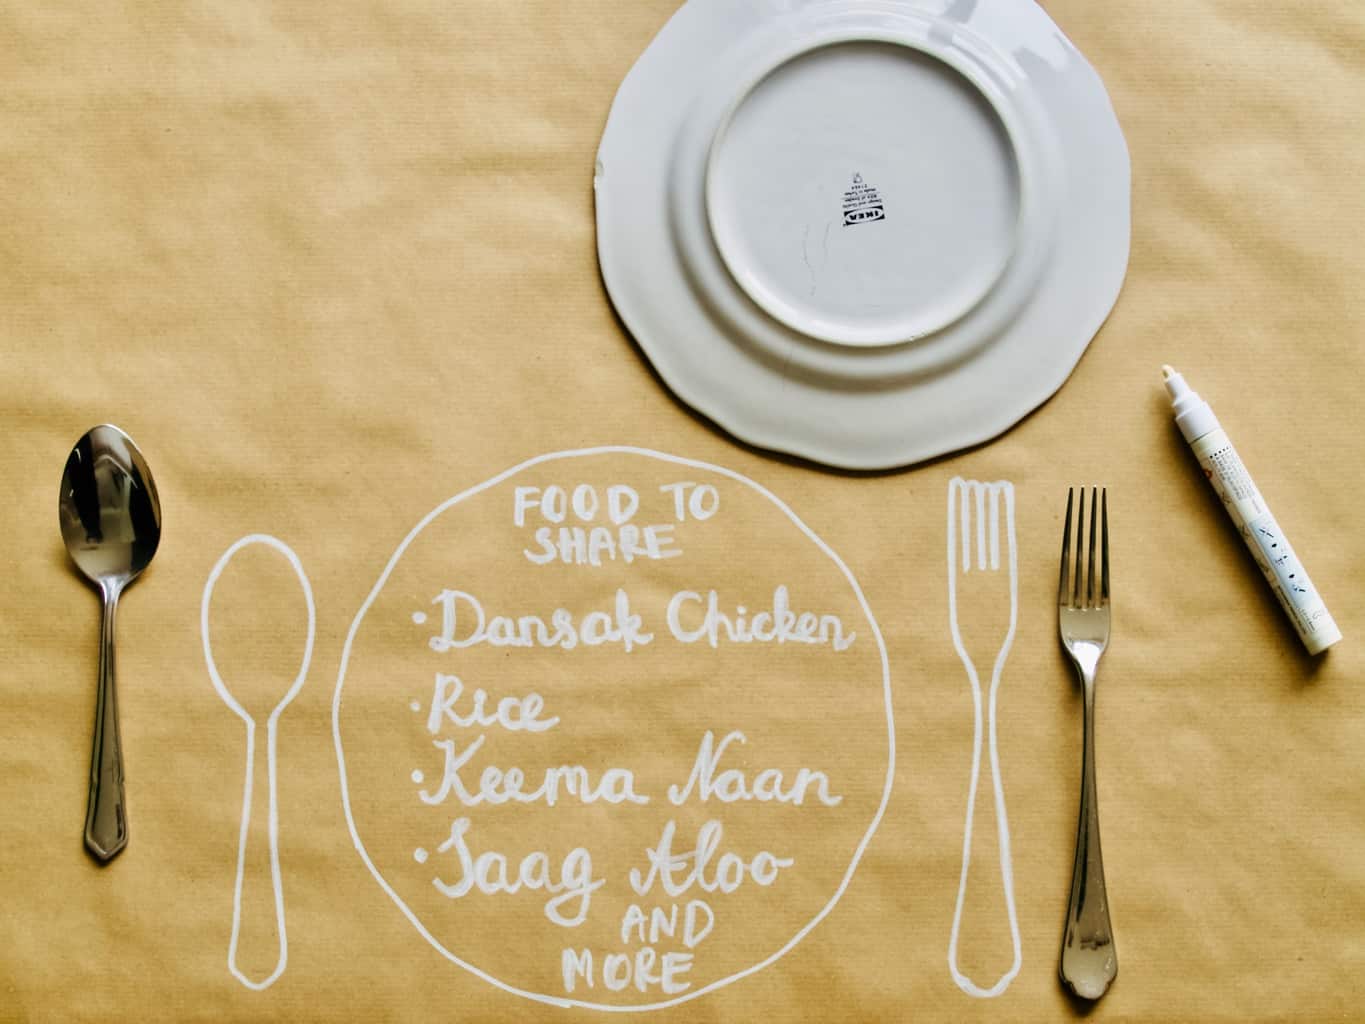
I decided to play battleships for the night. So I did make a grid so we did not need to do that on the date.  Idea for date night in: paper and pen games table layout
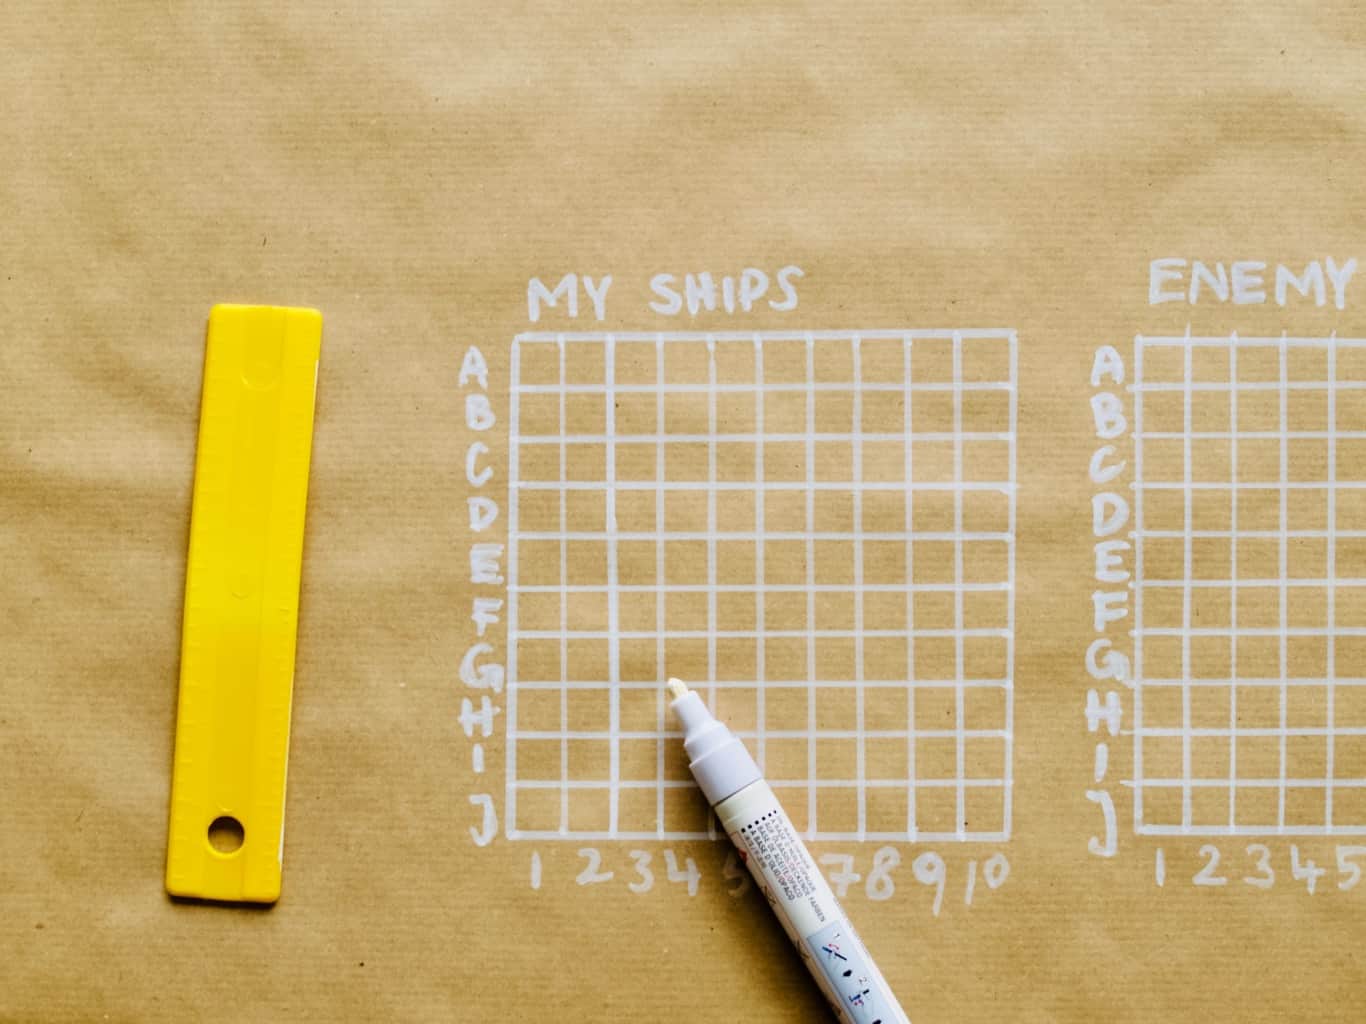
Next I arranged some items related to games such as dices, pens and books (for protecting the battleships). Candles and some leafy twigs were not related but pretty and I could not help myself.Idea for date night in: paper and pen games table layout
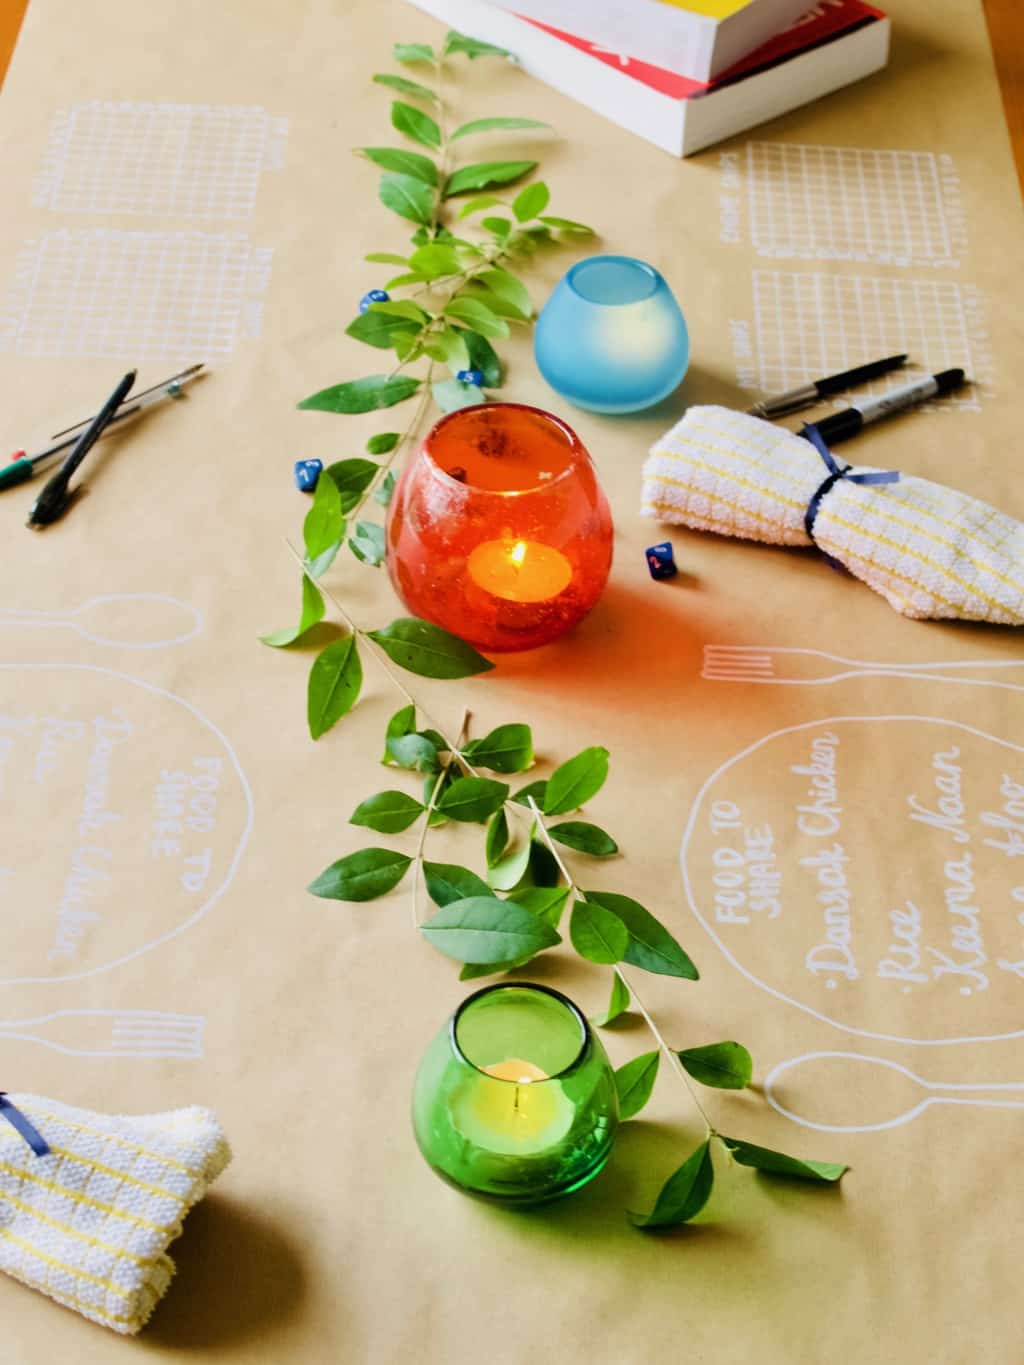
The date night was a complete success. Joni was very very surprised! I did not want to spend too much time in the kitchen so I used the take away to order some of the food. I made the dessert and rice myself. So I only spend £20 (half of the price to compare how much we would have spend if we went out). Idea for date night in: paper and pen games table layout
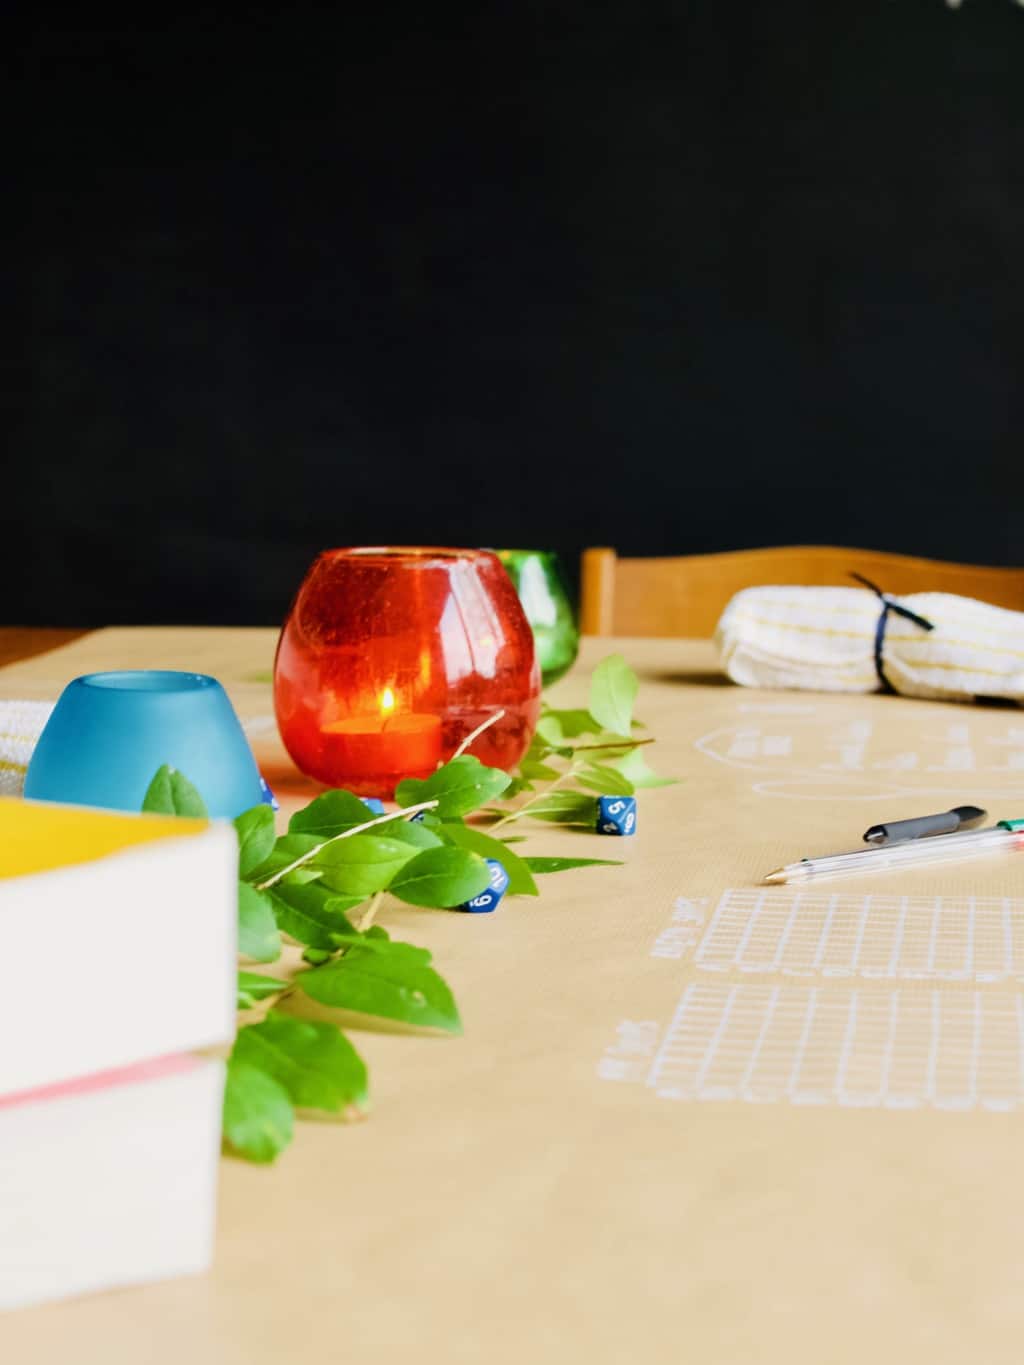
And do you know who won the battleships this time? It’s Joni. I may not want to play this game again ( ha ha).Idea for date night in: paper and pen games table layout
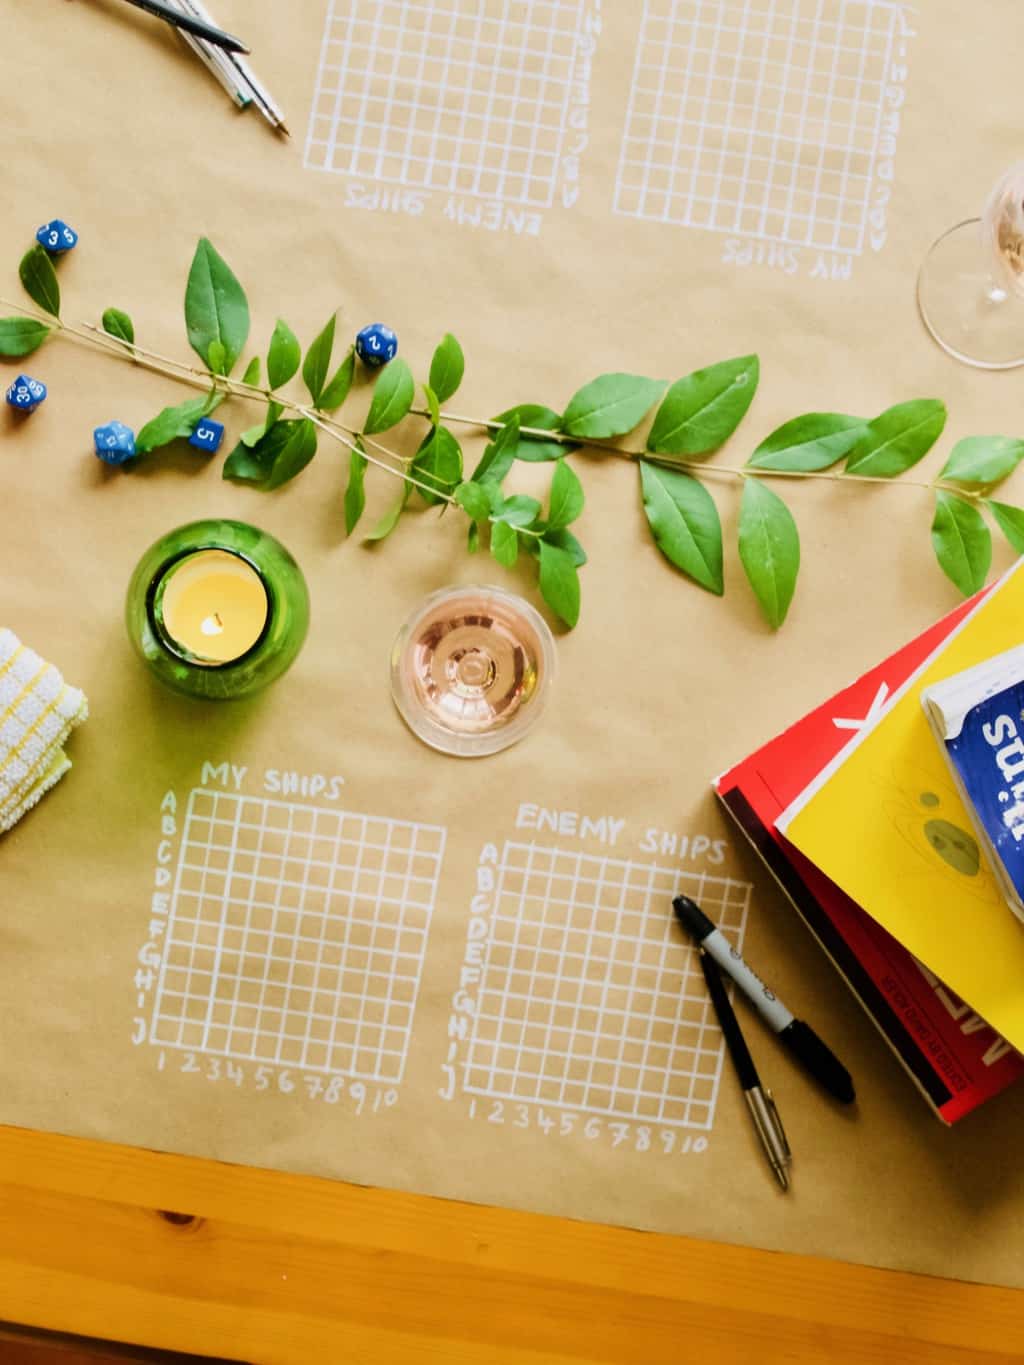
Happy Valentines day everyone and don’t forget the dates does not have to be spend with you husband or boyfriend. I am sure your BFF would appreciate this kind of date too ;-).

Rasa xoxo

0

Origami advent calendar

Origami advent calendar DIYSo here it is, our advent calendar for this year :). Very very simple to make and I have already received many compliments from friends! I simply used some pattern designs that I created for watercolour challenge few months ago and it brighten up our living room already. Yey!

Each package contain origami idea which is great for me (I love learning something new!) and great with involving kids. I am planning to either teach Lukas how to make stuff by folding paper (for easy ones) or let him decorate completed origami item. I am also considering not to be stuck with using only paper. The possibilities are endless, regular blanket could turn into star for all you know. For those who are following me on social media be prepared for daily dosage of origami!Origami advent calendar DIY You ready to make your own origami advent for this year? Then let’s crack on!

You will need:

  • A4 or square size patterned paper, either printouts or shop bought gift wrapping paper
  • number tags
  • origami idea “ribbons”
  • scissors
  • treats to add into the packages (optional and we decided to go without this year)
  • a hanger
  • string or slim ribbon

First, cut out all the tags and origami idea “ribbons”.Origami advent calendar DIYMake all the packages for every 24 days. Begin with folding in corners (1.), then fold in the sides and insert all the contents (2.). Finally fold in the pointy corners once again on both sides (3) and secure it using double sided tape. Use a string or a ribbon to wrap the package like a gift (4.). Don’t forget to insert the tag before tying the knot.How to fold an envelope from A4 Once all the packages are complete, then all you need to do is tie them on the hanger and hang it on the wall.Origami advent calendar DIY Origami advent calendar DIYHappy Christmas waiting!

Rasa xoxo

0

Make your own triangle garlands

Triangle garland DIYAs a follow up from a previous post here is what we had as a decoration for Tomas’s birthday last month. These triangle garlands fitted really well with our “cheerful, exciting and bold” theme. If you would like to make these for your next party (does not have to be kids party at all) then you are in luck, I am sharing how I made mine (along with the struggles I had too). Triangle garland DIY So first I cut some card/paper into triangles. I used the same technique to cut it as I used to make confetti just on a bigger scale of course! I was not bothered about being precise, the important thing is to be fast as there are quite a lot of them to cut in order to make an impact. Having done this myself however I do not recommend choosing different thickness paper/card (will tell you why later). Triangle garland DIY Next up is stitching all the triangles together and this is where I struggled the most. You see the different thickness paper/card can really confuse the sewing machine (unless my machine is not very good… hmm). It stitched either tight or loose or was cutting the thread in the middle of the job, it was really really frustrating for me. So if you can avoid it, please do! I think this project could be relatively quick otherwise.Triangle garland DIY Triangle garland DIY And there we are, its done! I hung mine from the light fitting in the centre to different corners of the room. I am sure you can hang from corner to corner too!Triangle garland DIYHope I inspired you xx

Rasa

0

Forest in patterns

Forest in patterns I have been so busy this year that I forgot when was the last time I have been creative. So no wonder when we went on holiday and walked around in the forest in Lithuania I was amazed once again how beautiful nature is! After taking detailed pictures of fern, moss, wild blueberry bushes and pine bark all I wanted is to create, create and create. So I did what I do best (I believe) is to make patters inspired by woodland of course!Forest in patterns First I used watercolour to make these backgrounds. It was hard to begin with (It’s been sooo long since I touched any paint), but the more relaxed I got I was able to produce decent textures. I used to dislike water colour when I was a kid as it is difficult to control the colour merging with each other accidentally.  But I fell in love with it when I went to art college as I realised you need to treat water colour completely differently. You need to be free with it. It is very therapeutic if you try ;-).Forest in patterns Once the water colour dried I cut it into shapes and mix and matched with the other backgrounds I created earlier.Forest in patterns Forest in patterns fern pattern I love how this bark pattern turned out, its not exactly like a bark, but it is very pretty to me :-).wood bark pattern Forest in patternsHope this post got you inspired, you are welcome to use these patterns I created anywhere you like (I am thinking to use it for my desktop if you ask me)

Rasa xoxo

0

Leia’s birthday celebrations!

Leia's Birthday CelebrationsYesterday Princess Leia turned 1 years old (Yey!), which makes her and an adult cat now (even though she still acts like a teenager). I decided to celebrate it today however, because Saturday is the day when I am mostly free! I made her a “cake” out of tuna decorated with the treats (because she just would not enjoy a regular birthday cake) and tried placing a tiara on her head…Leia's Birthday CelebrationsTo be completely honest after seeing this a while ago I had a specific image in my head how I would celebrate Leia’s birthday. However I later realised that Leia is a cat and would not voluntarily wear a hat or eat a sweet cake (I don’t even think this would be safe for her to eat). But since she is a Princess I thought I could at least make her wear a tiara. Initially I thought I could crochet it, but then I shouted to myself “whom am I kidding?”. This much effort for crocheted tiara would most likely go to waist! Thats when I made a tiara out of paper. Leia's Birthday CelebrationsAs suspected Princess Leia did not like her crown :-(.Leia's Birthday CelebrationsBut we made her wear it anyways :-DLeia's Birthday CelebrationsFancy making tiara for your own cat? here is the drawing. All you need to do is cut it out and staple both ends together for the size you need ;-). Kitten's tiaraWell… At least Leia liked her birthday “cake”!Leia's Birthday CelebrationsI hope you have been entertained :-)

Rasa xoxo

0

Creative ways to say “I love you”

Creative ways to say "I love you"It’s a last day of the month and you know whats happening in February?! Valentines day is going to be super special this year as this is going to be my first Valentines day after getting married. So I thought I will start getting ready early this year. I thought I would share some of my thoughts on potential thoughtful and creative gifts for your significant other. Hope you will like them!

First I am very proud to announce that we have a new craft kit in our shop! With the contents of this box you can not only enjoy some biscuits but also make four custom message heart magnets to convey a special sentiment. It’s like love heart candies that can be stuck onto your fridge (please don’t try to eat them). Let us know what you think!If making hearts is not your thing, than you can always buy ready made hearts! My friend and fellow blogger Jacolien crochets really cute ones and sells them on their own or attached to a ready made card. Check out her Etsy shop!Creative ways to say "I love you"I also could not help but share about this gift that Joni left me a few weeks ago. It is one of those thoughtful/creative gifts when you know that person well. Joni knew that Lithuanians (in olden days not now) often wear these flower garlands on their heads. So here we are, he got me a cactus with a wreath of dainty pink flowers around it’s head! I was super impressed! Creative ways to say "I love you"And if baking is what you enjoy most then these Graham Cracker Conversation Hearts (we call them digestives over here) will steal your heart! The recepie can be found here. To be honest I fell in love with that blog in general!GrahamCrackerConversationHearts3Have a lovely weekend!

Rasa xoxo

0

Pleated gift wrapping

Pleated Gift Wrapping DIYFinally almost all gifts are wrapped! If you are still working on your gift wrapping load,  then this is another gift packaging idea to get excited about. I love how pleated gift wrapping makes the gift look more interesting, however this technique does use up quite a lot of wrapping paper. So be warned! Pleated Gift Wrapping DIY1. To begin, pleat the wrapping paper while still on the roll (you want to make sure you have enough of paper left for the whole gift and the pleats before cutting it off). If you don’t know how the pleats work, all you need to do is fold a straight line in and next one out. Repeat this as many times as you want until you find you have enough of pleats.

2. Place a gift upside down onto the pleated gift wrapping paper. Measure how much more of paper you will need for the gift and then cut it off from the roll.

3. Wrap the gift as you would normally do. Secure the ends by inserting double sided tape (this tape is great, because it’s hidden so no loose tape on the show!!)

4. If you want you can cut into the pleats to create variety of “trims”. But this is completely optional, pleats are pretty by itself anyway! Pleated Gift Wrapping DIYThe gift then can be styled with the gift tag which can be attached with washi tape.Pleated Gift Wrapping DIYAlternatively you can tie a ribbon or even attach a ribbon flower (click here to see how you can make one).Pleated Gift Wrapping DIYPleated Gift Wrapping DIYPleated Gift Wrapping DIYMost importantly, have fun ;-)

Rasa xoxo

0

Cut-out paper layered gift wrapping

Cut-out paper layered gift packaging ideaMy Sunday has been spend on the gift wrapping. Which I love most when it comes to gift giving! Fortunately this year my family have expanded so I have even more gifts to give. So here is my another idea on gift wrapping. It includes layering like many others I have done in the past ;-). Cut-out paper layered gift packaging ideaTo begin you will need wrapping paper in two colours (one of them can be a sheet of colour paper), Sellotape, double-sided tape, scissors, pencil, scalpel and cutting mat.

1. Cover the gift with the piece of paper and secure it on with the Sellotape.

2. Measure enough of wrapping paper for the second layer (this one has to cover all around the gift). Mark the outskirts of the gift itself using the pencil.

3. Inside the marked area draw what you would like to cut out. I used star cookie cutter to draw lots of stars! But you can also draw other shapes as well as the letters to complete the words and phrases ;-). Cut-out paper layered gift packaging idea4. Cut out what you have drawn!Cut-out paper layered gift packaging idea5. Wrap the cut out paper around the gift, making sure the cut-outs cover the other paper layer. Cut-out paper layered gift packaging ideaCut-out paper layered gift packaging ideaFinish off the gift with some washi tape, ribbon or a matching gift tag!Cut-out paper layered gift packaging idea Cut-out paper layered gift packaging idea Cut-out paper layered gift packaging ideaHappy gift packaging!

Rasa xoxo

0

Let’s make some gift tags

handmade gift tags DIYA week or so ago I shared an idea on how to package the gift. Today I am hoping to inspire you on how to make some gift tags! It’s easer than you think and it gives a personal touch to the present you are giving. I made these using watercolour technique over wax (over waxy crayon to be specific).

So i drew the star shaped tags on the paper (sketch or watercolour paper is well recommended!). If you are into stars like me right now, then click here for the template ;-). I used yellow crayon to write the names in, but you can use any colour you want. However the lighter colour you choose, the better the effect will be . So if you got a white crayon (sadly I did not have any), then this maybe your perfect choice!handmade gift tags DIYThe next step is to paint over with water colour. The water colour pigment won’t stick to the area where you drew with crayon, leaving it to stand out even more! For more dramatic look try wetting the paper with the brush before applying any water colour. handmade gift tags DIYOnce the paint is dry (and it dries quicker than you think) you can cut the star shapes out. Using a punch hole make some holes for the ribbon or a piece of string. handmade gift tags DIY handmade gift tags DIYWrap the ribbon around the gift. Ta-dah!!handmade gift tags DIY handmade gift tags DIYHappy gift wrapping and Christmas waiting! Got your Christmas tree out yet?

Only joking (not)!

Rasa xoxo

1

Confetti gift wrapping idea

Confetti gift packaging ideaAs we come closer to Christmas we all need a bit of inspiration about how to wrap our gifts. I find packaging gifts to be very therapeutic! The gift wrapping is someones first impression and first impressions count. Right?

I made this confetti style packaging last week. The packaging technique is very similar to the one I used for my valentine’s gift packaging. All it needs is some confetti inserted in between the layers. See-through layer this time of course!Confetti gift packaging ideaAll you need to do is wrap the gift like you would usually do. Bright wrapping paper is highly recommended! Confetti gift packaging ideaThen throw some confetti in! I used some punched heart shapes here :-)Confetti gift packaging ideaIt’s easiest when you keep the confetti behind the gift while packaging as it won’t get in your way when sealing second layer of wrapping.Confetti gift packaging ideaI used baking paper for my second layer. Could you have guessed? Sometimes the most creative ideas come from the kitchen ;-).Confetti gift packaging ideaShake the gift so the confetti spreads evenly all over.Confetti gift packaging ideaTie the ribbon or whatever gift topper you want.Confetti gift packaging idea Confetti gift packaging ideaHappy gift giving

Rasa xoxo

1

Few ideas on how to survive Halloween at home

vanilla and peppercorn candyI don’t want to be a fun spoiler, but I really don’t like Halloween. I think I mentioned my reasons last year, one of them being the difficulty of making Halloween deco pretty. Anyway it’s fun for kids and you don’t want to stop that! Have you ever had one of those awkward moments when group of kids knocks on your door and say “trick or treat” when you have no single sweet treat in the house? To avoid this, here are few tips/ideas on how to avoid these unpleasant moments ;-).

1. Treats! Yes, stock up on treats! The best treats are candies and if you feel like making some here is the recipe that I made last year (it’s vanilla and black pepper BTW!). Or if you prefer, bake this ghost meringue cakeAutumn butternut squash cupcakes is another alternative if you want something sweet yourself while you wait ;-).Halloween treats2. Decorations, at least at the front of the house. Because you don’t want to bother and decorate the whole house! Garlands are grate for this. Here is one for you to try. Just make sure it’s all ready before 6pm this Friday!leaf garland3. Failed to do no. 1 and 2.? Just pretend you are not home and switch the lights off or something. Close the curtains and light the candle, that should be fun!

Happy Halloween!

Rasa xoxo

1

Tips on making a photo album

Tips on making a photo albumI will admit, this is my first time making a photo album. So I guess you are thinking why on earth am I sharing my tips on this! The thing is, when I was at Uni (studied Fashion) I did my fair share of presentations in booklet form (I don’t even remember what they were called, that was such a long time ago). They were kind of similar to a photo album. At least the planning process is the same. And this is what I am going to share here about. The way I create a layout that is eye pleasing, not just how to cut and paste.

I am using our wedding album as an example as I have been putting them together over the last few weeks.

1. Select the photos that you would like in the album. Go over couple of times to see if there are any photos that look very similar. Make sure you have a good selection of pics to tell a ‘story’ including some close ups as well as the main photos. I don’t personally like a row of pics with everyone posing in the groups, unless this is the style you are aiming for of course.  Basically, aim for variation!Tips on making a photo album2. Organise your photos into subfolders. If you have a large number of photos (which you should as it is an album that you are making) then this is a must. Sorting your pics into chronological or some other order helps to spot even more photos that you don’t need. Having to deal with a big volume of photos can be quite overwhelming. So cutting them into smaller bites is always a good idea. Here are a few subfolders I made for our wedding album: preparation, church, bride and groom exit, church group pics and so on. I of course mixed a few pics in between the folders to make it look good, but organising photos this way helps to see a bigger picture. Tips on making a photo album3. Create a mock up photo album on PowerPoint (or similar program). This helps you to play around with photo layouts before it is stuck in the actual album . At this stage you can also decide on the album theme and style. You can pick the font, picture frames, layout style or even small embellishments.  It’s important not to overdo it and pick only a few theme details that will reappear throughout the album. Reappearing features (let it be one font type or frame style etc) connect an album as a whole from start to finish. Try to do the same with the photos, look out for similar colours and shapes and have a good variation (some close ups next to wider angle shots). The last thing I want to say is have fun with it. This is your photo album at the end of the day ;-).Tips on making a photo album4. Cut and paste the photos in pre-planned order. This should be quite straight forward. One thing you should remember is that the layout might not look exactly how you planned, but it will be pretty close.Tips on making a photo album Tips on making a photo album5. Fix the unexpected issues. When you plan ahead it can help you to avoid mistakes. However mistakes do still happen. If there are any issues sometimes you have to think outside the box to creatively fix them. Sometimes the fixed mistake ends up better than the original plan. When making our album I made a mistake about the number of pages. I did not want to leave the extra pages blank as it would look unfinished. I put “to be continued…” to give a sense that the story being told in the album is still ongoing.    Tips on making a photo albumI created our wedding album in one of the hand bound books I made last week. That was great as I had complete control on how many pages to insert and what type. I could even choose the most suitable cover for our wedding theme!Tips on making a photo albumI hope this inspired you to make your own photo album!

Rasa xoxo

1

Say it in 3D: make a pop up greeting card!

Say it in 3D: make a pop up greeting cardLet’s be honest, do you keep the greeting cards you receive for birthdays or Christmas? I don’t, although I try to reuse them in paper crafts. I know that majority of us would eventually bin them. And knowing this makes me sad :(. I don’t like the idea that we spend 2-5 pounds on the card for it to be binned. This is why I make every possible effort to make a handmade card. There are two major reasons for that. It cost practically nothing since I reuse or use up all the paper stash I have. Handmade cards have a better chance in surviving longer as it has a sentimental, caring value attached to it.

I like making my own patterns that are perfect for for making paper crafts, here is one of them ;-).Simple flower pattern for paper crafts

Say it in 3D: make a pop up greeting cardReady to make one now? Click HERE for the step by step pop-up card project.Say it in 3D: make a pop up greeting card Say it in 3D: make a pop up greeting cardHave fun!

Rasa xoxo

1

Learn how to bind books!

Learn to bind booksEvery time I want to start a journal or a diary I can’t find one that I like in the shops. Can you relate? They either are too expensive or the styles available don’t quite fit mine. So that is why I have decided to make my own book. There are so many pros to making your own hand bound book. There are unfortunately also cons as it takes sooooo long (it took me a day to make two books)! But I guess the pros weighs it down so this is totally worth it. Here are the pros:

1. Create your own cover design

2. Insert the paper type you like

3. Have fun making it

4. It will be much much cheaper!

The choice is yours ;-)Learn to bind booksI made two books completely from scratch. I planned it to be painted over with an oily sort of fabric paint. However the cover surface did not come out as I expected. I hoped for a neat looking cover, but it turned out to be a bit messy. I would still use this technique in the future, but maybe not in such big amounts. For now however, I do prefer my second book that I covered with embroidered fabric.Learn to bind booksReady to make your own hand bound book? Click HERE for the step by step instructions.Learn to bind books Learn to bind booksHappy book binding ;-)

Rasa xoxo

0

Party decoration

Making a garland out of greeting cardsLast weekend we had our house warming party! I got busy with the decoration straight away… well, at least with the planning. I generally love garlands, because they are fun to make and they give such a wow factor (if you make enough of them of course). I used all of those greetings cards that we have received for our engagement and wedding, because I would not like to throw them out (but I can’t keep them either). I absolutely love reusing something that I already have! Making a garland out of greeting cardsWe simply (me and Vicki) have made many heart shapes out of the greeting cards by using this heart hole punch. They are easy to find in many craft shops, I am sure one of the Tiger shops would have them ;-). Making a garland out of greeting cards Making a garland out of greeting cardsVicki even cut out some of the shapes that she found on the cards. Here you could find even more hearts, birds, flowers and even butterflies!!! Making a garland out of greeting cardsMeanwhile I started connecting all the card shapes with needle and thread. Making a garland out of greeting cards Making a garland out of greeting cardsLeia was really eager to help, mainly because she believed that we are making a new toy for her. Making a garland out of greeting cardsBut we did include a cat shaped card figure on the garland which we thought was super cute!!! :)Making a garland out of greeting cardsHope you feel inspired for your future parties to come ;-)

Rasa x

3